In the
previous tutorial step, you created and populated a file repository.
Users of the file repository can browse and download files, but
administrators of the repository have an expanded role. When you created your own folder for this tutorial, you automatically received the administrator role.
As an administrator, you can:
- Add and delete files.
- Customize which actions are exposed in the user interface.
- Audit user activity, such as when users have logged in and where they have been inside the repository.
We will begin by interacting with the repository as an ordinary user would, then we will approach the repository as an administrator with expanded permissions.
Browse and Download Files (Users)
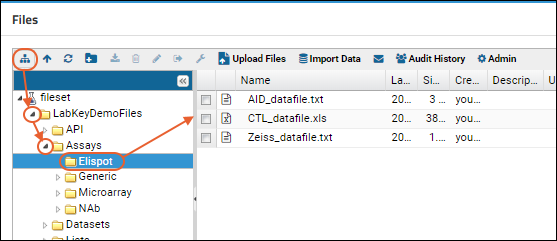
- Click the toggle to show the folder tree on the left, if it is not already visible.
- Note that if there are more buttons visible than fit across the panel, the button bar may overflow to a >> pulldown menu on the right.
- Click into the subfolders and files to see what sort of files are in the repository.

- Double-click an item to download it (depending on your browser settings, some types of files may open directly).
Customize the Button Bar (Admins)
You can add, remove, and rearrange the buttons in the
Files web part toolbar. Both text and icons are optional for each button shown.
- Return to the File Repository folder if you navigated away.
- In the Files web part toolbar, click Admin.
- If you don't see the admin button, look for it on a >> pulldown menu on the right. This overflow menu is used when there are more buttons shown than can fit across the window.
- Select the Toolbar and Grid Settings tab.
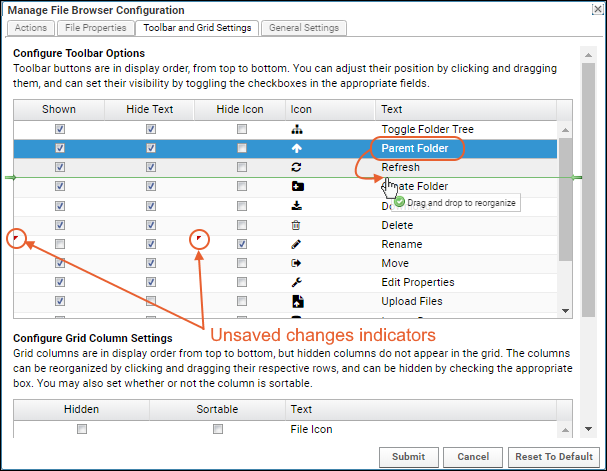
- The Configure Toolbar Options shows current toolbar settings; you can select whether and how the available buttons (listed on the right) will be displayed.
- Uncheck the Shown box for the Rename button. Notice that unsaved changes are marked with red corner indicators.
- You can also drag and drop to reorder the buttons. In this screenshot, the parent folder button is being moved to the right of the refresh button.

- Make a few changes and click Submit.
- You may want to undo your changes before continuing, but it is not required as long as you can still see the necessary buttons. To return to the original file repository button bar:
- Click Admin in the Files web part toolbar.
- Click the Toolbar and Grid Settings tab.
- Click Reset to Default.
Configure Grid Column Settings (Admins)
Grid columns may be hidden and reorganized using the pulldown menu on the right edge of any column header, or you can use the toolbar
Admin interface. This interface offers control over whether columns can be sorted as well.
- In the Files web part toolbar, click Admin.
- On the Toolbar and Grid Settings tab, scroll down to Configure Grid Column Settings.
- Using the checkboxes, select whether you want each column to be hidden and/or sortable.
- Reorder columns by dragging and dropping.
- Click Submit when finished.
- If needed, you may also Reset to Default.
Audit History (Admins)
The
Audit History report tells an administrator when each file was created or deleted and who executed the action.
- In the Files web part, click Audit History.
In this case you will see when you uploaded the demo files.
Related Topics
