An issue tracker can be configured by an administrator to suit a wide variety of workflow applications. To define an issue tracker, you first create an
Issue List Definition (the properties and fields you want), then create an
Issues List using it. Multiple issue trackers can be defined in the same folder, and issue list definitions can be
shared by multiple issues lists across projects or even site-wide.
Set Up an Issue Tracker
First, define an
Issue List Definition. Most issue trackers use the "General Issue Tracker" kind. The Label (Name) you give it can be used to
share definitions across containers.
- Add an Issue Definition web part.
- Click (Insert new row).
- Choose the Label that will identify this issue list.
- For the Kind, most issue trackers use "General Issue Tracker" as described in this topic.
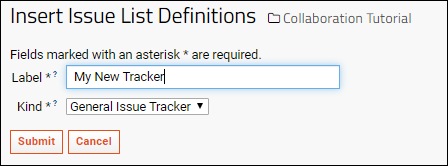
Issues List Properties
When you first create an issues list, you will be able to customize properties and fields. To reopen this page to edit an existing issue tracker's definition, click the
Admin button on the issues list grid border.

The issues admin page begins with
Issues List Properties:
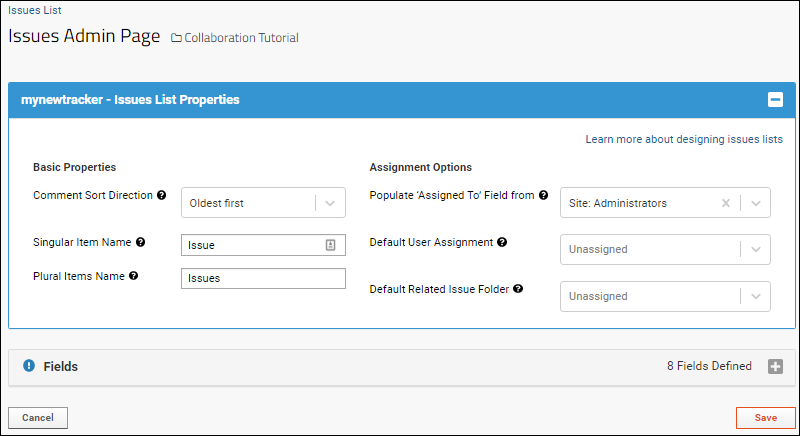
Define properties and
customize Fields before clicking
Save. Details are available in the following sections.
Comment Sort Direction
By default, comments on an issue are shown in the order they are added, oldest first. Change the
Comment Sort Direction to newest first if you prefer.
Item Naming
The
Singular item name and
Plural item name fields control the display name for an "issue" across the Issues module. For example, you might instead refer to issues as "Tasks", "Tickets", or "Opportunities" depending on the context.
Assignment Options
You can control the list of users that populates the
Assigned To dropdown field within the issue tracker.
- By default, the setting is "All Project Users" (as shown as placeholder text). This option includes all users who are BOTH of the following.
- Instead, you can select one specific group from the dropdown menu. Both site and project groups are available, but only users who also have the "Editor" role or higher will be available on the assignment dropdown.
Note: Administrators are not automatically included when "All Project Users" is selected, unless they are explicitly added to some project-level security group.
You also have the option of selecting the
Default User Assignment for new issues. This can be useful when a central person provides triage or load balancing functions. All users in the selected Assigned To group will be included as options in this list.
Default Folder for Related Issues
When a user creates a related issue from an issue in this tracker, you can set the default folder for that issue. This is a useful option when you have many individual project issue trackers and want to be able to create related issues in order to 'escalate' issues to a shared dashboard for developers or others to review only a subset.
Default folders can be used with Shared issue list definitions, though apply on a folder by folder basis. Set a folder-specific value for this field along with other
folder defaults.
Customize Fields
Click the
Fields section to open it. You will see the currently defined fields. General Issue Trackers (the default Kind) include a set of commonly used fields by default, some of which are used by the system and cannot be deleted.
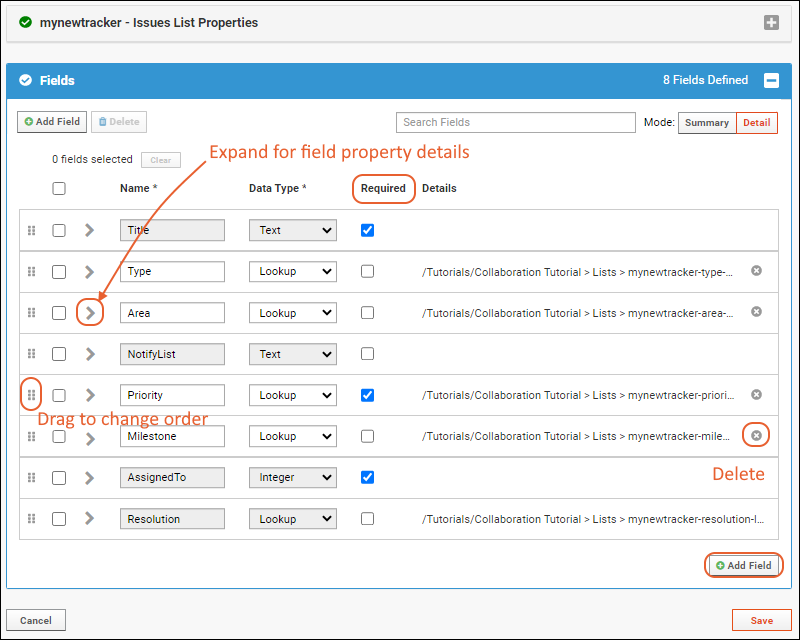
You can use the
field editor to add additional fields and modify them as needed.
- Check the Required box for any fields that you want users to always populate when creating an issue. Use default values when appropriate.
- Click the icon on the right to expand field details, including lookup targets and advanced settings.
- Use the six-block handle on the left to drag and reorder fields.
- Any field showing a on the right is not required by the system and may be deleted if not needed.
- Fields that are lookups, shown here in the case of the "Resolution" property, present users with a picklist menu of options. The field details panel shows the list that will be used; here "mynewtracker-resolution-lookup". Expand the field details if you want to change the lookup. Click the lookup target name to go to the list it is looking up from.
Default Values
To configure a field to provide users with a default value, click
to expand it, then click
Advanced Settings. The current type and value of the default will be shown (if any).
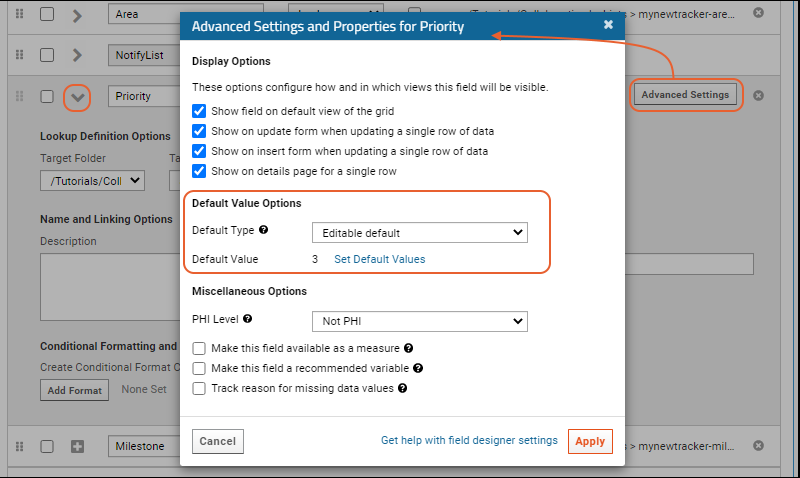
The
Default Type can be fixed, editable, or based on the last value entered. Select the type of default you want from the dropdown. If you change it, click
Apply and then
Save; reopen the editor if you want to now set a default value:
To set a
Default Value for a field, click
to expand any field. Click
Advanced Settings. Click
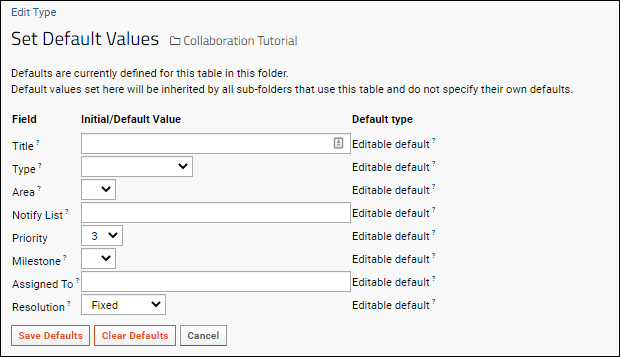
Set Default Values to open a page for editing all fields with default values enabled may be edited simultaneously:
Hide Protected Fields
To require that a user have insert permissions (Submitter, Editor, or higher) in order to see a given field, select
PHI Level > Limited PHI on the
Advanced Settings popup. This allows certain fields to be used by the issue tracking team, but not exposed to those who might have read-only access to the issue tracker.
Learn more in this topic:
Lookup/Selection Lists
If you want to offer the user a "pick list" of options, you will populate a list with the desired values and add a field with the type
Lookup into the appropriate list. Built in fields that use selection options (or pick lists) include:
- Type: the type of issue or task
- Area: the area or category under which this issue falls
- Priority: the importance of this issue
- Milestone: the targeted deadline for resolving this issue, such as a release version
- Resolution: ways in which an issue can be resolved, such as 'fixed' or 'not reproducible'
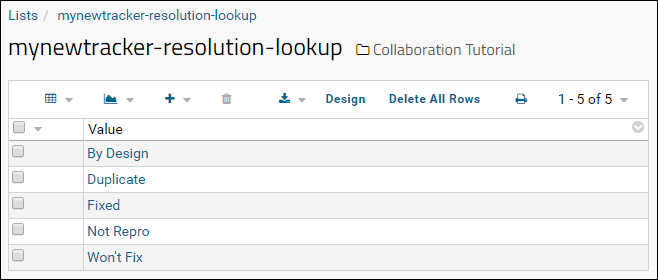
The list of options for each field is typically named combining the issue tracker name and field name. When editing the fields in an issue tracker definition, the name of the lookup target will link to the selection list. For example, in an issue tracker named "My New Tracker", the selection list for the "Resolution" field is named Lists.mynewtracker-resolution-lookup:

Click to open it. It looks like this (by default) and can be edited to change the available selections:
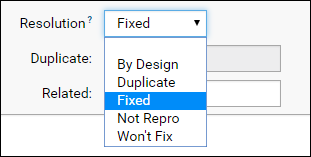
When a user is resolving an issue, the pulldown for the Resolution field will look like this:
To add, change, or remove options, select
(Admin) > Manage Lists and edit the appropriate list.
URL Properties
If you would like to have a custom field that links to an outside resource, you can use a
URL field property. To apply a URL field property, do not use the issue tracker admin page; instead you must edit the metadata for the issue tracker via the query browser:
- Select (Admin) > Go To Module > Query.
- Open the issues schema, then your specific issue list definition.
- Click Edit Metadata.
- Expand the details for your custom field.
- Set the URL Property here.
- Save your change and return to see that the values will now link to the target you specified.
Share an Issue List Definition
In some cases, you may want to use the same issue list definition in many places, i.e. have the same set of custom fields and options that you can update in one place and use in many. This enables actions like moving issues from one to another and viewing cross-container issues by using a grid filter like "All folders".
Issue list definitions can be shared by placing them in the project (top-level folder), for sharing in all folders/subfolders within that project, or in the /Shared project, for sharing site-wide. Note that an issue list definition in a folder within a project will not be 'inherited' by the subfolders of that folder. Only project level issue list definitions are shared.
When you define a new issue list definition in any folder, the name you select is compared first in the current folder, then the containing project, and finally the "Shared" project. If a matching name is found, a dialogue box asks you to confirm whether you wish to share that definition. If no match is found, a new unique definition is created. An important note is that if you create a child folder issue list definition first, then try to create a shared one with the same name, that original child folder will NOT share the definition.
Issue list definitions are resolved by name. When you create an issue tracker in a folder, you select the definition to use. If the one you select is defined in the current project or the /Shared project, you will be informed that the shared definition will be used.
Customize the Local Version of a Shared Issue Tracker
When you click the
Admin button for an issue tracker that uses a shared issue list definition, you will see a banner explaining the sharing of fields, with a link to manage the shared definition.
You can edit
Issues List Properties for the local version of this issue tracker, such as the sort direction, item name, and default user assignment. These edits will only apply to your local issue tracker.
Note that you cannot edit the
Fields or their properties here; they are shown as read only. Click the words
source container in the banner message, then click
Admin there to edit the fields where they are defined. Changes you make there will apply to all places where this definition is shared.
Note that you can edit the
default values for field properties in your local container. To do so, open the default value setting page for the shared definition, then
manually edit the URL to the same "list-setDefaultValuesList.view" page in your local container. Defaults set there will apply only to the local version of the issue tracker. You can also customize the dropdown options presented to users on the local issue tracker by directly editing the XML metadata for the local issue tracker to redirect the lookup.
Move an Issue to another Issue Tracker
If you organize issues into different folders, such as to divide by client or project, you may want to be able to move them. As long as the two issue lists
share the same issue definition, you can move issues between them. Select the issue and click
Move. The popup will show a dropdown list of valid destination issue lists.

Customize Notification Emails
Notification emails can be sent whenever an issue is created or edited in this folder. By default, these emails are automatically sent to the user who created the issue, the user the issue is currently assigned to, and all users on the
Notify List.
Click
Customize Email Template in the header of the issues list to edit the template used in this folder.

This email is built from a template consisting of a mix of plain text and substitution variables marked out by caret characters, for example,
^issueId^ and
^title^. Variables are replaced with plain text values before the email is sent.
For example, the variables in the following template sentence...
^itemName^ #^issueId^, "^title^," has been ^action^
...are replaced with plain text values, to become...
Issue #1234, "Typo in the New User Interface", has been resolved
You can also add format strings to further modify the substitution variables.
Complete documentation on the substitution variables and formats is shown on the template editor page. More details can be found in this topic:
Email Template Customization.
Issue Tracking Web Parts
Web parts are the user interface panels that expose selected functionality. If desired, you can create multiple issue trackers in the same folder. Each will track a different set of issues and can have different fields and properties. To do so, create additional issue definitions. When you create each
Issues List web part, you will select which issue list to display from a drop down menu.
Issues List Web Part
Once you have created an issue definition in the folder, you can add an interface for your users to a tab or folder.
- Add an Issues List web part.
- Select the issue definition to use.
- If you don't provide a web part Name, a generic one based on the name of the issue definition will be used.

Issues Summary Web Part
The
Issues Summary web part displays a summary of the Open and Resolved issues by user. This can be a useful dashboard element for managing balancing of team workloads.
Add this web part to a page where needed. You can give it a custom name or one will be generated using the name of the issue definition.
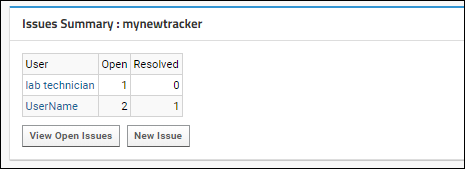
Clicking any user
Name link opens the grid filtered to show only the issues assigned to that user. Click
View Open Issues to see all issues open in the issue tracker.
Note that a given project or folder has only one associated Issues module, so if you add more than one Issues List or Summary web part associated with a given issue definition, both will display the same data.
Related Topics
 To add, change, or remove options, select (Admin) > Manage Lists and edit the appropriate list.