Query reports let you package a query or grid view as a report. This can enable sharing the report with a different audience or presenting the query as of a specific data cut date. A user needs the "Author" role or higher to create a query report. The report also requires that
the target query already exists.
Create a Query Report
- Select > Manage Views.
- Select Add Report > Query Report.
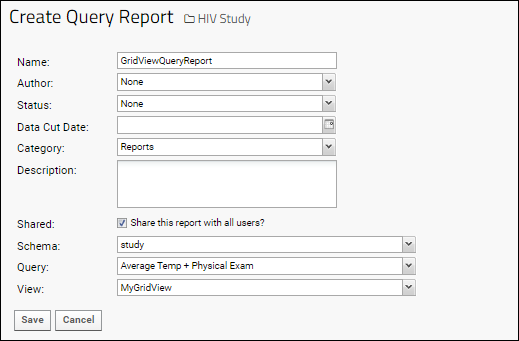
Complete the form, providing:
- Name (Required): The report name.
- Consider naming the report for the query (or grid view) it is "reporting" to make it clearer to the user.
- Author: Select from all project users listed in the dropdown.
- Status: Choose one of "None, Draft, Final, Locked, Unlocked".
- Data Cut Date: Specify a date if desired.
- Category: If you are creating a report in a study, you can select an existing category.
- Description: Optional text description.
- Consider including details like the origin of the report (schema/query/view) so that you can easily search for them later.
- Shared: Check the box if you want to share this report with other users.
- Schema (Required): The schema containing the desired query. This choice will populate the Query dropdown.
- Query (Required): Select a query from those in the selected schema. This will populate the View dropdown.
- View: If there are multiple views defined on the selected query, you'll be able to choose one here.

- Click Save when finished.
You can customize the thumbnail and mini-icon displayed with your Query Report. Learn more
here.
Use and Share Query Reports
Your report is now available for display in a web part or wiki, or sharing with others. Query Reports can be assigned report-specific permissions in a study following the
instructions in this topic.
In a study, your report will appear in the
Data Views web part under the selected category (or as "Uncategorized"). If you want to hide a Query Report from this web part, you can
edit the view metadata to set visibility to "Hidden".
Manage Query Reports
Metadata including the name, visibility, data cut date, category and description of a Query Report can all be edited through
the manage views interface.
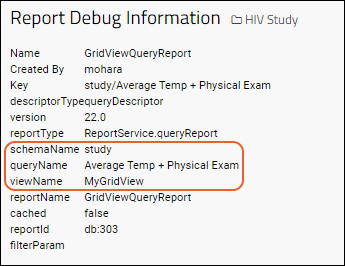
To see the details of the schema, query, and view used to create the report, you can view the
Report Debug Information page. Navigate to the report itself, you will see a URL like the following, where ### is the id number for your report:
/reports-renderQueryReport.view?reportId=db%3A###
Edit the URL to replace
renderQueryReport.view with
reportInfo.view, as so:
/reports-reportInfo.view?reportId=db%3A###

Related Topics
