Data Classes are used to represent virtual entity definitions such as Protein Sequences, Nucleotide Sequences, Cells Lines, and Expression Systems. See
LabKey Data Structures. This topic describes creation and population of a Data Class within the user interface.
Data Class User Interface
Add the web part "Data Classes" to see a list of those defined in the current folder, parent project, or
/Shared project.
- Enter > Page Admin Mode.
- Select Data Classes from the selector in the lower left, then click Add.
- Note that there is a "narrow" web part for Data Classes available on the right side of the page. It does not have the controls described below, but can be used as a shortcut once you have set up your classes.
- Click Exit Admin Mode.
You can create a Data Class from scratch, using the designer interface below, or by first defining a
domain template, then using it to
create similar classes.
Create New Data Class
To create a new Data Class, navigate to the container where you want it defined, then click
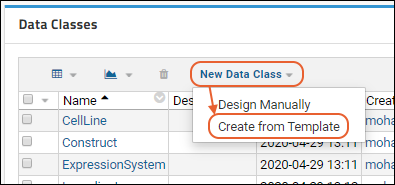
New Data Class. If any templates are defined, this link will open a menu from which you'll select
Design Manually to follow these steps. Creating a Data Class from a template is described
below.

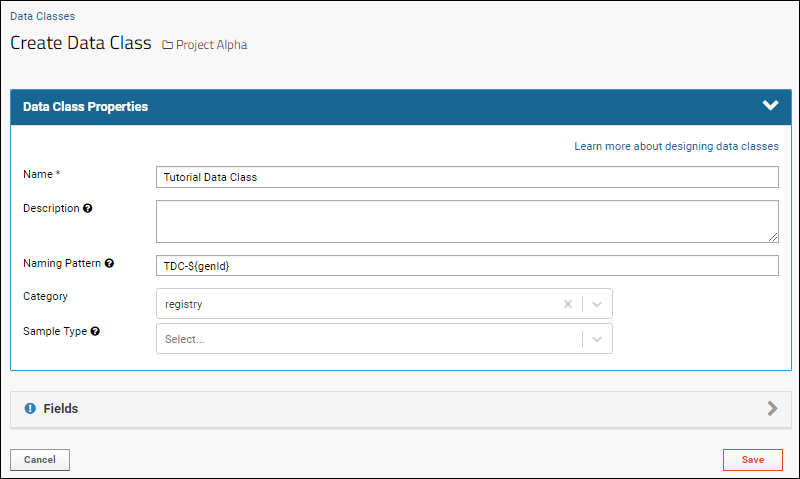
Data Class Properties
The first panel defines
Data Class Properties.
- Name: Required. This is the name of the Data Class itself.
- The name must be unique, must start with a letter or number character, and cannot contain special characters or some reserved substrings listed here.
- Description: Optional short description.
- Naming Pattern: Unless your data will already include unique identifiers for each member of this class, use the Naming Pattern to specify how to generate unique names. Names can be generated with a combination of fixed strings, auto-incrementing integers, and column values. If you don't provide a naming pattern, your data must contain a Name column. Learn more about naming in this topic.
- Category: Select a category, if applicable. For example, registry, media, and sources are categories of Data Class.
- Sample Type: (Optional) The default sample type where new samples will be created for this Data Class.

Before saving, continue to add any
Fields.
Fields
Click the
Fields panel to open it.
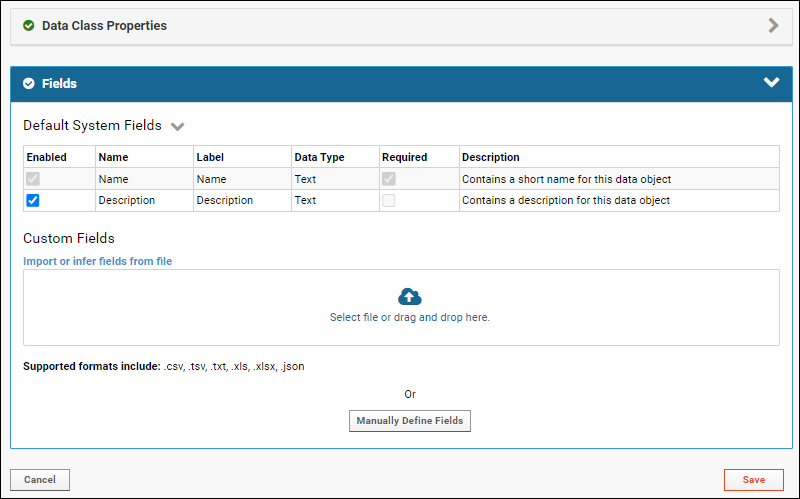
Default System Fields
The top section shows
Default System Fields that are always created with a Data Class.
- Name: This field uniquely identifies each member of the Data Class. It is always required and cannot be disabled.
- Description: This field can be disabled by unchecking the Enabled box, or required by checking the Required checkbox.

Click the
to collapse this section and move on to any
Custom Fields.
Custom Fields
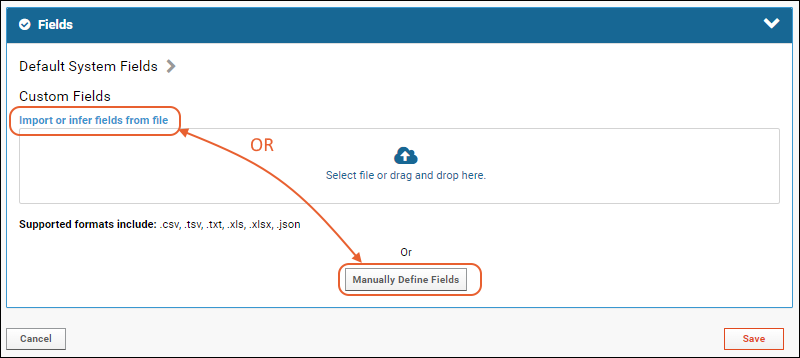
To add custom fields, you have several options. When there are no fields defined yet you can:
- Import or Infer Fields from File:
- Infer them from a example data-bearing spreadsheet by dropping it into the upload area or clicking to browse and select it.
- Supported file types are listed below the panel.
- If your spreadsheet contains data for 'reserved fields', they will not be shown in the inferral, but are always created for you by the system. A banner will indicate that these fields are not shown.
- Import field definitions from a specially formatted JSON file.
- Click Manually Define Fields, then use the Field Editor to add fields and set their properties. For details, see Field Editor.

Once you have defined the fields, click
Save to create the new Data Class. You will see it listed.
Create Data Class from Template
If there is a
Data Class template available, you can use it to create a new Data Class.
Select
New Data Class > Create From Template.

Select the template to use and click
Create.

You will use the same
Data Class designer described above to define the properties and fields for your new Data Class. The information from the template you selected will be prepopulated for you, and you can make adjustments as needed. Click
Save to create the Data Class.
Populate a Data Class
To add data to a Data Class, you can insert individual rows or more commonly bulk import data from a spreadsheet.
- In the Data Classes web part, click the name of the class you want to add data to.
- In the grid below the properties, select (Insert data) and whichever import method you prefer:
- Insert new row: Use a data entry panel with entry boxes for every field to add a single row.
- Import bulk data: Similar to importing bulk sample type data, you can:
- Click Download Template to obtain an empty spreadsheet matching the data structure.
- Use the Copy/paste text box to add tab- or comma-separated data directly (include the column headers).
- Use the Upload file (.xlsx, .xls, .csv, .txt) panel to import a file directly.
- Both import options offer Import Options: add, update, and merge
- Both import options allow you to Import Lookups by Alternate Key if you have lookups that should be resolved using a column other than the primary key.
Update or Merge Data During Import
Once your Data Class has been populated and is in use, new data can be added, and existing data can be updated in most cases. Select
Import Options:
- Add data (Default): Only add new data; if data for existing rows is included, the import will fail.
- Update data: Update existing rows. All imported rows must match an existing row or the update will fail unless the following checkbox is checked.
- Check the box to Allow new data during update to merge both updates to existing rows and addition of new rows.

- When you update existing data, only the columns you update (for the rows you specify) will be changed. Existing data in other columns remains unchanged. This allows you to make a known change (update a review status for example) without needing to know the contents of all other columns.
Related Topics

 Before saving, continue to add any Fields.
 Once you have defined the fields, click Save to create the new Data Class. You will see it listed.
 Select the template to use and click Create.
 You will use the same Data Class designer described above to define the properties and fields for your new Data Class. The information from the template you selected will be prepopulated for you, and you can make adjustments as needed. Click Save to create the Data Class.