Use the following step-by-step instructions to quickly create and import study datasets from Excel and/or TSV files. This method of creating datasets via
study folder import is especially useful for any of the following scenarios:
- You want to avoid manually defining all the fields in all your study datasets.
- You want to define and import study datasets as an initial, one-time job, and then develop your study using the server user interface.
- You want to control your study data using files, instead of adding/updating data using the server user interface.
The overall process goes as follows:
- Prepare Files: Assemble and prepare your Excel and/or TSV files to conform to dataset requirements, namely, having (1) required fields (ParticipantId and timepoint fields) and (2) conforming to dataset uniqueness constraints.
- Create Study Framework: Create the directory structure and XML metadata files for the study folder archive.
- Add Your Files: Add the Excel/TSV files to the archive.
- Reload the Study: Use the 'folder import' pipeline job to create the datasets and import the data.
- Troubleshooting
Prepare Files
First prepare your Excel and/or TSV files. Each file will become a separate dataset in your study. Each file must meet the following requirements:
- Each file must have a column that holds the participant ids, using the same column name across all files. Any column name will work, such as "ParticipantId" or "SubjectId", but whatever name you choose, it must be the same in all your datasets.
- Each file must have the same way of indicating the time point information, either using dates or numbers. If you choose dates, then each file must have a column named "Date" (with calendar dates in that column). If you choose numbers, each file must have a column named "Visit" or "VisitId" (with integers or decimal numbers in that column).
- File names with trailing numbers (for example, Demographics1.xlsx) may result in unexpected reload behavior.
- To control how these files are reloaded, set up a File Watcher reload trigger and use a "name capture group" in the FilePattern property. For details see File Watcher.
- If your files include column names with any special characters (including spaces) you should adjust them prior to import so that you can more easily work with your data later. For example, if your data includes a column named "CD4+ (cells/mm3)", you should edit that name to be just "CD4" for best results. After dataset inferral, you can edit the design to include your desired display name in the Label field properties to show the version with special characters to users. Spaces are displayed automatically when you use "camelCasing" in field names (i.e. "camelCasing" would be shown as "Camel Casing").
- Prepare your files.
- To use this topic as a tutorial, download the following files to use as test datasets suitable for reload:
Create Study Framework
To make it easier to load your datasets, make an empty study, then export it to the browser, giving you a framework into which to place your own files.

- Click Create Study and you will land on the Manage tab.
- Scroll down and click Export Study.
- Leave the folder objects and options at their defaults.
- Under Export To: select Pipeline root export directory, as individual files.
- Click Export.
You will be redirected to the
Files web part.
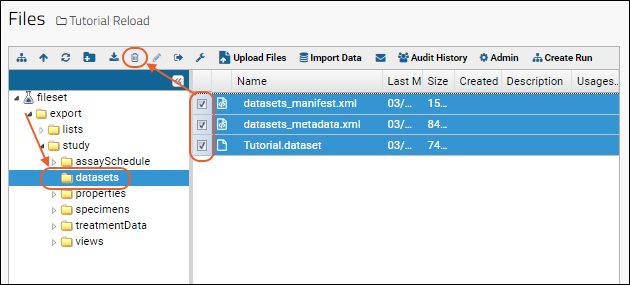
- In the Files web part, open the directories export > study > datasets.
The files in the datasets directory are used by the server to know which Excel/TSV files to import. When these files are removed, the server will import whatever Excel/TSV files it finds in the /datasets directory.
- In the datasets directory, select and click to delete the following three files.
- datasets_manifest.xml
- datasets_metadata.xml
- XX.dataset (the XX in this filename will be the first word of your folder name).

Add Your Files
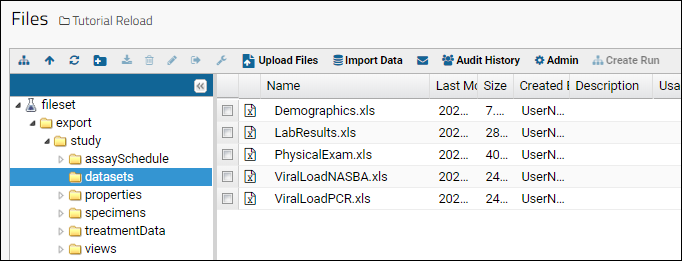
- Drag and drop your Excel/TSV files into the Files web part, into the export/study/datasets directory (where you just deleted the three files above).

Reload the Study
- In the Files web part, click to navigate to the "study" directory and select the file "study.xml".
- Click Import Data.

- Confirm that Reload Study is selected, and click Import.

- On the Import Study from Pipeline page, make no changes, and click Start Import.
- The server will examine your files, infer column names and data types, and import the data into new datasets.
- Click the Clinical and Assay Data tab to view the datasets. Note that if you change the original Excel/TSV files and reload these changes, the server will replace the dataset data; update is not supported.
Once the datasets are imported, you can define the rest of your study properties, such as cohort information, visualizations, etc.
Troubleshooting
If there is a problem with the reload process, the server will indicate an error in the pipeline job. Click the
Error link to see details.

Duplicate Row
Example error message:
10 Apr 2018 09:52:48,534 ERROR: PhysicalExam.xlsx -- Only one row is allowed for each Participant/Visit. Duplicates were found in the imported data.
10 Apr 2018 09:52:48,557 ERROR: PhysicalExam.xlsx -- Duplicate: Participant = P1, VisitSequenceNum = 1.0
This error message means that the PhysicalExam.xlsx file has a duplicate row of data for participant P1 / visit 1.0. Study datasets are allowed only one row of data for each participant/visit combination. If more than one row of data appears for a given participant/visit combination, data import will fail for the entire dataset.
The following violates the dataset uniqueness constraint:
The following dataset has duplicate subject id / timepoint combinations.
| ParticipantId | Visit | SystolicBloodPressure |
|---|
| P-100 | 1 | 120 |
| P-100 | 1 | 105 |
| P-100 | 2 | 110 |
| P-100 | 3 | 90 |
Solution:
Edit your Excel/TSV file to either (1) remove the duplicate row of data or (2) define a new visit number to retain the row of data.
The following table removes the duplicate row.
| ParticipantId | Visit | SystolicBloodPressure |
|---|
| P-100 | 1 | 120 |
| P-100 | 2 | 110 |
| P-100 | 3 | 90 |
Missing Visit Column
Example error message:
10 Apr 2018 12:54:33,563 ERROR: LabResults.xlsx -- Row 1 Missing value for required property: SequenceNum
This error message arises in a Visit-based study when one of the files does not have a column named 'Visit'. (The server's internal name for the 'Visit' column is 'SequenceNum' -- that's why the error message mentions 'SequenceNum'.)
Solution:
Ensure that the timepoint information is captured in a column named 'Visit'.
Missing Date Column
Example error message:
10 Apr 2018 13:00:06,547 ERROR: LabResultsBad.xlsx -- Missing required field Date
This error message arises in a date-based study when one of the files does not have a column named 'Date' (for a non-demographics dataset).
Solution:
Ensure that the timepoint information is captured in a column named 'Date'.
SequenceNum Issues
Example error message:
ERROR: Physical_Exam.xlsx -- Row 1 Missing value for required property: SequenceNum
This error message arises when one of your columns is named "SequenceNum".
Solution:
Change the column name to Visit or VisitId.
Related Topics


