Learn more about how LabKey manages security through roles and groups in this topic.
This topic is intended to be used alongside a
LabKey Trial Server. You should have another browser window open to view the
Example Project folder. This walkthrough also assumes you are the original creator of the trial server and are an administrator there, giving you broad access site-wide.
Tour
Our Example Project contains three subfolders, intended for different groups of users:
- Collaboration Workspace: The entire team communicates here and shares project-wide information.
- Laboratory Data: A lab team performs tests and uploads data here, perhaps performing basic quality control.
- Research Study: A team of researchers is exploring a hypothesis about HIV.
LabKey's security model is based on assignment of permission
roles to users, typically in
groups.
Project Groups
Groups at the project level allow you to subdivide your project team into functional subgroups and grant permissions on resources to the group as a whole in each folder and subfolder. While it is possible to assign permissions individually to each user, it can become unwieldy to maintain in a larger system.
- Navigate to the Example Project. You can be in any subfolder.
- Select > Folder > Permissions.
- Click the tab Project Groups.
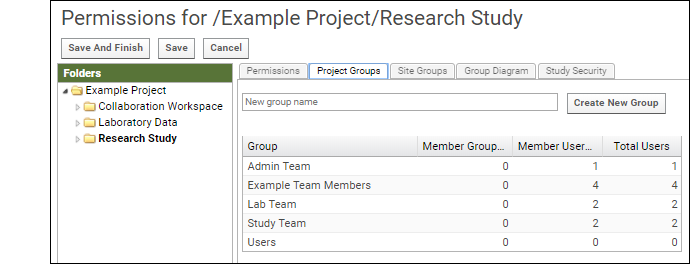
- There are 5 predefined project groups. See at a glance how many members are in each.
- Click the name to see the membership. Click Example Team Members and see the list of all our example users.
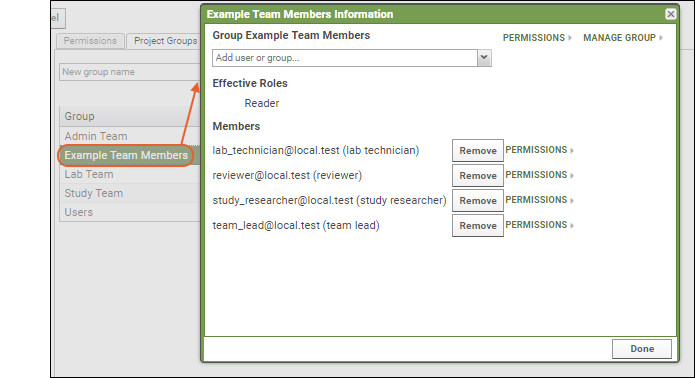
- Click Done in the popup.
- Click the Lab Team to see that the two members are the team lead and the lab technician.
- Click the Study Team to see that the two members are the team lead and the study researcher.
Next we'll review how these groups are assigned different permissions within the project's subfolders.
Permission Roles
Permission roles grant different types of access to a resource. Read, Edit, and Admin are typical examples; there are many more permission roles available in LabKey Server. Learn more
here.
- If you navigated away after the previous section, select > Folder > Permissions.
- Click the Permissions tab.
- In the left column list of folders, you will see the entire project hierarchy. The folder you are viewing is shown in bold. Click Example Project to see the permissions in the project itself.
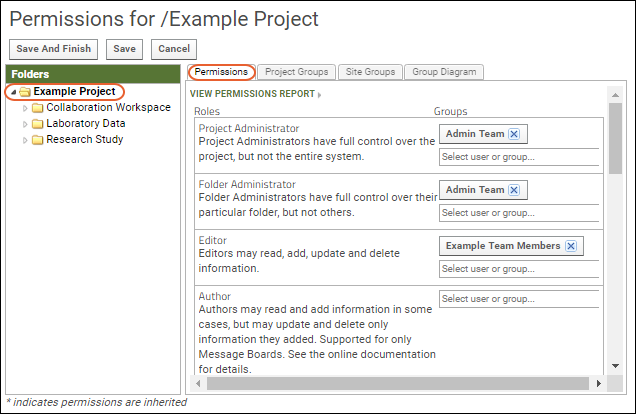
- The "Admin Team" is both project and folder administrator, and the "Example Team Members" group are Editors in the project container.
- Click Collaboration Workspace and notice that the "Example Team Members" are editors here, too.
- Click Laboratory Data. In this folder, the "Lab Team" group has editor permissions, and the "Example Team Members" group only has reader permission.
- Note that when users are members of multiple groups, like in the case of our sample "lab_technician@local.test", they hold the sum of permissions granted through the groups they belong to. This lab_technician has read access with example team membership, but also editor access because of lab team membership, so that user will be able to edit contents here.
- To see the user membership of any group, click the group name in the permissions UI.
- To see all permissions granted to a given user, click the Permissions link in the group membership popup.
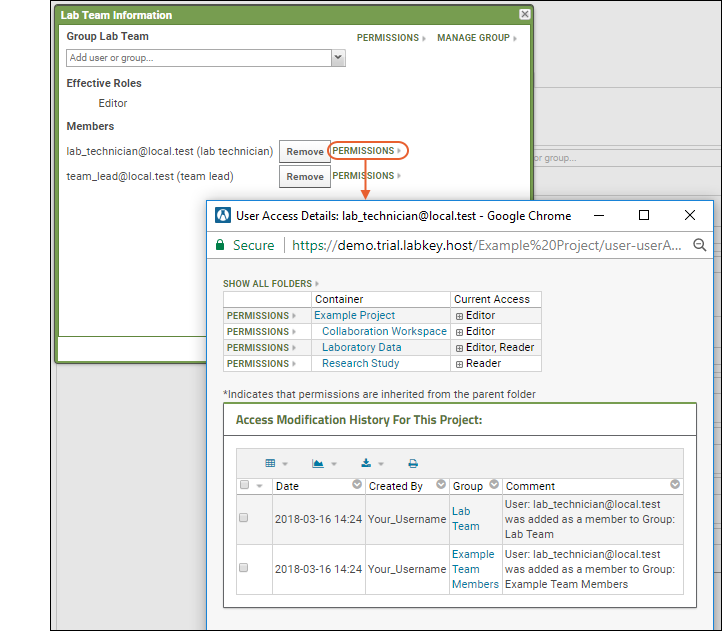
- This example lab technician can edit content in the example project, the collaboration workspace folder, and the laboratory data folder. They can read but not edit content in the research study folder.
- Close any popups, then click Cancel to exit the permissions editing UI.
Try It Now
Impersonation
Using
impersonation, an admin can see what another user would be able to see and do on the server.
- Navigate to the Example Project/Research Study folder using the project menu.
- Notice that as yourself, the application admin on this server, you can see a (pencil) icon in the header of the Study Overview web part. You would click it to edit study properties. You also see the Manage tab.
- Select (User) > Impersonate > User.
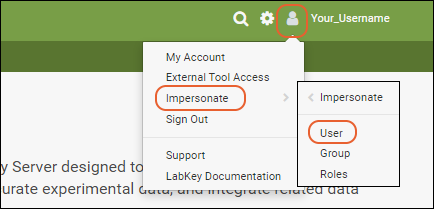
- Select "lab_technician@local.test" from the dropdown and click Impersonate.
- Now you are seeing the content as the lab technician would: with permission to read but not edit, as we saw when reviewing permissions above.
- Notice the (pencil) icon and Manage tabs are no longer visible. You also no longer have some of the original options on the menu in the header.
- Click Stop Impersonating to return to your own "identity".
Impersonate a Group
Impersonation of a
group can help you better understand permissions and access. In particular, when configuring access and deciding what groups should include which users, group impersonation can be very helpful.
- Navigate to the Example Project/Research Study folder, if you navigated away.
- Select (User) > Impersonate > Group.
- Choose the "Study Team" and click Impersonate.
- Hover over the project menu and notice that the only folder in "Example Project" that members of the "Study Team" can read is this "Research Study" folder.

- Click Stop Impersonating.
- To see an error, select (User) > Impersonate > Group, choose the "Lab Team" and click Impersonate. This group does not have access to this folder, so the error "User does not have permission to perform this operation" is shown.
- Click Stop Impersonating.
Impersonate a Role
You can also directly impersonate roles like "Reader" and "Submitter" to see what access those roles provide.
To learn more about impersonation, see
Test Security Settings by Impersonation.
Audit Logging
Actions on LabKey Server are extensively logged for audit and security review purposes. Impersonation is among the events logged. Before you complete this step, be sure you have stopped impersonating.
- Select > Site > Admin Console.
- Under Management, click Audit Log.
- Using the pulldown, select User Events.
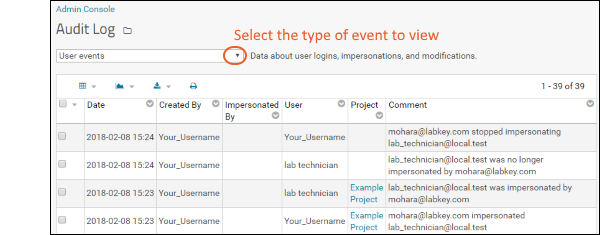
- You will see the impersonation events you just performed. Notice that for impersonations of individual users, these are paired events - both the action taken by the user to impersonate, and the action performed "on" the user who was impersonated.
- Explore other audit logs to see other kinds of events tracked by the server.
What Else Can I Do?
The
Security Tutorial walks you through more security features. You can
create a new project for tutorials on your trial server, then run the security tutorial there.
Learn More
Explore More on your LabKey Trial Server


