This topic describes how to enable and run existing ETL (Extract Transform Load) processes from within the user interface. You can use our
tutorial or
create your own basic ETL if you don't already have ETLs defined.
Enable the Data Integration Module
- In the folder where you want to use ETLs, go to > Folder > Management.
- On the Folder Management page, click the Folder Type tab.
- Under Modules, place a checkmark next to DataIntegration.
- If you don't have this module, contact your Account Manager.
- Click Update Folder to save your changes.
- Go back to > Folder > Management and notice that the ETLs tab has been added.
ETL User Interface
Once the module has been enabled, you can add two new web parts to your folder:
- Data Transforms: Manage and run existing ETLs.
- You can also access this interface without the web part via > Go To Module > Data Integration.
- Data Transform Jobs: See the history of jobs run.
If you don't know how to add a web part, learn how in this topic:
Add Web Parts.
Data Transforms Web Part
This is the primary user interface for running existing ETLs. It lists all of the ETL processes that are available in the current folder.

Columns:
- Name - This column displays the name of the process.
- Source Module - This column tells you the module where the ETL is defined. For ETLs added in the user interface, it reads "User Defined".
- Schedule - This column shows you the reload schedule.
- Enabled - This checkbox controls whether the automated schedule is enabled: when unchecked, the ETL process must be run manually.
- Last Status, Last Successful Run, Last Checked - These columns record the latest run of the ETL process.
- Run: Click Run Now to run this ETL.
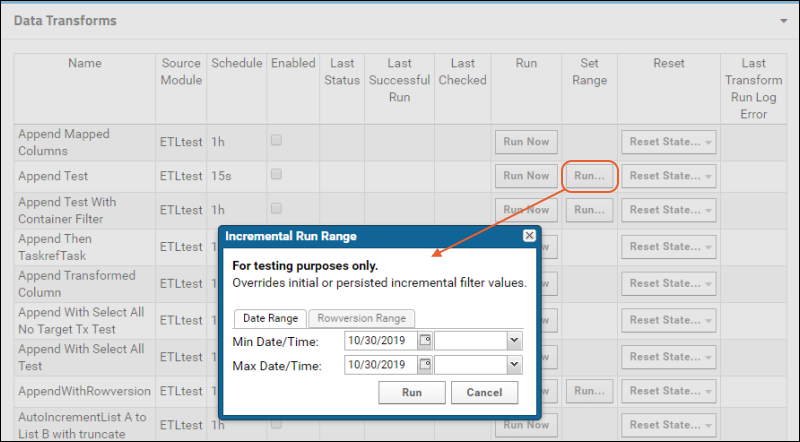
- Set Range (Available only in devmode): The Set Range column is displayed only on servers running in development mode and is used for testing filtering strategies. Learn more below.
- Reset: Use the options on the Reset State button to return the ETL process to its original state, deleting its internal history of which records are, and are not, up to date. There are two options:
- Last Transform Run Log Error - Shows the latest error logged, if any exists.
At the bottom of this web part, you can click
View Processed Jobs to see
a log of all previously run ETL jobs.
Run an ETL Process Manually
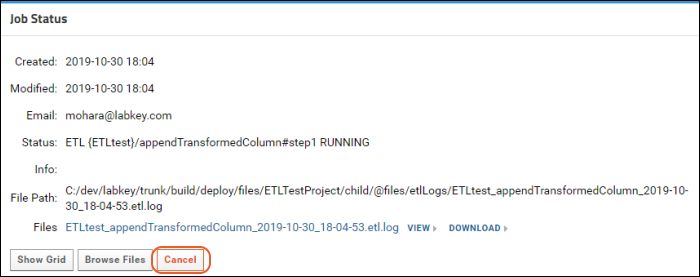
To run an ETL manually, even if a schedule is also configured, click
Run Now for the row. You'll see the
Job Status panel.
Cancel and Roll Back Jobs
While a job is running you can click
Cancel to stop it.

To
roll back a run (deleting the rows added to the target), return to the
Data Transforms web part, and select
Reset State > Truncate and Reset. Note that rolling back an ETL which outputs to a file will have no effect, that is, the file has already been written and will not be deleted or changed.

Enable/Disable Running an ETL on a Schedule
In the
Data Transforms web part, you can see in the
Schedule column whether an ETL is defined to run on a schedule, and if so, what that schedule is. ETLs with no schedule defined show a default "1h" hourly schedule. Learn more about schedule options for ETLs in this topic:
ETL: Schedules.
Enabling that ETL to run on its schedule is performed separately:
- Check the box in the Enabled column to run that ETL on the schedule defined for it.

- The ETL will now run on the defined schedule under the credentials of the user who checked the box.
- Hover over the for details about when and by whom this ETL was enabled.
- To change this ownership to a new user, that user must log in, then uncheck and recheck the checkbox. From then forward, this ETL will be run under the new user's credentials.
- When unchecked (the default) the ETL will not be run on it's schedule, but can still be run manually.
If you see a red
, the user who enabled the ETL has been deactivated. The ETL will not run (until another user unchecks and rechecks the box).

To find all the ETLs that are failing because of a deactivated userID on your site, an admin can check the pipeline logs (
> Site > Admin Console > Pipeline) for messages like "Unable to queue ETL job. The account for user [username] is not active."
Set Range for Testing Filter Strategies (Developer Mode Only)
When your server is running in
"Development" mode, i.e. devmode=true, you will see the
Set Range column, and for ETLs that use a date or run based filtering strategy, it will contain an additional
Run... button.
- The Run button is only displayed for ETL processes with a filter strategy of RunFilterStrategy or ModifiedSinceFilterStrategy; the button is not displayed for the filter strategy SelectAllFilterStrategy.
- Click Run to set a date or row version window range to use for incremental ETL filters, overriding any persisted or initial values.

When you click
Run in the popup, the ETL will run assuming the range you set was applied to the source data. Use this to debug and refine a filter strategy without needing to advance the clock or otherwise manipulate test data.
Be sure to turn off Development mode after debugging your filter strategy. This requires restarting the server without the
-Ddevmode=true flag set.
See Run History for this Folder
The
Data Transform Jobs web part provides a detailed history of all executed ETL runs, including the job name, the date and time when it was executed, the number of records processed, the amount of time spent to execute, and links to the log files.
To add this web part to your page, enter
> Page Admin Mode, then scroll down to the bottom of the page and click the dropdown
<Select Web Part>, select
Data Transform Jobs, and click
Add. When added to the page, the web part appears with a different title: "Processed Data Transforms". Click
Exit Admin Mode.

Click the
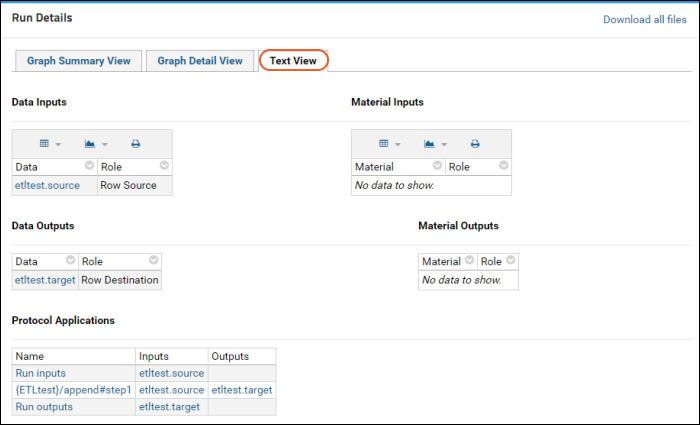
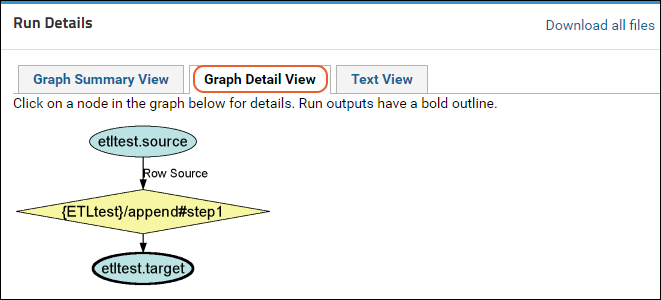
Name of a transform for more details including the run ID, schedule, and count of records. Go back to the grid view of all transforms and
click
Run Details for fine-grained details about any run, including a graphical representation.


Admin Console for ETLs
Under
Premium Features on the
> Site > Admin Console you can view and manage ETLs at the site level.
Site-Wide History of ETL Jobs Run
To view a history of all ETL jobs ever run across the whole site:
- Go to Admin > Site > Admin Console.
- Under Management, click ETL- All Job Histories.
The history includes the name of the job, the folder it was run in, the date and time it was run, and other information. Links to detailed views of each job and run are provided.

Run Site Scope ETLs
From this page, you will see and be able to run any ETLs that are scoped to be available site wide. To be site scoped, an ETL must have the attribute set to true:
<etl xmlns="http://labkey.org/etl/xml" siteScope="true">
Note that this dashboard does not show ETLs defined in any container on the site via the UI or via module. You will see the source module for any site-scoped ETLs shown here.
View Scheduler Summary
This page shows a summary of jobs and triggers for any scheduled ETLs.
Related Topics
 Columns:
 To roll back a run (deleting the rows added to the target), return to the Data Transforms web part, and select Reset State > Truncate and Reset. Note that rolling back an ETL which outputs to a file will have no effect, that is, the file has already been written and will not be deleted or changed.

 When you click Run in the popup, the ETL will run assuming the range you set was applied to the source data. Use this to debug and refine a filter strategy without needing to advance the clock or otherwise manipulate test data.
 Click the Name of a transform for more details including the run ID, schedule, and count of records. Go back to the grid view of all transforms and
click Run Details for fine-grained details about any run, including a graphical representation.

