When you
create a study, you specify how time will be tracked, i.e. whether the study is
visit-based or
date-based. Both are similar methods of separating data into sequential buckets for tracking data about participants over the events in a research study.
This topic describes the options available for managing either visits or timepoints. You will be able to see which type of study you are using by what the name is on the link you click to reach the manage page.
To reach the Manage page:
- Click the Manage tab.
- Select either Manage Visits or Manage Timepoints.
Note that if you don't see either link, your study is defined as
continuous, in which data is time-based but not managed in either timepoints or visits.
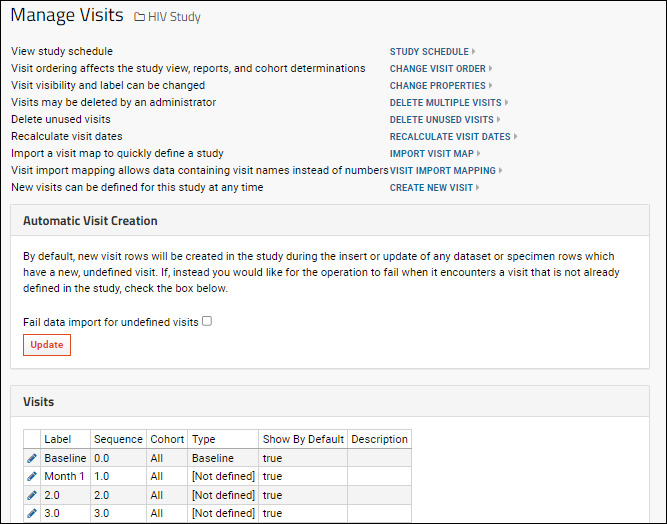
Manage Visits

- Study Schedule
- Change Visit Order: Change the display order and/or chronological order of visits.
- Change Properties: The label, cohort, type, and default visibility of multiple visits can be edited at the same time.
- Delete Multiple Visits: Select the visits you want to delete. Note this will also delete any related dataset rows. The number of rows associated with each visit are shown for reference.
- Delete Unused Visits: If there are any visits not associated with any data, you can delete them. You will see a list of unused visits and confirm the deletion.
- Recalculate Visit Dates: The number of rows updated is shown after recalculating.
- Import Visit Map: Import a visit map in XML format.
- Visit Import Mapping: Define a mapping between visit names and numbers so that data containing only visit names can be imported. Provide the mapping by pasting a tab-delimited file that includes Name and SequenceNum columns.
- Create New Visit.
The table of
Visits shown on the
Manage Visits page displays some basic details about the currently defined set of visits.
Note that the
Label column displays either the
Label field if set, or the
Sequence if the label has not been set. Edit a row using the
icon to see if the label has been set.
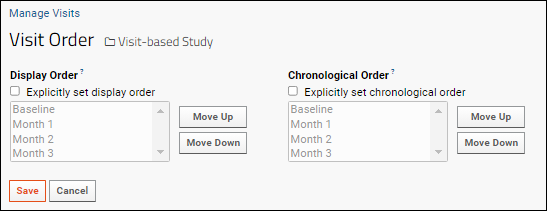
Change Visit Order
Display order determines the order in which visits appear in reports and views for all study data. By default, visits are displayed in order of increasing visit ID for visit-based studies, which is often, but not necessarily the same as date order as used in timepoint-based studies. You can also explicitly set the display order.
Chronological visit order is used to determine which visits occurred before or after others. Visits are chronologically ordered when all participants move only downward through the visit list. Any given participant may skip some visits, depending on cohort assignment or other factors. It is generally not useful to set a chronological order for date-based studies.
To explicitly set either order, check the box, then use the "Move Up" or "Move Down" buttons to adjust the order if needed. Click "Save" when you are done.

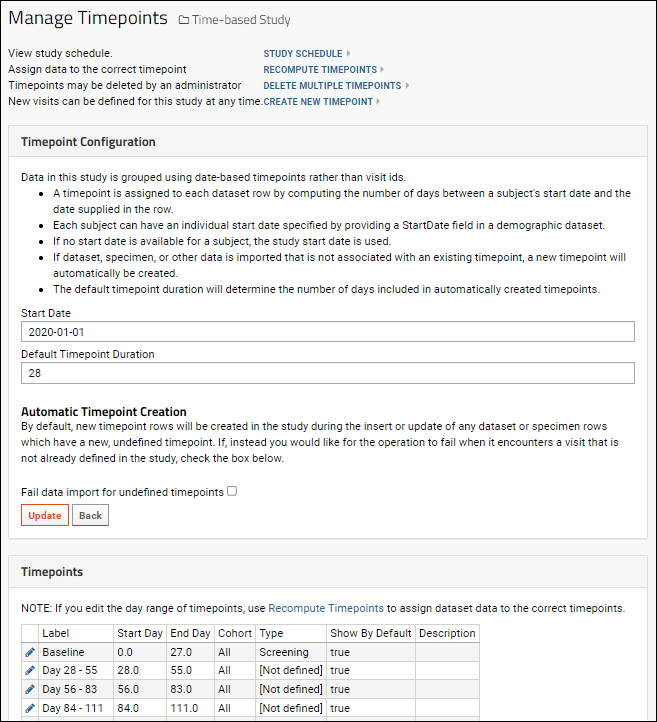
Manage Timepoints

- Study Schedule
- Recompute Timepoints: If you edit the day range of timepoints, use this link to assign dataset data to the correct timepoints. The number of rows changed will be reported.
- Delete Multiple Timepoints: Select the timepoints you want to delete. Note this will also delete any related dataset rows. The number of rows associated with each timepoint are shown for reference.
- Create New Timepoint
Timepoint Configuration
Set the study start date and duration for timepoints. Used to assign a row to the correct timepoint when only a date field is provided.
- A timepoint is assigned to each dataset row by computing the number of days between a subject's start date and the date supplied in the row.
- Each subject can have an individual start date specified by providing a StartDate field in a demographic dataset. Note that if you do not immediately see these start dates used, you may have to click Recompute Timepoints on the Manage Timepoints page.
- If no start date is available for a subject, the study start date specified here is used.
- If dataset data is imported that is not associated with an existing timepoint, a new timepoint will be created. This option can be disallowed if you prefer to fail imports for data that would create new timepoints.
- The default timepoint duration will determine the number of days included in any automatically created timepoints.
Disallow Automatic Visit or Timepoint Creation
By default, a new visit or timepoint will be created in the study during the insert or update of any dataset or specimen rows which do not already belong in an existing visit or timepoint. If you would like to disallow this auto creation and disallow new visits or timepoints, in the
Automatic Visit (or Timepoint) Creation section, check the box to
Fail data import for undefined visits.

Related Topics