In a LabKey Study, the places where collection and storage of material and information take place are collectively referred to as
locations. Administrators can manage and change the study locations available, and assign one or more of the location types to each physical location. Location types include:
- clinics
- repositories
- labs
Topics
Manage Locations
Managing locations and changing location definitions requires folder or project administrator permissions. However, the contents of the table can be made visible to anyone with read permissions by adding a locations query web part.
- Click the study's Manage tab.
- Select Manage Locations.

Add a Location
Click
(Insert New Row), enter information as required, then click
Save. Fields include:
- Location Id: The unique LDMS identifier assigned to each location, if imported from an LDMS system.
- External Id: The external identifier for each location, if imported from an external data source.
- Labware Lab Code: The unique Labware identifier assigned to each location, if imported from a Labware system.
- Lab Upload Code: The upload code for each location.
- Label (Required): The name of the location.
- Description: A short description of each location.
- Location Types: Check boxes to select which type of location this is (more than one may apply): SAL (Site-Affiliated Laboratory), Repository, Endpoint, Clinic.
- Street Address/City/Governing District/Postal Area: Physical location.
Edit an Existing Location
Hover over a row and click
(Edit) to change any information associated with an existing location.
Delete Unused Locations
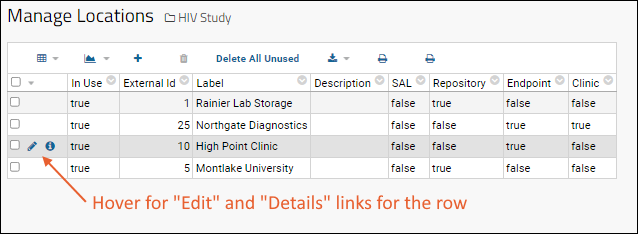
Locations which are not in use may be deleted from the
Manage Locations page, shown above. The
In Use column reads true for locations referred to by other tables within the study.
To delete specific locations, select one or more rows using the checkboxes on the left, then click
(Delete). To delete all locations not in use, click
Delete All Unused.
Offer Read Access
To show the contents of the table to anyone with read access, place a query web part in the folder or tab of your choice:
- Enter > Page Admin Mode.
- Select Query from the Select Web Part dropdown in the lower left.
- Click Add.
- Give the web part the title of your choice.
- Select Schema "study" and check the box to show the contents of a specific query.
- Select Query "Location" and choose the desired view and choose other options as needed.
- Click Submit.
- Click Exit Admin Mode when finished.
Related Topics
