Assay transformation scripts offer an automatic way to clean and validate data. This topic shows how you could also create a new sample (based on parent information provided) if one is not already present in the folder, then import the data related to it.
Learn more about the basics of writing transformation scripts in R in these topics:
Set Up the Example
1. Make sure your server has
R scripting enabled and your R instance includes the packages:
2. Navigate to your
Tutorials project (create it if necessary) then, create a new subfolder named
AssayTransform (no spaces) of type "Assay".
3. Download and import this preconfigured folder archive to the new folder:
- Click to download: AssayTransform.folder.zip
- Do not unzip it.
- Select > Folder > Management.
- Click the Import tab.
- Click Choose File/Browse and select the AssayTransform.folder.zip you just downloaded.
- Click Import.
- When the import is complete, click the AssayTransform link near the top of the page to go to the main folder page.
4. Customize a transformation script for your server and credentials.
In your favorite file editor, open the script itself. Make these customizations:
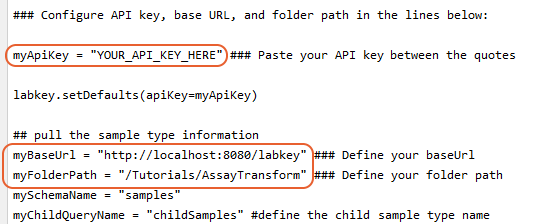
- Generate an API key on your server. Edit the line beginning "myApiKey" to paste your generated API key between the quotes. For example, myApiKey = "12345678901234567890"
- Edit the line that begins "myBaseUrl" so that it includes your base URL - if you are using a local dev machine, this is typically "http://localhost:8080/labkey". Note that some servers include "/labkey" in the path and some do not.
- Edit the line that begins "myFolderPath" with the folder path (preceded by a slash): "/Tutorials/AssayTransform" if you followed our directions.
- Save your changes to the script.
5. Attach the script to the assay design:
- Select > Manage Assays.
- Click TransformCheck.
- Select Manage Assay Design > Edit Assay Design.
- In the Transform Scripts line, click Add Script and select or drag and drop the "TransformCheckScript.R" file.
- Notice the full path location of the script. It will be under the file root in a "@scripts" subdirectory. If you have edit access to that location, you can also edit it directly after attaching it.
- Click Save.
Use the Transform Script
- Return to your AssayTransform folder via the project menu.
- In the Files web part, right click example.xlsx and select Download.
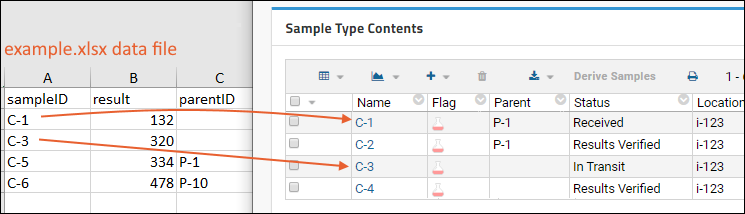
- Review the columns and notice some samples have parentIDs indicated and some do not. You can also compare the contents of this file to the childSamples sample type in the folder and see that some samples already exist in the set and some do not.
- Return to your Assay Transform folder if you navigated away.
- In the Files web part, check the box for the example.xlsx file and click Import Data.
- In the popup, select Use TransformCheck (in the Import Text or Excel Assay section) and click Import.
- Make no changes to the batch properties and click Next.
- Click Save and Finish.
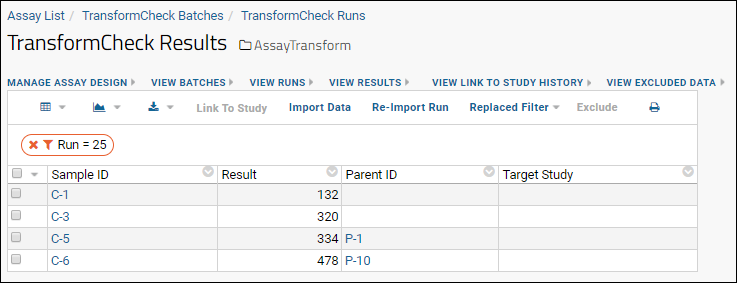
- Click example.xlsx to see the grid of data you just imported.
- Clicking any Sample ID will show you details about the sample.
- Return to the AssayTransform folder and click childSamples.
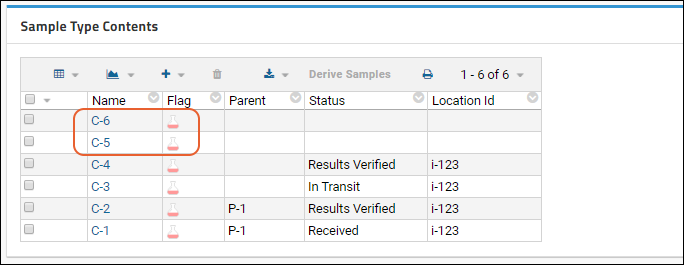
- Notice two new child samples, C-5 and C-6 were added by the script during the import of the example.xlsx file.
Show Sample Parentage
You may notice that the "Parent" text field in childSamples sample type was not populated during the import for the two newly added samples. If you click the sample ID, such as C-6, you will see more details, including the link
Lineage for C-6 under
Lineage Graph, showing that the parent information was recorded.
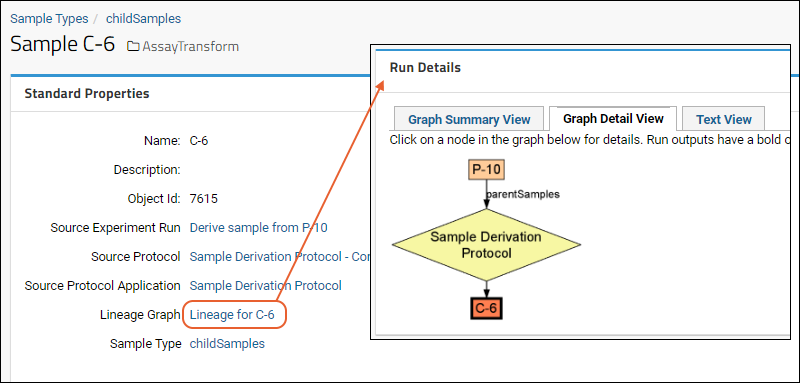
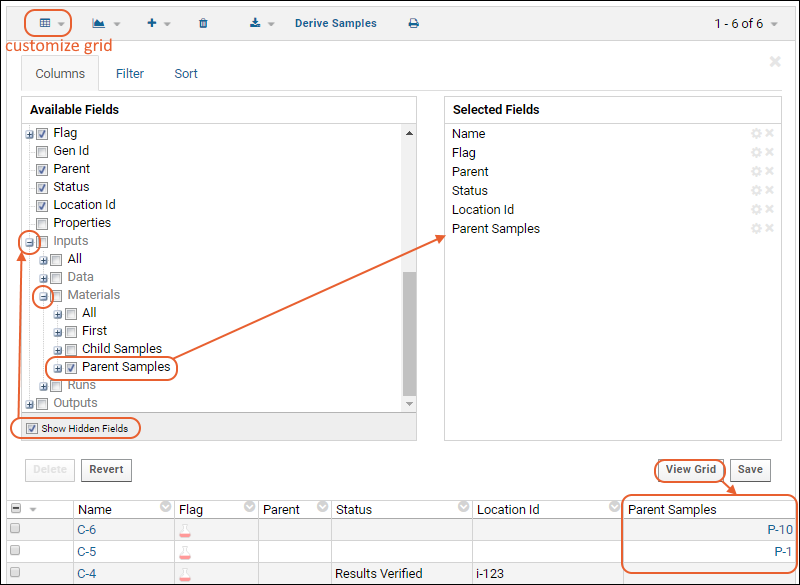
To expose the parent sample information in the childSamples sample type, customize the grid as follows:
- Return to the Assay Transform folder.
- Click childSamples to open the sample type.
- Select (Grid Views) > Customize Grid.
- Check the box for Show Hidden Fields.
- Scroll down and open the node for Inputs, then for Materials.
- Check the box for Parent Samples.
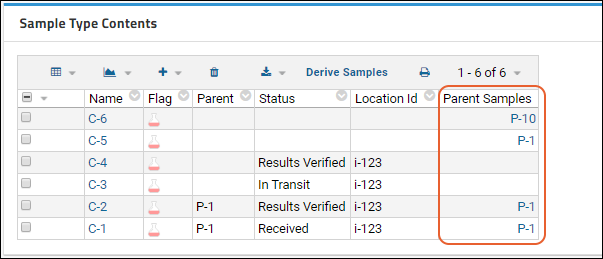
- Click View Grid to add the column linking each child sample to the parent sample.
Save the edited grid as the default to see it whenever you open the childSamples sample type.
Read the Transform Script
Script sections are highlighted with comments describing their operations. You can add additional data cleaning, formatting, or calculations using this basic script as a model.
#####################################################
### Transformation script that registers samples  ###
###   if they are not already in LabKey.          ###
### Created by: Hannah Brakke                     ###
#####################################################

#load needed packages (assuming they are already installed on your server)
library(Rlabkey); library(readxl)

################################################
# Read in the run properties and results data. #
################################################

run.props = labkey.transform.readRunPropertiesFile("${runInfo}");

# save the important run.props as separate variables
run.data.file = labkey.transform.getRunPropertyValue(run.props, "runDataFile");
run.output.file = run.props$val3[run.props$name == "runDataFile"];
error.file = labkey.transform.getRunPropertyValue(run.props, "errorsFile");

# read in the results data file content
run.data = read.delim(run.data.file, header=TRUE, sep="t", stringsAsFactors = FALSE);

###########################################################
# Now that the file is loaded, perform the transformation #
###########################################################


### If you want to transform any of your assay data, do it here.


### Now register samples that don't exist in LabKey but are in your assay file
### Include lineage of these samples to a parent sample type

### Configure API key, base URL, and folder path in the lines below:

myApiKey = "YOUR_API_KEY_HERE" ### Paste your API key  between the quotes

labkey.setDefaults(apiKey=myApiKey)

## pull the sample type information
myBaseUrl = "http://localhost:8080/labkey" ### Define your baseUrl
myFolderPath = "/Tutorials/AssayTransform" ### Define your folder path
mySchemaName = "samples"
myChildQueryName = "childSamples" #define the child sample type name
myParentQueryName = "parentSamples" #define the parent sample type name

#load the child sample data
childData= labkey.selectRows(
  baseUrl= myBaseUrl,
  folderPath= myFolderPath,
  schemaName= mySchemaName,
  queryName= myChildQueryName,
  colSelect="Name" #we only care about the name to register samples
)

#load the parent sample data
parentData= labkey.selectRows(
  baseUrl= myBaseUrl,
  folderPath= myFolderPath,
  schemaName= mySchemaName,
  queryName= myParentQueryName,
  colSelect="Name" #we only care about the name to register the lineage
)

### Determine if the sample ID in your assay matches with your sample type (this assumes you have a column called sampleID)

#match the child sample type IDs with my assay IDs
childmatches = match(run.data$sampleID, childData$Name, nomatch=NA)
parentmatches = match(run.data$parentID, parentData$Name, nomatch=NA)

#create an empty data frame to load sample IDs and the sample parent
rowsToInsert = setNames(data.frame(matrix(ncol = 2, nrow = 0)), c("Name","MaterialInputs/parentSamples")) #change the parentSamples to your parent sample name

for(i in 1:nrow(run.data)){
    if(is.na(childmatches[i]) == TRUE && is.na(parentmatches[i]) == TRUE){
      #if there is no sampleID registered or a parent ID registered, error out
      stop("If the sampleId isn't registered, the parent sample must be registered. Please register a sample Id or a parent sample.")
    }else if(is.na(childmatches[i]) == TRUE && is.na(parentmatches[i]) == FALSE){
      rowsToInsert[i,] = c(run.data$sampleID[i],run.data$parentID[i])
  }
}

#remove rows with NA
rowsToInsert =na.omit(rowsToInsert)

#insert new samples
labkey.insertRows(
  baseUrl= myBaseUrl,
  folderPath=myFolderPath,
  schemaName= mySchemaName,
  queryName= myChildQueryName,
  toInsert = rowsToInsert)


###########################################################
# Write the transformed data to the output file location. #
###########################################################

# write the new set of run data out to an output file
write.table(run.data, file=run.output.file, sep="t", na="", row.names=FALSE, quote=FALSE)

# print the ending time for the transform script
writeLines(paste("nProcessing end time:",Sys.time(),sep=" "))
Related Topics

