Study participant IDs can be managed using several mechanisms accessed via
> Manage Study > Manage Participants.
Alternate Participant IDs
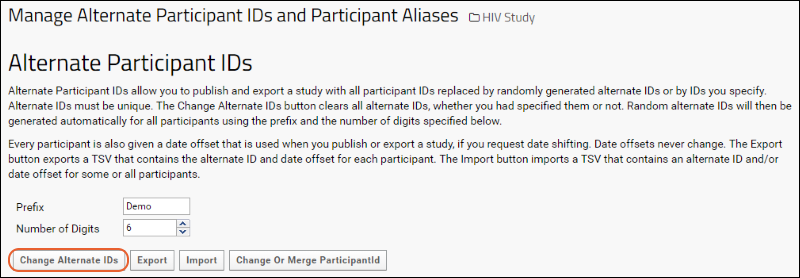
When exporting study data, you can obscure the real participant ids by replacing them with randomly generated, alternate ids. You can either specify your own "alternates" or have the system generate random IDs using a prefix you choose. Alternate IDs are still mapped consistently to the same real IDs; there can only be one set of mappings.
Alternate IDs are unique and automatically generated for each participant. Once generated, the alternate IDs will not change unless you explicitly request to change them. Multiple publications of the same study will use the same alternate IDs and date offsets.
Change Alternate IDs
You can control the prefix and number of digits in the generated alternate IDs: go to
> Manage Study > Manage Participants. You can also export a list of the alternate IDs and date offsets from this page.
- Click the Manage tab.
- Click Manage Alternate Participant IDs and Aliases.
- For Prefix, enter a fixed prefix to use for all alternate IDs.
- Select the number of digits you want the alternates to use.

- Click Change Alternate IDs. Click to confirm; these alternates will not match any previously used alternate IDs.
- Scroll down and click Done.
Export/Import Participant Alternates and Offsets
In addition to assigning alternate IDs, you can also
shift participant dates to obscure the exact dates but preserve the elapsed time between them. These "Participant Transforms" can be shared among different studies to maintain alignment of these 'obscured' values.
In order to export participant transforms, you must first have set and used both alternate IDs and date shifting in a publish or export from this study.
Once both are set, clicking
Export will export a TSV file containing both the alternate IDs and date offset for each participant. If you already have such a file, and want to align a new study to match the same 'shifted' data, click
Import to choose and import it from file or via copy/paste.
Change or Merge Participant ID
If you want to change a participant ID within a study, perhaps because naming conventions have changed, or data was accidentally entered with the wrong ID, or was entered for a participant before an
alias was added to the alias-mapping dataset, you can do so as follows.
- Go to > Manage Study > Manage Participants.
- Click Change or Merge ParticipantID.

- Enter the participant id to change, and the value to change it to.
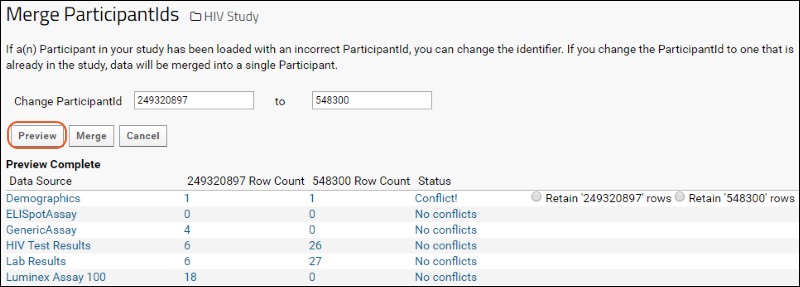
- Click Preview.
- LabKey Server searches all of the data in the folder and presents a list of datasets to be changed. IDs that don't exist in the study yet will show 0. Learn about merging participant IDs in the next section.

- Click Merge to complete the participant ID change.
Note that
participant alias datasets are never updated by this merge process; they must be maintained manually.
Merging Participant Data
Suppose you discover that data for the same individual in your study has been entered under two participant IDs. This can happen when naming conventions change, or when someone accidentally enters the incorrect participant id. Now LabKey Server thinks there are two participants, when in fact there is only one actual participant. To fix these sort of naming mistakes and merge the data associated with the "two" participants into one, LabKey Server can systematically search for an id and replace it with a new id value.
- Decide which participant ID you want to remove from the study. This is the "old" ID you need to change to the one you want to retain.
- Follow the same procedure as for changing a participant ID above.
- Enter the "old" value to change (9 digits in the following screencap), followed by the ID to use for the merged participant (6 digits shown here).

- Click Preview.
- LabKey Server searches all of the data in the folder and presents a list of datasets to be changed.
- Click link text in the report to see filtered views of the data to be changed.
- If conflicts are found, i.e., when a dataset contains both ids, use the radio buttons in the right hand column to choose which participantID's set of rows to retain.
- Click Merge to run the replacement.
Auto-Create New Alias
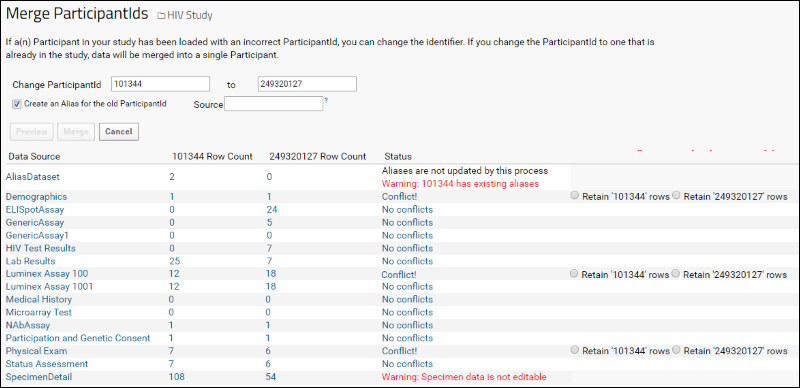
If your study is date-based and contains a configured alias mapping table, you will have the option to convert the old name to an alias by selecting
Create an Alias for the old ParticipantId. When this option is selected, a new row will be added to the alias table. For details on configuring an alias table, see
Participant Aliases.
- If an alias is defined for an old id, the server won't update it on the merge. A warning is provided in the preview table: "Warning: <old id> has existing aliases".
- If a dataset is marked as read-only, a red warning message appears in the status column..

This option is not available for visit-based studies. To merge participant IDs and update the alias table in a visit based study, you must perform these steps separately.
Delete Participant
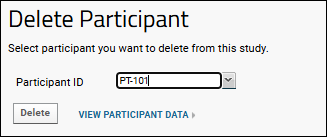
To remove a participant from a study, either because they have unenrolled or for other reasons, you can select the participant ID here and click
Delete.

You can also click the link to
View participant data to view the participant's data in another tab, letting you confirm first that you are deleting the correct participant.
Deleting a participant will:
- Delete all rows for that participant from all study datasets
- Delete cohort associations for that participant
- Remove the participant from any participant groups
- Remove rows for this participant from study.participant, study.participantvisit, and study.participantgroupmap
Note that this feature only deletes the participant from the study. There may still be list references, sample type data, or specimens associated with that participant ID. If there are any non-study tables with foreign key constraints referencing any of the study dataset tables, deletion may lead to constraint violations, which will be displayed to the user so they can be addressed.
Related Topics
- Publish a Study - Export randomized dates; hold back protected data columns.
- Participant Aliases - Align participant data from sources that use different names for the same subject.

 This option is not available for visit-based studies. To merge participant IDs and update the alias table in a visit based study, you must perform these steps separately.