This topic covers methods for working with data in grids as well as customizing grid views, detail pages, and entry forms in LabKey Biologics LIMS.
Common topics below link to the Sample Manager documentation for these features.
Custom Details Pages
An administrator can create a special custom grid view to control the fields shown on an entity details page. If you create this special view using the Biologics interface, it will only show for your own user account. To make this change to the details view for all users, select
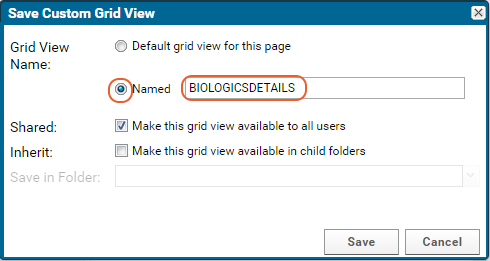
> LabKey Server > [Your Biologics Project Name] to switch to the LabKey Server UI. Here you can save the "BIOLOGICSDETAILS" view and share it with all users.
Customize the view for the entity type, then save it:
- Uncheck "Make default view for all users"/"Default grid view for this page".
- Use the name "BIOLOGICSDETAILS".
- Check the box to "Make this grid view available to all users" (available only in the LabKey Server interface).
- Optionally check the box to "Make this grid view available in child folders."

Entry Forms
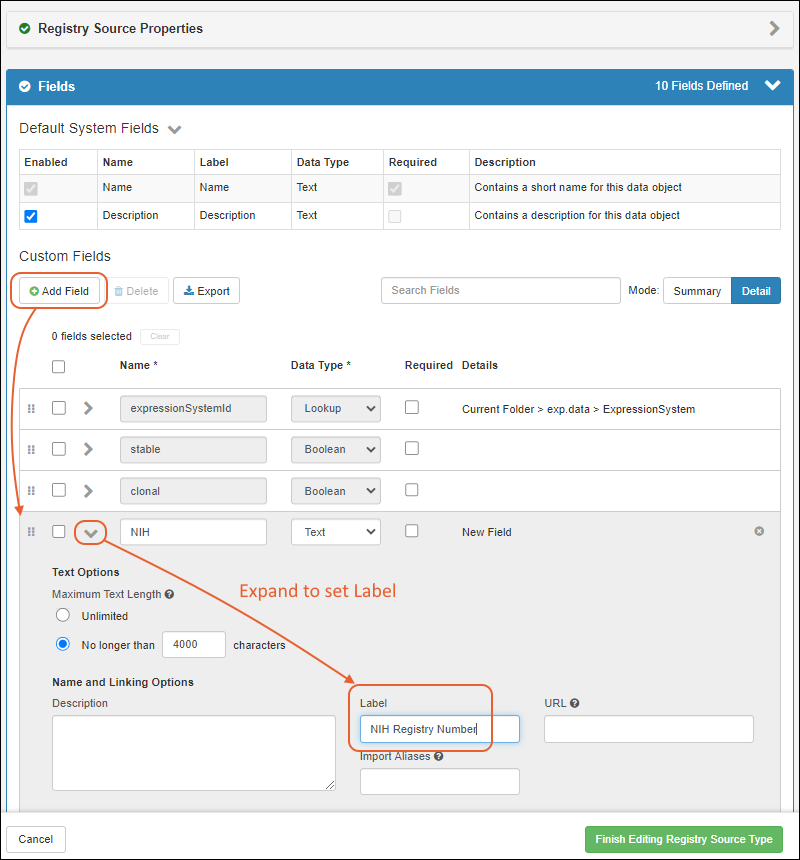
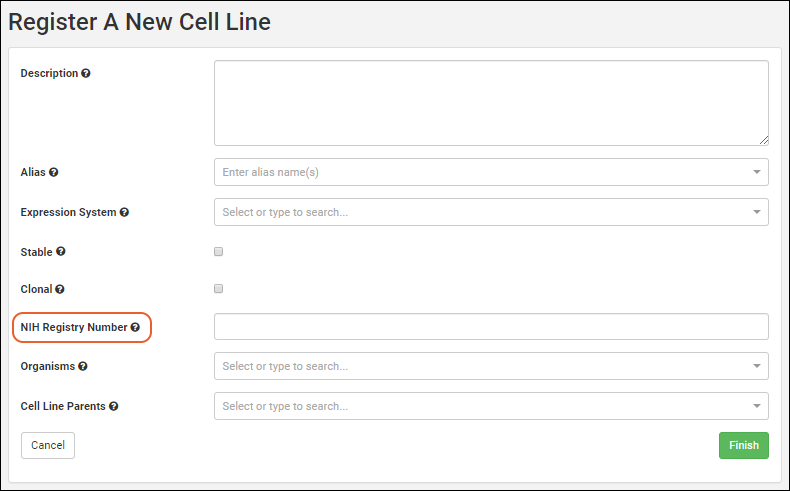
To modify entry and update forms, modify the fields in the field designer. For example, to add a field "NIH Registry Number" to the Cell Line entity:
- From the main menu, click Cell Lines.
- Select Manage > Edit Cell Lines Design.
- Click the Fields section to open it.
- Expand the desired field details and enter a Label if you want to show something other than the field name to users.

- Click Finish Editing Source Type.
- The field will appear in the entry form for Cell Lines when you Create a new one.

Follow similar procedures to delete or modify entry form fields for other entities.
Customize Details Shown for Lookups
Lookup fields connect your data by letting a user select from a dropdown which joins in data from another table. By default, a lookup column will only show a
single display field from the table, generally the first text field in the target table.
Details for Registry Sources and Sample Types
By defining
Identifying Fields for Registry Sources and Sample Types, including Media types, you can expose additional detail. Learn more here:
As an example of how this can be used to make it easier for users to select the right raw materials for a batch, review this topic:
Add Detail to "Raw Materials Used" Dropdown for Registering Batches
Details for Lists
You can also customize the lookup view in the Sample Manager, LabKey LIMS, and Biologics LIMS for a list or other table by editing the metadata directly. For example, for dropdown targeting a list of Supplier names, it might also be helpful to users to show the state where that supplier is located. In this example, the "Suppliers" list would include the following XML metadata to set
shownInLookupView to true for the desired field(s):
<tables xmlns="http://labkey.org/data/xml">
  <table tableName="Suppliers" tableDbType="NOT_IN_DB">
    <columns>
      <column columnName="State">
        <shownInLookupView>true</shownInLookupView>
      </column>
    </columns>
  </table>
</tables>
Before applying the above, the user would only see the lab name. After adding the above, the user would see both the name and state when using the same dropdown.

Related Topics


 Follow similar procedures to delete or modify entry form fields for other entities.