This topic is under construction for the 23.11 (November 2023) release of LabKey Biologics LIMS. For the previous version of this documentation, click here.
LabKey Biologics represents materials in various phases of bioprocessing using
Samples. Samples of many different types can be defined to represent your development process. They can be standalone compounds, they can have parentage/lineage, they can be aliquoted, used to derive new samples, or pooled. The lineage of samples you track may be both concretely real (such as a parent material or vial) and virtual (such as a Recipe and/or an Expression System used).
Sample Types define the fields and properties for the different kinds of samples in your system.
Sample Types Dashboard
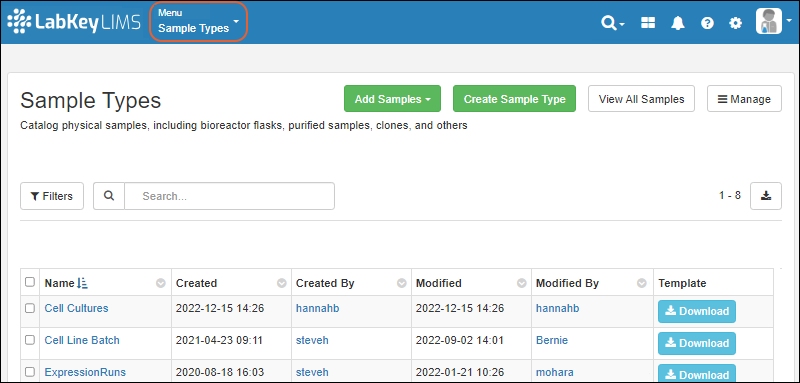
In Biologics LIMS, the
Sample Types dashboard displays an overview of all the samples known to the system.
Sample Types can be
created and edited either inside or outside of the application. From this page you can add new samples, view
a tabbed grid of all samples of all types, or
download a template for any type of sample to make importing samples from file easier.

Click the name of a Sample Type to see the overview page for the type, including
Details like how new names will be generated, a panel of
sample type Insights, and a grid of all registered samples of this type.
Sample Type Details
Hover over the
Details link to see the properties of the sample type, such as naming patterns, units, and any import aliases defined.
Sample Type Insights
The panel above the sample grid gives a quick visual summary of
Storage Status,
Sample Status, and
Aliquots. Color coded bars show the relative prevalence of each state. Hover over any bar segment for details about what it represents. Click the bar segment to filter the samples grid to show only those samples.

Learn more in the
companion topic for Sample Manager.
Sample Grid Menus
Menus offered include the following. You can also filter, search, export, adjust paging, and access custom views and charts. Note that some options require one or more samples to be selected, and will be shown grayed out when none are selected.
- Add:
- Edit:
- Derive:
- Assay:
- Import Assay Data > Choose type of assay to import (one or more samples must first be selected to activate this option)
- Picklists:
- Jobs:
- Storage: (For users with the "Storage Editor" role only)
- Reports:
When the browser window is narrower, most of the above will be collapsed into a
More menu with sections for each category:
Sample Details
Click an individual SampleID value to see details for that sample. A sample
details page shows various tabs:
- Overview: Summary of sample and parent information.
- Lineage: Shows the parents and children of the current sample.
- Aliquots: Shows all aliquots created from this sample (if any).
- Assays: Displays any assay data associated with this sample.
- Jobs: Shows all jobs involving this sample.
- Timeline: A detailed timeline of every action for this sample.
A brief summary of each is shown below. More details are available in the
Sample Manager documentation.
Overview
The overview tab shows the values of all properties for the sample. Panels for
Storage Location, Aliquots, and Notebooks give details specific to this sample. Note that if the sample is not in storage, the first panel will be
Inventory and show only the amount of the sample.

Use the
Manage menu to:
- Create Samples (of any Sample Type): Only creation of derivatives is supported here. By default this sample will be a parent of the new one(s).
- Import Assay Data
- Add to Picklist
- Create a New Picklist
- Create Workflow Job: By default this sample will be automatically assigned to the job.
- Check Out (For users with the "Storage Editor" role only)
- Add to Storage/Discard from Storage (For users with the "Storage Editor" role only)
- Print Labels (when BarTender is configured)
- Delete Sample: Available only when samples do not have dependents like derived samples, assay data, or status that prevents deletion.
- View Audit History
Parent Details
Below the panel of details about this sample, you will see a panel of
Parent Details giving the type and property values for the parent from which this sample was created.
Users with appropriate permissions can edit the parent details here when appropriate, changing parents, adding additional "parents" of other types, etc.
Lineage
Sample lineage is available as a graphical view by default, as shown below. Hover over any node for more information, click any node to see details. Click
Go To Lineage Grid to see the same information as a grid. Learn more in the topic:
Entity Lineage.
Aliquots
A grid of all the aliquots created from this sample. Learn more about creating aliquots in the
Sample Manager documentation.

The
Aliquot Naming Pattern is part of the
sample type definition. The default is the parent sample name (
AliquotedFrom) followed by a dash and incrementing counter:
${${AliquotedFrom}-:withCounter}
If instead you wanted to use a dot between the sample name and aliquot number, you'd use the pattern:
${${AliquotedFrom}.:withCounter}
Learn more about customizing aliquot naming patterns here:
Aliquot Naming Patterns
Assays
On the
Assays tab, you can see all the assay data available for that sample, as well as for all aliquots (and subaliquots) created from it. An
Assay Run Summary tab gives you a count of runs per assay type, and assay-specific tabs give you details about the results. Click the assay tab to see all results for that assay for the sample you are viewing. Select whether grids include data for samples, aliquots of those samples, or both.
Jobs
A grid of links to all the jobs that involve this sample, if any. Click
Start a New Job to create a new one with this sample as an input.
Timeline
On this tab, you'll see all events that have happened for this sample. Click an event for more details.

Learn more about the sample timeline in this topic:
Sample Status
The status of samples can be tracked using customizable
Sample Status values. There are three main types of status:
- Available: Can be used.
- Consumed: Used up, and can longer can be aliquoted or checked out, but remains in the system for analysis and tracking.
- Locked: Not currently available; some actions are prevented.
Learn more in the
Sample Manager companion topic for this feature.
Manage Status Options
From the main menu, click
Sample Types then click
Manage > Sample Statuses. Scroll down to find the current status settings defined.
Use Status Settings
Users can assign statuses to their samples throughout the system:
- At sample creation
- During file import of new or updated samples
- When updating a single sample's details
- In a bulk sample update
Aliquots can have status values different from their parent sample.
Sample Status Legend
In many places in the application, users can access a legend of available status values. Hover over the
for the
Status column or field to see a legend listing all the available status values and their color coding.
Sample Picklists
When working with samples, it can be convenient to create user-defined
picklists for gathering a set together for some operation like adding to a workflow job, adding to storage, performing bulk operations, etc.
Administrators and users with the
Workflow Editor role can add samples to picklists from many places in the application, and create new ones as needed on the fly. A user can build a picklist privately, adding and removing samples until the correct set are defined, or share with the team so that everyone can work from the same list.
Access the picklists dashboard from the
main menu or the user menu:
Sample Grids Containing Samples of Several Types
Some sample grids, including picklists, workflow sample lists, and lineage listings of descendent samples, may contain samples of more than one sample type. These grids will offer a set of tabs:
- All Samples: A listing of all samples on the list, with system fields common to any sample type. This is the default tab when the grid contains more than one sample type.
- Specific Sample Types: The type-specific listings will show properties of the specific sample type. When only one type of sample is present, this is the default tab.

Buttons and menus on multi-tab sample grid(s) offer:
Multi-tab Excel Exports
When you export from a grid that contains multiple tabs, such as one containing samples of different types as shown below, the exported Excel file can also include multiple tabs (sheets). Select
> Excel, then in the popup, you will see the per-tab
Count and which
View will be used for each tab. Check the boxes for the tabs you want included in the export and click
Export.
Sample Finder
Use the
Sample Finder tool to search for samples based on:
- Sample Properties (only built-in properties common to all Sample Types that are also shown in the default view are available here)
- Sample Parent Properties
- Registry Parent Properties
- Assay Properties (i.e. results from assays performed on the samples)

Built-in reports provide quick ways to access common sample requests:
- All Samples Created by Me
- All Samples Created by Other Users
- All Samples Created in the Last 7 Days
- Samples Expiring in the Next 7 Days
- Samples with Fewer than 5 Aliquots Available
Learn more in these topics:
Related Topics
LabKey Server Documentation about Samples