LabKey Biologics LIMS is designed to accelerate antibody discovery and the development of biologic therapies by providing key tools for research teams, including:
- A consolidated Bioregistry knowledge base to store and organize all your data and entity relationships
- Sample and Storage management tracking production batches, inventories, and all contents of your physical storage systems
- A data-integrated electronic lab notebook (ELN) for recording your research and coordinating review
- Tools promoting collaboration among teams for automated workflows, smooth handoffs, and reproducible procedures
- Media management for clear tracking of ingredients and mixtures in the Enterprise Edition
This topic provides an introductory tour of these key features.
Knowledge Base
Bioregistry
The
Bioregistry forms the team's shared knowledge base, containing detailed information on your sequences, cell lines, expression systems, and other research assets. The application is prepopulated with common Registry Source Types.

- Cell Lines
- Compounds
- Constructs
- Expression System
- Molecules
- Molecule Sets
- Molecule Species
- Nucleotide Sequences
- Protein Sequences
- Vectors
Bioregistry source types are structured in the same way as
Sources in the Sample Manager application and are customizable to provide the metadata and use the terminology you need. You can also add more registry source types as needed. Learn about Source Types here:
Entity Details
Click an entity in a grid to see its details page. Each details page shows the entity's properties and relationships to other entities.

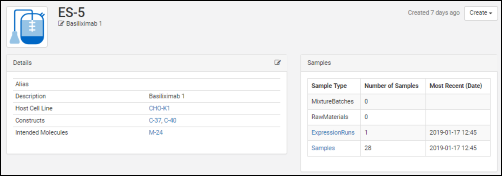
All details pages can be configured to show the most relevant data. For example, the details page for a protein sequence shows the chain format, average mass, extinction coefficient, the number of S-S bonds, etc., while the details page for a expression system shows the cell lines, constructs, and target molecule, as well as the samples drawn from it.
Entity Relationships
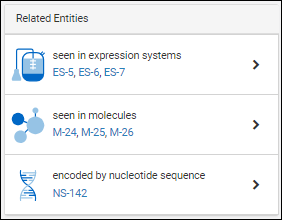
Each details page contains a panel of relationships to other entities. For example, for a given protein sequence, the relationship panel shows:

- which expression systems it is included in
- which molecules it is a part of
- which nucleotide sequence encodes for it
Entity relationships are shown as links to other details pages, making it easy to follow lineage lines and to track down associated samples and experimental data.
Sample Management and Data Integration
Data about your samples, experiments, and instrument assay results can be integrated to provide a full data landscape. Design customized methods for representing and linking your information. Using Biologics LIMS follows the same interface and has all the capabilities of the other Sample Management applications.
Analytics and Visualizations
Analytics and visualizations can be included throughout LabKey Biologics to provide key insights into the large molecule research process.

Protein Classification Engine
When new protein sequences are added to the Registry, they are passed to the
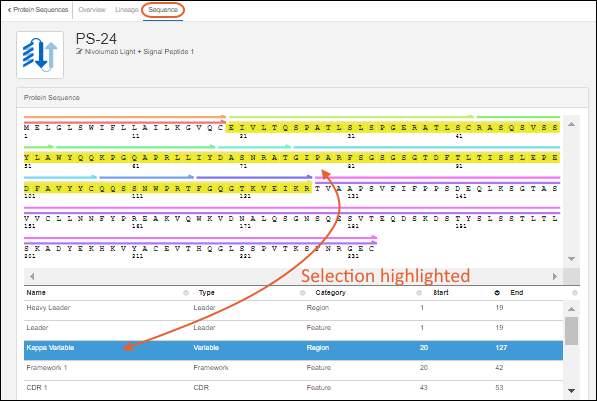
classification and annotation engine, which calculates their properties and identifies key regions on the protein chain, such as leader sequences, variable regions, and constant regions. (Researchers can always override the results of the classification engine, if desired.) Results are displayed on the Sequence tab of the protein's detail page. Identified regions are displayed as multicolored bars, which, when clicked, highlight the annotation details in the scrollable section below the sequence display.
Workflow Collaboration
A fully customizable task-based workflow system is included in LabKey Biologics. Individual users can all be working from the same knowledge base with personalized task queues and priorities. Several example jobs with representative tasks are included in your trial, you can also create your own.
Media Management (Enterprise Edition feature)
In the
Media section of the main menu, you will find sections for tracking:
- Batches
- Ingredients
- Mixtures
- Raw Materials
Careful tracking of media and components will help your team develop quality production methods that are reproducible and scalable. Define both media recipes and real batches of media, so you can track current state of your lab stocks, expiration, and storage location and overall quantities.
Learn more in this section:
Our data-integrated ELN (electronic lab notebook) helps you record results and support collaboration and publication of your research. Directly link to relevant registry entities, specific result runs, and other elements of your biologics research. Submit for review and track feedback and responses within the same application.
Learn more in this section:
When you use
Storage Management tools within LabKey Biologics, you can directly track the locations of samples and media in all the freezers and other storage systems your team uses. Create an exact digital match of your physical storage and record storage details and movements accurately. Sample data is stored independently of storage data, so that all data is retained even after a sample is consumed or removed from storage.
Learn more in the Sample Manager documentation here:

 All details pages can be configured to show the most relevant data. For example, the details page for a protein sequence shows the chain format, average mass, extinction coefficient, the number of S-S bonds, etc., while the details page for a expression system shows the cell lines, constructs, and target molecule, as well as the samples drawn from it.

