A grid view is a way to see tabular data in the user interface. Lists, datasets, assay results, and queries can all be represented in a grid view. The default set of columns displayed are not always what you need. This topic explains how to create custom grid views in the user interface, showing selected columns in the order you wish. You can edit the default grid view, and also save as many named grid views as needed.
Editors, administrators, and users granted "Shared View Editor" access can create and share customized grid views with other users.
Customize a Grid View
To customize a grid, open it, then select
(Grid Views) > Customize Grid.
The tabs let you control:
You can close the grid view customizer by clicking the
X in the upper right.
Note that if you are using LabKey Sample Manager or Biologics LIMS and want to customize grids there, you'll find instructions in this topic:
Adjust Columns Displayed
On the
Columns tab of the grid view customizer, control the fields included in your grid and how they are displayed in columns:

- Available Fields: Lists the fields available in the given data structure.
- Selected Fields: Shows the list of fields currently selected for display in the grid.
- Delete: Deletes the current grid view. You cannot delete the default grid view.
- Revert: Returns the grid to its state before you customized it.
- View Grid: Click to preview your changes.
- Save: Click to save your changes as the default view or as a new named grid.
Actions you can perform here are detailed below.
Add Columns
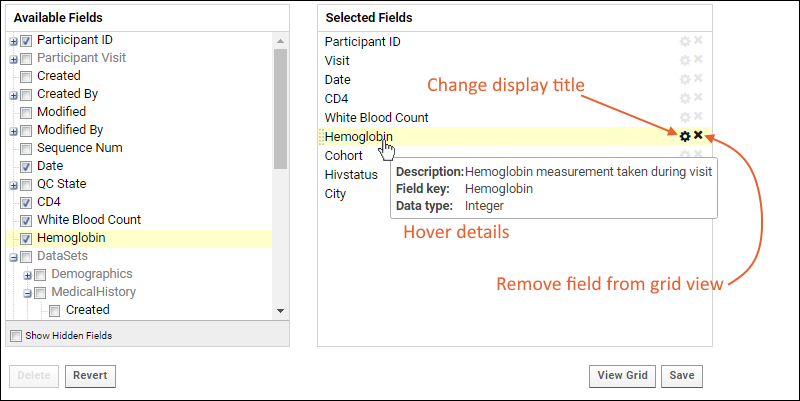
- To add a column to the grid, check the box for it in the Available Fields pane.
- The field will be added to the Selected Fields pane.
- This is shown for the "Hemoglobin" field in the above image.
Notice the checkbox for
Show hidden fields. Hidden fields might contain metadata about the grid displayed or interconnections with other data. Learn more about common hidden fields for lists and datasets in this topic:
Expand Nodes to Find More Fields
When the underlying table includes elements that reference other tables, they will be represented as an expandable node in the Available Fields panel. For example:
- Fields defined to lookup values in other tables, such as the built in "Created By" shown above. In that case to show more information from the Users table.
- In a study, there is built in alignment around participant and visit information; see the "Participant Visit" node.
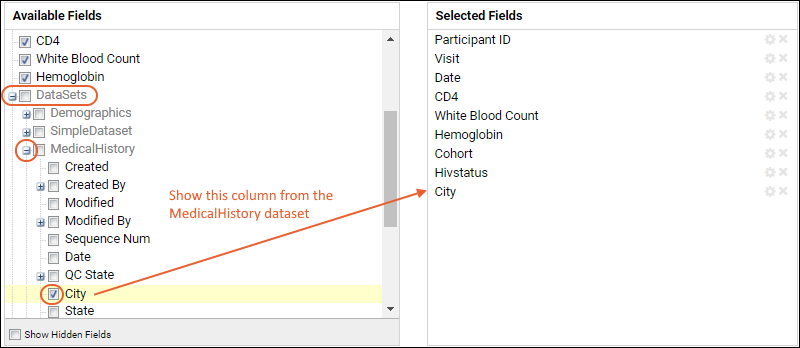
- In a study, all the other datasets are automatically joined through a special field named "Datasets". Expand it to see all other datasets that can be joined to this one. Combining datasets in this way is the equivalent of a SQL SELECT query with one or more inner joins.
- Click and buttons to expand/collapse nodes revealing columns from other datasets and lookups.
- Greyed out items cannot be displayed themselves, but can be expanded to find fields to display.
Add All Columns for a Node
If you want to add all the columns in a given node, hold down shift when you click the checkbox for the top of the node. This will select (or unselect) all the columns in that node.
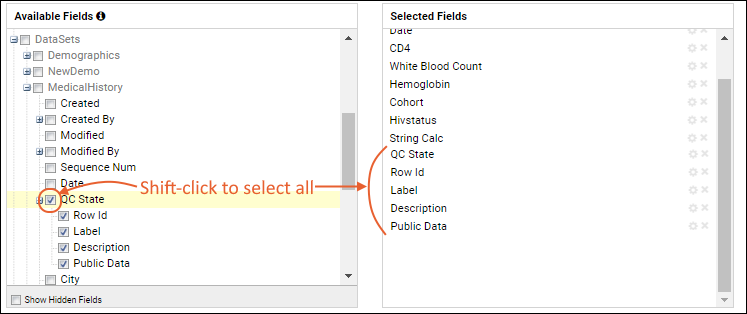
Note that this will only add one "layer" of the columns under a node. It also does not apply to any grayed out "special" nodes like the "Datasets" node in a study.
Reorder Columns
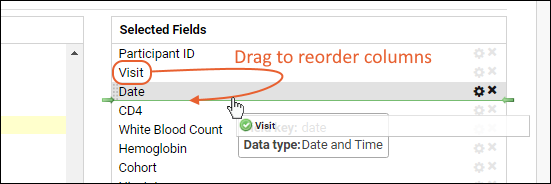
To reorder the columns, drag and drop the fields in the
Selected Fields pane. Columns will appear left to right as they are listed top to bottom. Changing the display order for a grid view does not change the underlying data table.
Change Column Display Name
Hover over any field in the
Selected Fields panel to see a popup with more information about the key and datatype of that field, as well as a description if one has been added.
To change the column display title, click the
(Edit title) icon. Enter the new title and click
OK. Note that this does not change the underlying field name, only how it is displayed in the grid.
Remove Columns
To remove a column, hover over the field in the
Selected Fields pane, and click
(Remove column) as shown in the image above.
Removing a column from a grid view does not remove the field from the dataset or delete any data.
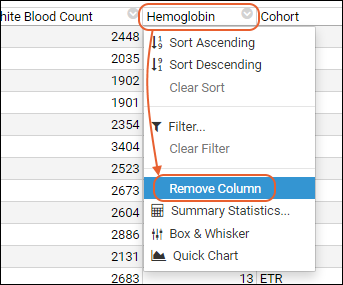
You can also remove a column directly from the grid (without opening the view customizer) by clicking the column header and selecting
Remove Column. After doing so, you will see the "grid view has been modified" banner and be able to revert, edit, or save this change.
Save Grid Views
When you are satisfied with your grid, click
Save. You can save your version as the default grid view, or as a new named grid view.
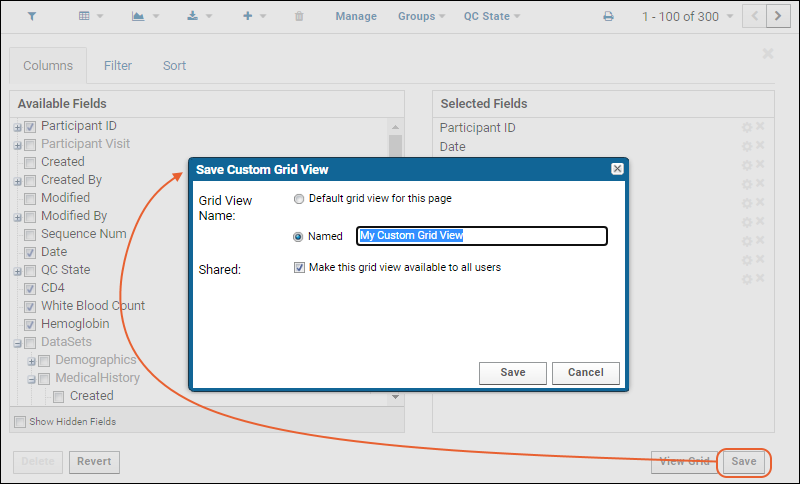
In the popup, select:
- Grid View Name:
- "Default grid view for this page": Save as the grid view named "Default".
- "Named": Select this option and enter a title for your new grid view. This name cannot be "Default" and if you use the same name as an existing grid view, your new version will overwrite the previous grid by that name.
- Shared: By default a customized grid is private to you. If you have the "Editor" role or "Shared View Editor" role (or higher) in the current folder, you can make a grid available to all users by checking the box Make this grid view available to all users.
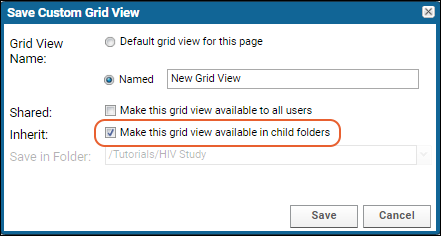
- Inherit: If present, check the box to make this grid view available in child folders.
In this example, we named the grid "My Custom Grid View" and it was added to the
(Grid Views) pulldown menu.
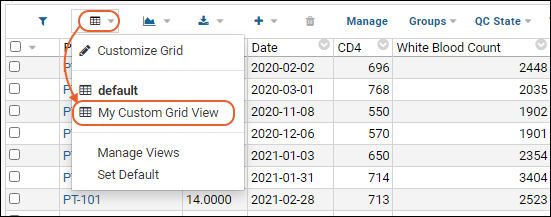
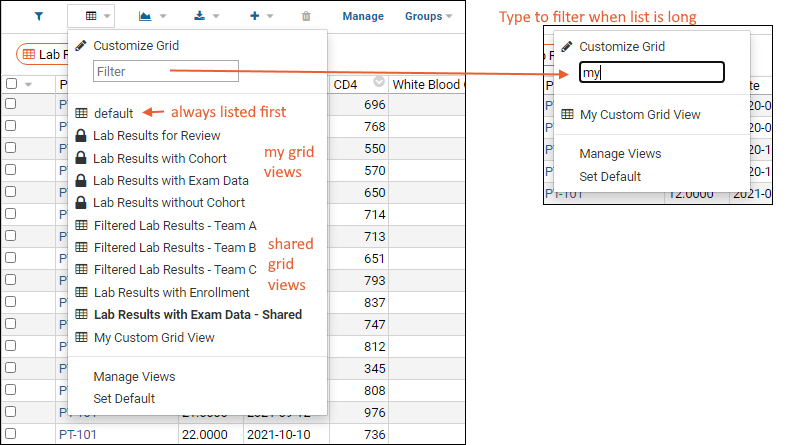
Saved grid views appear on the
(Grid Views) pulldown menu. On this menu, the "Default" grid is always first, then any grids saved for the current user (shown with a
icon), then all the shared grid views. If a customized version of the "Default" grid view has been saved but not shared by the current user, it will also show a lock icon, but can still be edited (or shared) by that user.
When the list of saved grid views is long, a
Filter box is added. Type to narrow the list making it easier to find the grid view you want.
In a study, named grid views will be shown in the Data Views webpart when "Queries" are included. Learn more in this topic:
databrowser
Save Filtered and Sorted Grids
You can further refine your saved grid views by including saved filters and sorts with the column configuration you select. You can define filters and sorts directly in the view customizer, or get started from the user interface using column menu filters and sorts.
Learn about saving filters and sorts with custom grid views in this topic:
Note: When saving or modifying grid views of
assay data, note that run filters may have been saved with your grid view. For example, if you customize the default grid view while viewing a single run of data, then import a new run, you may not see the new data because of the previous filtering to the other single run. To resolve this issue:
- Select (Grid Views) > Customize Grid.
- Click the Filters tab.
- Clear the Row ID filter by clicking the 'X' on it's line.
- Click Save, confirm Default grid view for this page is selected.
- Click Save again.
Include Column Visualizations and Summary Statistics
When you save a default or named grid, any
Column Visualizations or
Summary Statistics in the current view of the grid will be saved as well. This lets you include quick graphical and statistical information when a user first views the data.
For example, this grid in our example study includes both column visualizations and summary statistics:
Reset the Default Grid View
Every data structure has a grid view named "Default" but it does not have to be the default shown to users who view the structure.
- To set the default view to another named grid view, select (Grid Views) > Set Default.
- The current default view will be shown in bold.
- Click Select for the grid you prefer from the list available. The newly selected on will now be bold.
- Click Done.
Revert to the Original Default Grid View
- To revert any customizations to the default grid view, open it using (Grid Views) > Default.
- Select (Grid Views) > Customize Grid.
- Click the Revert button.
Views Web Part
To create a web part listing all the customized views in your folder, an administrator can create an additional web part:
- Enter > Page Admin Mode
- In the lower left, select Views from the Select Web Part menu.
- Click Add.
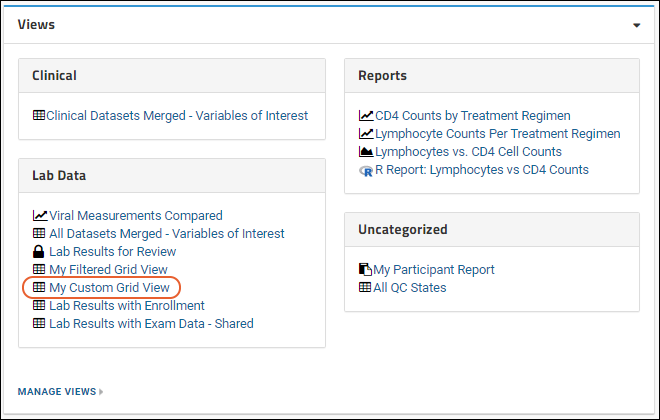
- The web part will show saved grid views, reports, and charts sorted by categories you assign. Here we see the new grid view we just created.
Inheritance: Making Custom Grids Available in Child Folders
In some cases, listed in the table below, custom grids can be "inherited" or made available in child folders. This generally applies to cases like queries that can be run in different containers, not to data structures that are scoped to a single folder. Check the box to
Make this grid view available in child folders.
The following table types support grid view inheritance:
| Table Type | Supports Inheritance into Child Folders? |
|---|
| Query | Yes (Also see Edit Query Properties) |
| Linked Queries | Yes (Also see Edit Query Properties) |
| Lists | No |
| Datasets | No |
| Query Snapshots | No |
| Assay Data | Yes |
| Sample Types | Yes |
| Data Classes | Yes |
Troubleshooting
Why Can't I Add a Certain Column?
In a study, why can't I customize my grid to show a particular field from another dataset?
Background: To customize your grid view of a dataset by adding columns from another dataset, it must be possible to join the two datasets. The columns used for a dataset's
key influence how this dataset can be joined to other tables. Certain datasets have more than one key column (in other words, a "compound key"). In a study, there are three types of datasets, distinguished by how you set
Data Row Uniqueness when you create the dataset:
- Demographic datasets use only the Participants column as a key. This means that only one row can be associated with each participant in such a dataset.
- Clinical (or standard) datasets use Participant/Visit (or Timepoint) pairs as a compound key. This means that there can be many rows per participant, but only one per participant at each visit or date.
- Datasets with an additional key field including assay or sample data linked into the study. In these compound key datasets, each participant can have multiple rows associated with each individual visit; these are uniquely differentiated by another column key, such as a rowID.
Consequences: When customizing the grid for a table, you cannot join in columns from a table with more key columns. For example, if you are looking at a demographics dataset in a study, you cannot join to a clinical dataset because the clinical dataset can have multiple rows per participant, i.e. has more columns in its key. There isn't a unique mapping from a participant in the 'originating' dataset to a specific row of data in the dataset with rows for 'participant/visit' pairs. However, from a clinical dataset, you can join either to demographic or other clinical datasets.
Guidance: To create a grid view combining columns from datasets of different 'key-levels', start with the dataset with more columns in the key. Then select a column from the table with fewer columns in the key. There can be a unique mapping from the compound key to the simpler one - some columns will have repeated values for several rows, but rows will be unique.
Show CreatedBy and/or ModifiedBy Fields to Users
In LabKey data structures, there are built in lookups to store information about the users who create and modify each row. You can add this data to a customized grid by selecting/expanding the
CreatedBy and/or
ModifiedBy fields and checking the desired information.
However, the default lookup for such fields is to the
core.SiteUsers table, which is accessible only to site administrators; others see only the row for their own account. If you wish to be able to display information about other users to a non-admin user, you need to customize the lookup to point to the
core.Users table instead. That table has the same columns but holds only rows for the users in the current project, restricting how much information is shared about site-wide usage to non-admins. From the schema descriptions:
- core.SiteUsers: Contains all users who have accounts on the server regardless of whether they are members of the current project or not. The data in this table are available only to site administrators. All other users see only the row for their own account.
- core.Users: Contains all users who are members of the current project. The data in this table are available only to users who are signed-in (not guests). Guests see no rows. Signed-in users see the columns UserId, EntityId, and DisplayName. Users granted the 'See User and Group Details' role see all standard and custom columns.
To adjust this lookup so that non-admins can see
CreatedBy details:
- Open > Go To Module > Query.
- If you don't have access to this menu option, you would need higher permissions to make this change.
- Select the schema and table of interest.
- Click Edit Metadata.
- Scroll down and click Edit Source.
- Add the following to the </columns> section:
<column columnName="CreatedBy">
    <fk>
      <fkDbSchema>core</fkDbSchema>
      <fkTable>Users</fkTable>
      <fkColumnName>UserId</fkColumnName>
    </fk>
  </column>
- Click Save & Finish.
Now anyone with the "Reader" role (or higher) will be able to see the display name of the user who created and/or modified a row when it's included in a custom grid view.
How do I recover from a broken view?
It is possible to get into a state where you have a "broken" view, and the interface can't return you to the editor to correct the problem. You may see a message like:
View has errors
 org.postgresql.util.PSQLException:  … details of error
Suggestions:
- It may work to log out and back in again, particularly if the broken view has not been saved.
- Depending on your permissions, you may be able to access the view manager by URL to delete the broken view. The Folder Administrator role (or higher) is required. Navigate to the container and edit the URL to replace "/project-begin.view?" with: This will open a troubleshooting page where admins can delete or edit customized views. On this page you will see grid views that have been edited and saved, including a line with no "View Name" if the Default grid has been edited and saved. If you delete this row, your grid will 'revert' any edits and restore the original Default grid.
- If you are still having issues with the Default view on a grid, try accessing a URL like the following, replacing <my_schema> and <my_table> with the appropriate values:
/query-executeQuery.view?schemaName=<my_schema>&query.queryName=<my_table>
Customize Grid and Other Menus Unresponsive
If you find grid menus to be unresponsive in a LabKey Study dataset, i.e. you can see the menus drop down but clicking options do not have any effect, double check that there are no apostrophes (single quote marks) in the definition of any cohorts defined in that study.
Learn more
here.
Related Topics


 The following table types support grid view inheritance: