This topic covers using the
Field Editor, the user interface for defining and editing the fields that represent columns in a grid of data. The set of fields, also known as the schema or "domain", describes the shape of data. Each field, or column, has a main field type and can also have various properties and settings to control display and behavior of the data in that column.
The field editor is a common tool used by many different data structures in LabKey. The method for opening the field editor varies by data structure, as can the types of field available. Specific details about fields of each data type are covered in the topic:
Field Types and Properties.
Topics:
Open the Field Editor
How you open the field editor depends on the type of data structure you are editing.
| Data Structure | Open for Editing Fields |
|---|
| List | Open the list and click Design in the grid header |
| Dataset | In the grid header, click Manage, then Edit Definition, then the Fields section |
| Assay Design | Select Manage Assay Design > Edit Assay Design, then click the relevant Fields section |
| Sample Type | Click the name of the type and then Edit Type |
| Data Class | Click the name of the class and then Edit |
| Study Properties | Go to the Manage tab and click Edit Additional Properties |
| Specimen Properties | Under Specimen Repository Settings, click Edit Specimen/Vial/Specimen Event Fields |
| User Properties | Go to > Site > Site Users and click Change User Properties |
| Issue Definitions | Viewing the issue list, click Admin |
| Query Metadata | Go to > Go To Module > Query, select the desired schema and query, then click Edit Metadata |
If you are learning to use the Field Editor and do not yet have a data structure to edit, you can get started by creating a simple list as shown in the walkthrough of this topic.
- In a folder where you can practice new features, select > Manage Lists.
- Click Create New List.
- Give the list a name and click the Fields section to open it.
Default System Fields for Sample Types and Data Classes
Both Sample Types and Data Classes show
Default System Fields at the top of the
Fields panel. Other data types do not show this section.
- Some system fields, such as Name cannot be disabled and are always required. Checkboxes are inactive when you cannot edit them.
- Other fields, including the MaterialExpDate (Expiration Date) column for Sample Types, can be adjusted using checkboxes, similar to the Description field for Data Classes, shown below.
- Enabled: Uncheck the box in this column to disable a field. This does not prevent the field from being created, and the name is still reserved, but it will not be shown to users.
- Note that if you disable a field, the data in it is not deleted, you could later re-enable the field and recover any past data.
- Required: Check this box to make a field required.
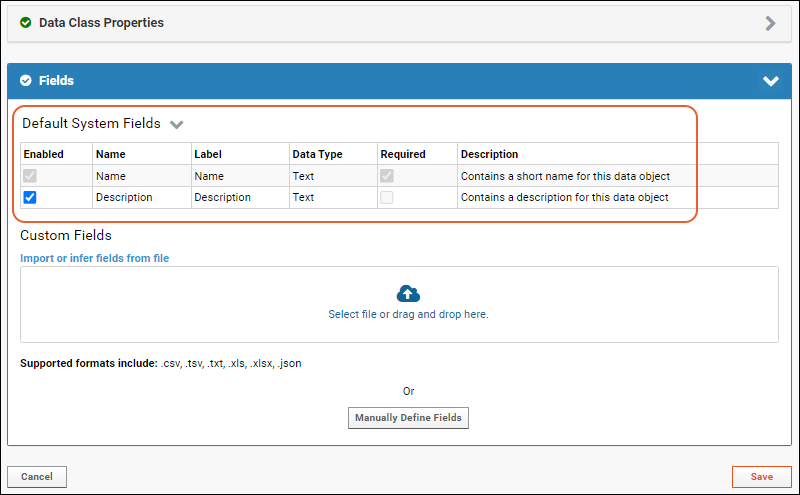
Click the
to collapse this section and move on to any
Custom Fields as for any data type.
Create Custom Fields
- Open your data structure for editing.
- For Sample Types and Data Classes you will see a collapsible panel of Default System Fields. Click the to collapse it for now.
- Decide how you want to define your first custom fields:

Both options are available when the set of fields is empty. Once you have defined some fields by either method, the
manual editor is the only option for adding more fields.
Import or Infer Fields from File
- When the set of fields is empty, you can import (or infer) new fields from a file.
- The range of file formats supported depends on the data structure. Some can infer fields from a data file; all support import from a JSON file that contains only the field definitions.
- When a JSON file is imported, all valid properties for the given fields will be applied. See below.
- Click to select or drag and drop a file of an accepted format into the panel.
- The fields inferred from the file will be shown in the manual field editor, where you may fine tune them or save them as is.
- Note that if your file includes columns for reserved fields, they will not be shown as inferred. Reserved field names vary by data structure and will always be created for you.
Manually Define Fields
- After clicking Manually Define Fields, the panel will change to show the manual field editor. In some data structures, you'll see a banner about selecting a key or associating with samples, but for this walkthrough of field editing, these options are ignored.
- Depending on the type of data structure, and whether you started by importing some fields, you may see a first "blank" field ready to be defined.
- If not, click Add Field to add one.

- Give the field a Name. If you enter a field name with a space in it, or other special character, you will see a warning. It is best practice to use only letters, numbers and underscores in the actual name of a field. You can use the Label property to define how to show this field name to users.
- SQL queries, R scripts, and other code are easiest to write when field names only contain combination of letters, numbers, and underscores, and start with a letter or underscore.
- If you include a dot . in your field name, you may see unexpected behavior since that syntax is also used as a separator for describing a lookup field. Specifically, participant views will not show values for fields where the name includes a .
- Use the drop down menu to select the Data Type.
- The data types available vary based on the data structure. Learn which structures support which types here.
- Each data type can have a different collection of properties you can set.
- Once you have saved fields, you can only make limited changes to the type.
- You can use the checkbox if you want to make it required that that field have a value in every row.

Edit Fields
To edit fields,
reopen the editor and make the changes you need. If you attempt to navigate away with unsaved changes you will have the opportunity to save or discard them. When you are finished making changes, click
Save.
Once you have saved a field or set of fields, you can change the name and most options and other settings. However, you can only make limited changes to the type of a field. Learn about specific type changes
in this section.
Rearrange Fields
To change field order, drag and drop the rows using the six-block handle on the left.

Delete Fields
To remove one field, click the
on the right. It is available in both the collapsed and expanded view of each field and will turn red when you hover.
To delete one or more, use the selection checkboxes to select the fields you want to delete. You can use the box at the top of the column to select all fields, and once any are selected you will also see a
Clear button. Click
Delete to delete the selected fields.
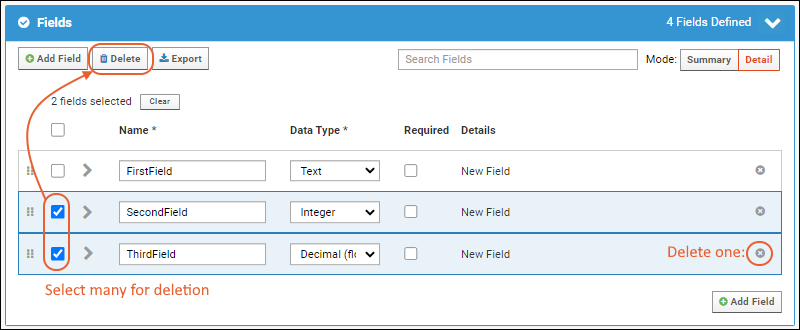
You will be asked to confirm the deletion and reminded that all data in a deleted field will be deleted as well. Deleting a field cannot be undone.
Click
Save when finished.
Edit Field Properties and Options
Each field has a data type and can have additional properties defined. The properties available vary based on the field type. Learn more in this topic:
Field Types and PropertiesTo open the properties for a field, click the
icon (it will become a
handle for closing the panel). For example, the panel for a text field looks like:
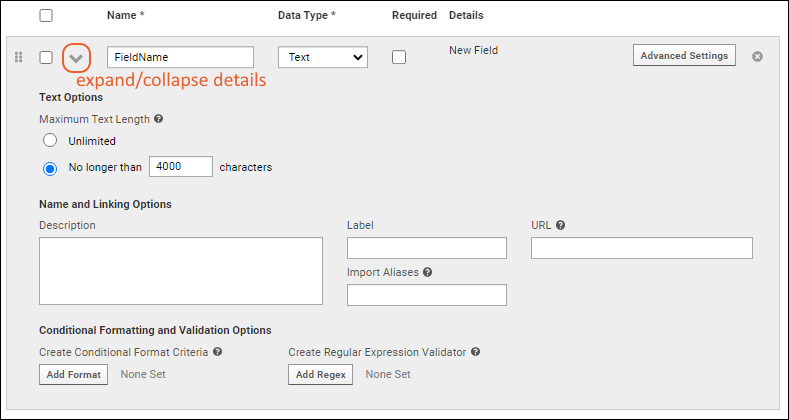
Fields of all types have:
Most field types have a section for
Type-specific Field Options: The details of these options as well as the specific kinds of conditional formatting and validation available for each field type are covered in the topic:
Field Types and Properties.
Name and Linking Options
All types of fields allow you to set the following properties:
- Description: An optional text description. This will appear in the hover text for the field you define. XML schema name: description.
- Label: Different text to display in column headers for the field. This label may contain spaces. The default label is the Field Name with camelCasing indicating separate words. For example, the field "firstName" would by default be labelled "First Name". If you wanted to show the user "Given Name" for this field instead, you would add that string in the Label field.
- Import Aliases: Define alternate field names to be used when importing from a file to this field. This option offers additional flexibility of recognizing an arbitrary number of source data names to map to the same column of data in LabKey. Multiple aliases may be separated by spaces or commas. To define an alias that contains spaces, use double-quotes (") around it.
- URL: Use this property to change the display of the field value within a data grid into a link. Multiple formats are supported, which allow ways to easily substitute and link to other locations in LabKey. The ${ } syntax may be used to substitute another field's value into the URL. Learn more about using URL Formatting Options.
- Ontology Concept: (Premium Feature) In premium editions of LabKey Server, you can specify an ontology concept this field represents. Learn more in this topic: Concept Annotations
Conditional Formatting and Validation Options
Most field types offer
conditional formatting. String-based fields offer regular expression validation. Number-based fields offer range expression validation. Learn about options supported for each type of field
here.
Note that conditional formatting is not supported in Sample Manager, unless used with a Premium Edition of LabKey Server. The LabKey LIMS and Biologics LIMS products both support conditional formats.
Create Conditional Format Criteria
Conditional formats change how data is displayed depending on the value of the data. Learn more in this topic:
To add a conditional format for a field where it is supported:
- Click Add Format to open the conditional format editor popup.
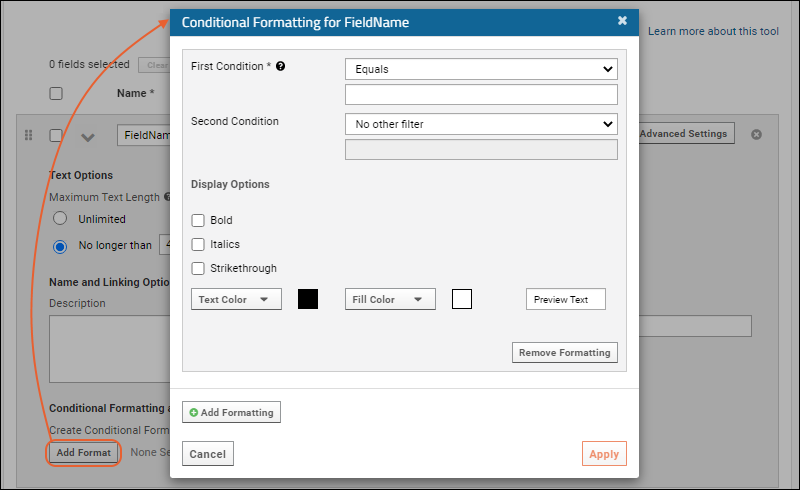
- Specify one or two Filter Type and Filter Value pairs.
- Select Display Options for how to show fields that meet the formatting criteria:
- Bold
- Italic
- Strikethrough
- Text/Fill Colors: Choose from the picker (or type into the #000000 area) to specify a color to use for either or both the text and fill.

- You will see a cell of Preview Text for a quick check of how the colors will look.
- Add an additional format to the same field by clicking Add Formatting. A second panel will be added to the popup.
- When you are finished defining your conditional formats, click Apply.
Create Regular Expression Validator
- Click Add Regex to open the popup.
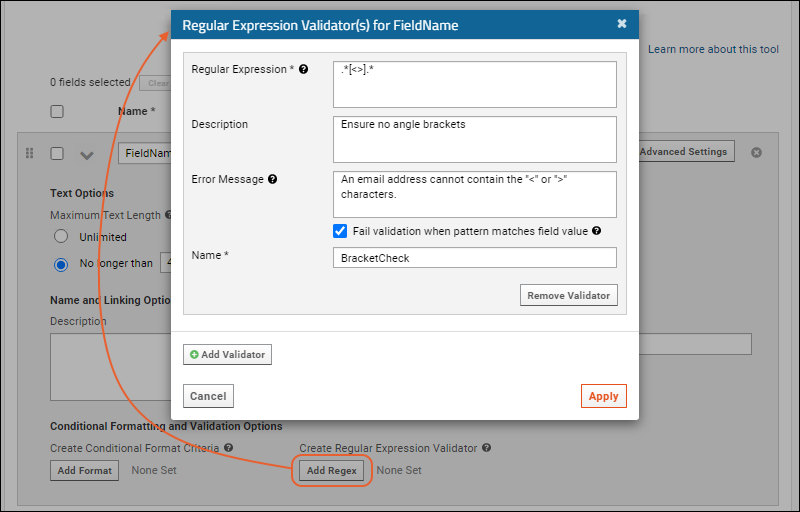
- Enter the Regular Expression that this field's value will be evaluated against.
- All regular expressions must be compatible with Java regular expressions as implemented in the Pattern class.
- You can test your expression using a regex interpreter, such as https://regex101.com/.
- Description: Optional description.
- Error Message: Enter the error message to be shown to the user when the value fails this validation.
- Check the box for Fail validation when pattern matches field value in order to reverse the validation: With this box unchecked (the default) the pattern must match the expression. With this box checked, the pattern may not match.
- Name: Enter a name to identify this validator.
- You can use Add Regex Validator to add a second condition. The first panel will close and show the validator name you gave. You can reopen that panel using the (pencil) icon.
- Click Apply when your regex validators for this field are complete.
- Click Save.
Create Range Expression Validator
- Click Add Range to open the popup.

- Enter the First Condition that this field's value will be evaluated against. Select a comparison operator and enter a value.
- Optionally enter a Second Condition.
- Description: Optional description.
- Error Message: Enter the error message to be shown to the user when the value fails this validation.
- Name: Enter a name to identify this validator.
- You can use Add Range Validator to add a second condition. The first panel will close and show the validator name you gave. You can reopen that panel using the (pencil) icon.
- Click Apply when your range validators for this field are complete.
- Click Save.
Advanced Settings for Fields
Open the editing panel for any field and click
Advanced Settings to access even more options:
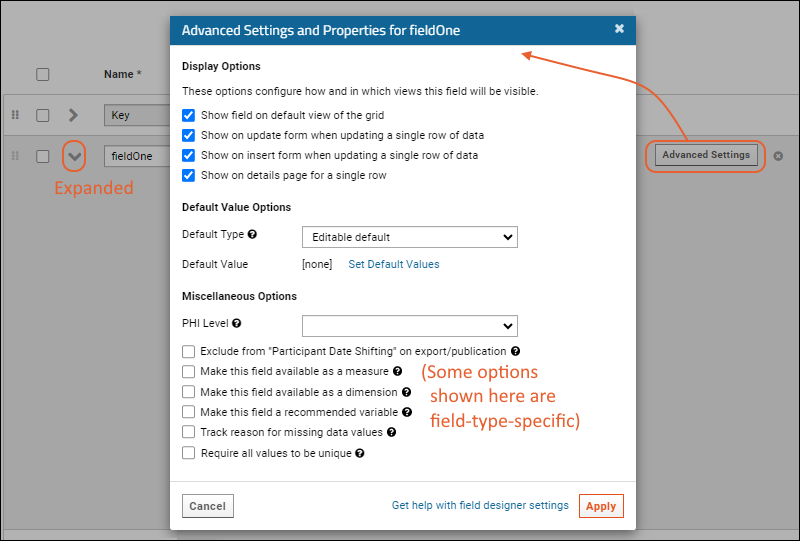
- Display Options: Use the checkboxes to control how and in which contexts this field will be available.
- Show field on default view of the grid
- Show on update form when updating a single row of data
- Show on insert form when updating a single row of data
- Show on details page for a single row
- Default Value Options: Automatically supply default values when a user is entering information. Not available for Sample Type fields or for Assay Result fields.
- Default Type: How the default value for the field is determined. Options:
- Last entered: (Default) If a default value is provided (see below), it will be entered and editable for the user's first use of the form. During subsequent uploads, the user will see their last entered value.
- Editable default: An editable default value will be entered for the user. The default value will be the same for every user for every upload.
- Fixed value: Provides a fixed default value that cannot be edited.
- Default Value: Click Set Default Values to set default values for all the fields in this section.
- Default values are scoped to the individual folder. In cases where field definitions are shared, you can manually edit the URL to set default values in the specific project or folder.
- Note that setting default values will navigate you to a new page. Save any other edits to fields before leaving the field editor.
- Miscellaneous Options:
- PHI Level: Use the drop down to set the Protected Health Information (PHI) level of data in this field. Note that setting a field as containing PHI does not automatically provide any protection of that data.
- Exclude from "Participant Date Shifting" on export/publication: (Date fields only) If the option to shift/randomize participant date information is selected during study folder export or publishing of a study, do not shift the dates in this field. Use caution when protecting PHI to ensure you do not exempt fields you intend to shift.
- Make this field available as a measure: Check the box for fields that contain data to be used for charting and other analysis. These are typically numeric results. Learn more about using Measures and Dimensions for analysis.
- Make this field available as a dimension: (Not available for Date fields) Check the box for fields to be used as 'categories' in a chart. Dimensions define logical groupings of measures and are typically non-numerical, but may include numeric type fields. Learn more about using Measures and Dimensions for analysis.
- Make this field a recommended variable: Check the box to indicate that this is an important variable. These variables will be displayed as recommended when creating new participant reports.
- Track reason for missing data values: Check this box to enable the field to hold special values to indicate data that has failed review or was originally missing. Administrators can set custom Missing Value indicators at the site and folder levels. Learn more about using Missing Value Indicators.
- Require all values to be unique: Check this box to add a uniqueness constraint to this field. You can only set this property if the data currently in the field is unique. Supported for Lists, Datasets, Sample Types, and Data Classes.
View Fields in Summary Mode
In the upper right of the field editor, the
Mode selection lets you choose:
- Detail: You can open individual field panels to edit details.
- Summary: A summary of set values is shown; limited editing is possible in this mode.
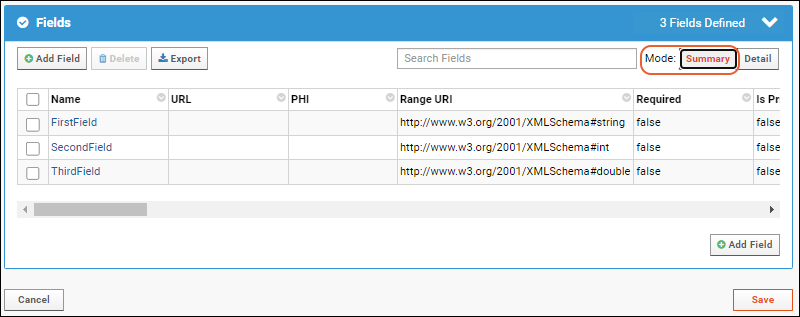
In
Summary Mode, you see a grid of fields and properties, and a simplified interface. Scroll for more columns. Instead of having to expand panels to see things like whether there is a URL or formatting associated with a given field, the summary grid makes it easier to scan and search large sets of fields at once.
You can add new fields, delete selected fields, and export fields while in summary mode.
Export Sets of Fields (Domains)
Once you have defined a set of fields (domain) that you want to be able to save or reuse, you can export some or all of the fields by clicking
(Export). If you have selected a subset of fields, only the selected fields will be exported. If you have not selected fields (or have selected all fields) all fields will be included in the export.

A
Fields_*.fields.json file describing your fields as a set of key/value pairs will be downloaded. All properties that can be set for a field in the user interface will be included in the exported file contents. For example, the basic text field named "FirstField" we show above looks like:
[
    {
        "conditionalFormats": [],
        "defaultValueType": "FIXED_EDITABLE",
        "dimension": false,
        "excludeFromShifting": false,
        "hidden": false,
        "lookupContainer": null,
        "lookupQuery": null,
        "lookupSchema": null,
        "measure": false,
        "mvEnabled": false,
        "name": "FirstField",
        "propertyValidators": [],
        "recommendedVariable": false,
        "required": false,
        "scale": 4000,
        "shownInDetailsView": true,
        "shownInInsertView": true,
        "shownInUpdateView": true,
        "isPrimaryKey": false,
        "lockType": "NotLocked"
    }
]
You can save this file to import a matching set of fields elsewhere, or edit it offline to reimport an adjusted set of fields.
For example, you might use this process to create a dataset in which all fields were marked as measures. Instead of having to open each field's advanced properties in the user interface, you could find and replace the "measure" setting in the JSON file and then create the dataset with all fields set as measures.
Note that importing fields from a JSON file is only supported when creating a new set of fields. You cannot apply property settings to existing data with this process.
Related Topics
 Click the to collapse this section and move on to any Custom Fields as for any data type.
