This topic covers how to move, delete, and rename projects and folders. Naming, casing, and creating hidden projects and folders are also covered. All of these options are available on the folder management page, found via
> Folder > Management.
Move a Folder
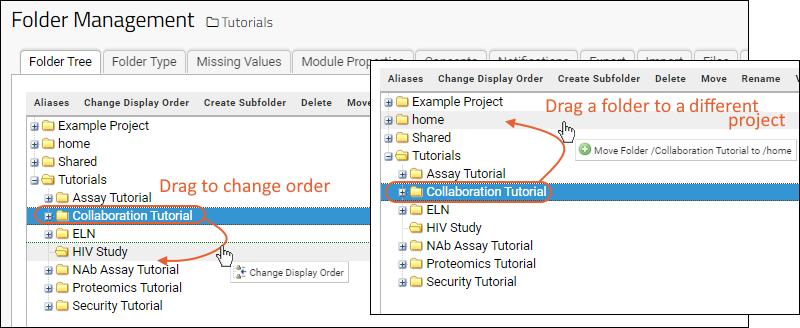
A folder can be moved within a project, or from one folder to another. Remember that folders are peers under a common parent. While both actions are "moving" the folder, the movement within a folder is only changing the display order on menus and in the folder management tree.
- Select > Folder > Management.
- On the Folder Tree tab (open by default).
- Select the folder to move, then drag and drop it into another location in the folder tree. Hover messages will indicate what action you can expect.

- You will be asked to click to confirm the action.
Considerations
When moving a folder from one project to another, there are a few additional considerations:
- If your folder inherits configuration or permissions settings from the parent project, be sure to confirm that inherited settings are as intended after the move to the new parent. An alternative is to export and re-import the folder which gives you the option to retain project groups and role assignments. For details, see Export and Import Permission Settings.
- If the folder is using assay designs or sample types defined at the project level, they will no longer have access to them.
Because a project is a top level folder that is created with different settings and options than an ordinary folder, you cannot promote a folder to be a project.
Since a project is a top-level folder, you can not "move" it into another project or folder, and drag and drop reordering is not supported.
Change Project Display Order
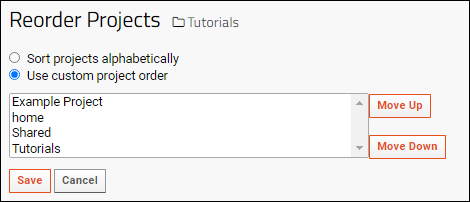
By default, projects are listed on the project and folder menu in alphabetical order. To use a custom order instead:
- On the Folder Tree tab, select any project.
- Click Change Display Order.
- Click the radio button for Use custom project order.
- Select any project and click Move Up or Move Down.
- Click Save when finished.

You can also reorder folders within a project using this interface by first selecting a
folder instead of a project, then clicking
Change Display Order.
Delete a Folder or Project
- On the Folder Tree tab, select the folder or project to delete.
- Click Delete.
- You will see a list of the folder and subfolder contents to review. Carefully review the details of which containers and contents you are about to delete as this action cannot be undone.
- Confirm the deletion by clicking Yes, Delete All.
Rename a Folder or Project
You can change the project or folder
name or the folder
title. The folder name determines the URL path to resources in the folder, so changing the name can break resources that depend on the URL path, such as reports and hyperlinks. If you need to change the folder name, we recommend leaving
Alias current name checked to avoid breaking links into the folder, with the two exceptions below:
- Renaming a project/folder will break any queries and reports that specifically point to the old project/folder name. For example, a query created by the LABKEY.Query API that specifically refers to the old folder in the container path will be broken, even when aliasing is turned on. Such queries and reports that refer to the old container path will need to be fixed manually.
- Renaming a folder will move the @files under the file root to the new path. This means that any links via _webdav to the old folder name will no longer find the file. To avoid broken links, refer to files by paths relative to the container. Full URL links from the base URL to the old name will also resolve correctly, as long as they do not involve the @files fileroot which has now been moved.
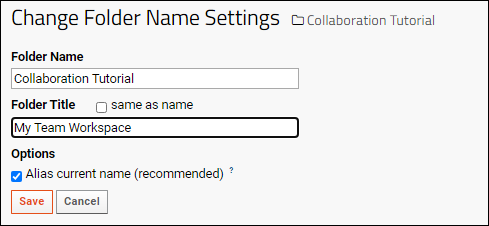
As an alternative to changing the folder name, you can change the title displayed by the folder in page headings. Only page headings are affected by a title change. Navigation menus show the folder name and are unaffected by a folder title change.
- On the Folder Tree tab, select a folder or project.
- Click Rename.

- To change the folder name, enter a new value under Folder Name, and click Save.
- To change the folder title, uncheck Same as Name, enter a new value under Folder Title, and click Save.
- If you want to ensure links to the current name will still work, check the box to Alias current name.
Changing Folder Name Case
Suppose you want to rename the "Demo" folder to the "demo" folder. To change capitalization, rename the folder in two steps to avoid a naming collision, for example, "Demo" to "foo", then "foo" to "demo".
Hidden Projects or Folders
Hidden folders can help admins hide work in progress or admin-only materials to avoid overwhelming end-users with material that they do not need to see.
Folders and projects whose names begin with "." or "_" are automatically hidden from non-admins in the navigation tree. The folder will still be visible in the navigation tree if it has non-hidden subfolders (i.e., folders where the user has read permissions). To hide subfolders of a hidden folder, the admin could prefix the names of these subfolders with a dot or underscore as well.
Hiding a folder only affects its visibility in the navigation tree, not permissions to the folder. If a user is linked to the folder or enters the URL directly, the user will be able to see and use the folder based on permission settings regardless of the "hidden" nature.
Related Topics

