An ODBC (Open Database Connectivity) Connection exposes the LabKey schema and queries as a data source to external clients for analysis and reporting. This enables users to continue
outside tools they may already be using with data stored in LabKey.
This topic covers how to set up the host Windows machine to use the ODBC connection, including installation of the TLS access certificate for each user. An administrator must already have enabled ODBC connections on LabKey Server following this topic:
Topics
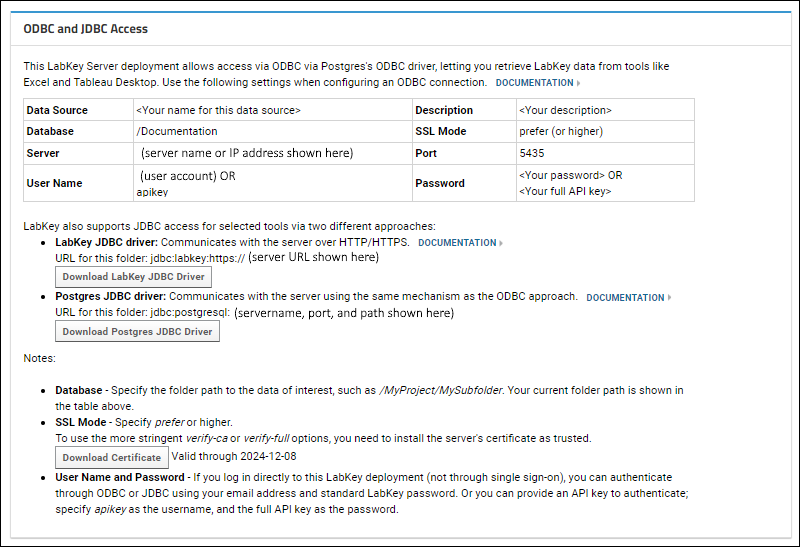
View ODBC Access Settings
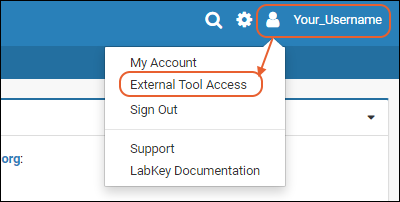
To confirm that configuration has been completed, and obtain the relevant settings to use when setting up your
driver, users can select
(username) > External Tool Access.

If you will be using
a secure ODBC connection, you will need to download and install the certificate from this page and install it on your local machine.
Windows: Install PostgreSQL Driver
On the client machine, install the latest release of the PostgreSQL ODBC driver.
There are 32-bit and 64-bit drivers available. You will need to install the version that matches your client tool, not necessarily the host machine. For example, if you have a 32-bit version of Excel, then install the 32-bit ODBC driver, even if you have a 64-bit machine.
To cover all options, you can install both versions.
Windows: Create a Data Source Name (DSN)
On the client machine, create a "data source name" (DSN) to wrap a data container on LabKey Server. Creating a "system" DSN, as shown below, makes it available to various clients. Client tools use the ODBC driver to query this DSN.
- On Windows, open the ODBC Data Source Administrator.
- Search for it as ODBC Data Sources (##-bit) under Windows Administrative Tools.
- Choose "Run as Administrator".
- Click the System DSN tab.
- Click Add....
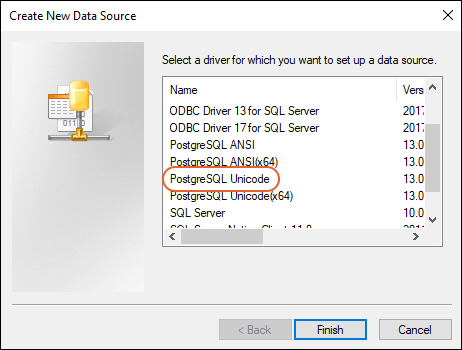
- Select PostgreSQL Unicode from the list. This is the driver you installed above.

- Click Finish.
- Enter the configuration details in the popup:
- Data Source: This is the name you will select within the client tool. If you will need different data source configurations for different tools or different LabKey container paths, differentiate them by name of the data source.
- Description: This can be any text.
- Database: A LabKey container path, that is, the project or folder you are connecting to. Include a leading slash in the path, for example, "/Home" or "/Home/MyDataFolder". Be sure there are no leading or trailing spaces in this path.
- SSL Mode: Use "prefer" or higher. Set to "require" if the target server uses TLS for a secure connection. To use the more stringent "verify-ca" or "verify-full" options, you will need to install the server's certificate as trusted.
- Server: The server you are connecting to, as listed in the External Tool Access grid. For example, www.labkey.org or localhost. Note that for cloud instances of LabKey Server, this URL may differ from the actual server URL; i.e. if your server is lk.myserver.net, the ODBC URL might be lk.myserver-odbc.net.
- Port: This number must match the port enabled on the server. 5435 is the default used by LabKey Server.
- User Name: The user this connection will authenticate against. This user should have at least the Reader role in the LabKey Server container.
- Password: The password for the above user.
- Click Test to ensure the connection is successful.
- Click Save to finish.

Configure PostgreSQL Client for Secure Connections
PostgreSQL supports the following TLS connection modes. When secure connections are enforced through LabKey Server, connections through
disable and
allow modes are not successful.
- disable
- allow
- prefer
- require
- verify-ca
- verify-full
For details on these modes see the PostgreSQL documentation at
Protection Provided in Different Modes .
For modes
verify-ca and
verify-full, users will need to place the certificate for the server in the location specified in the PostgreSQL docs at
Client Verification of Server Certificates If the client has been configured to trust the certificate (by adding it to the CA list)
verify-ca will also work.
Install Certificate on Windows
To use the secure ODBC connection, the user must install the self-signed certificate on their own Windows machine as follows:
- First, if you are using an existing certificate, it is good practice to back it up before making these changes.
- Go to the directory where your driver will expect to find it (creating the "postgresql" subdirectory if it is not already present). Similar to:
C:\Users\username\AppData\Roaming\postgresql
- If there is a root.crt file, make a backup copy of it (such as backupRoot.crt).
- You will append the new certificate to the end of the original root.crt file.
- Obtain the new certificate from within LabKey Server:
- From the (user) menu, select External Tool Access.

- You will see the current ODBC access settings. Click Download Certificate to download the certificate.
- In the same directory as identified above, (i.e. C:\Users\username\AppData\Roaming\postgresql) append the new certificate to your existing root.crt file, or create a new root.crt file to contain it.
- More instructions about obtaining and placing the certificate are available here:
Related Topics

