An administrator can add custom menus to offer quick pulldown access to commonly used tools and pages from anywhere within a project. Custom menus will appear in the top bar of every page in the project, just to the right of the project and folder menus. For example, the LabKey Server Documentation is itself part of a project featuring custom menus:

Included in this topic:
Add a Custom Menu
- From the project home page, select > Folder > Project Settings.
- Click the Menu Bar tab.
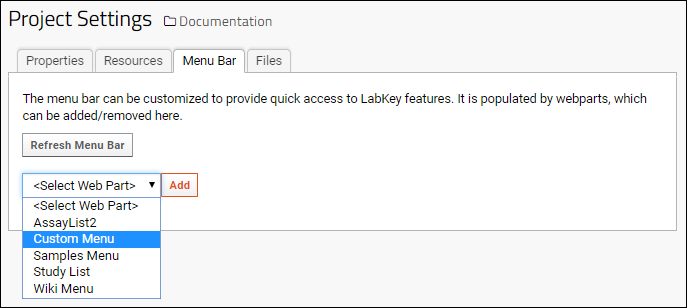
There are several types of menu web part available. Each web part you add to this page will be available on the header bar throughout the project, ordered left to right as they are listed top to bottom on this page.
The
Custom Menu type offers two options, the simplest being to create a menu of folders.
Folders Menu
- On the Create Custom Menu page, add a Custom Menu web part.
- The default Title is "My Menu"; edit it to better reflect your content.
- Select the radio button for Folders.
- Elect whether to include descendents (subfolders) and whether to limit the choice of root folder to the current project. If you do not check this box, you can make a menu of folders available anywhere on the site.
- Select the Root Folder. Children of that root will be listed as the menu. The root folder will not be presented on the menu itself, so you might choose to use it as the title of the menu.
- The Folder Types pulldown allows you to limit the type of folder on the menu if desired. For example, you might want a menu of workbooks or of flow folders. Select [all] or leave the field blank to show all folders.
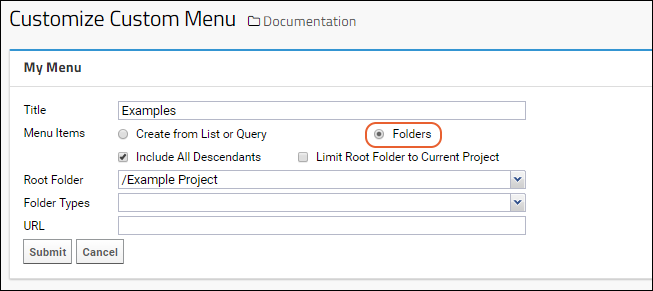
- Click Submit to save your new menu.
- You will now see it next to the project menu, and there will be a matching web part on the Menu Bar tab of Project Settings. The links navigate the user to the named subfolder.
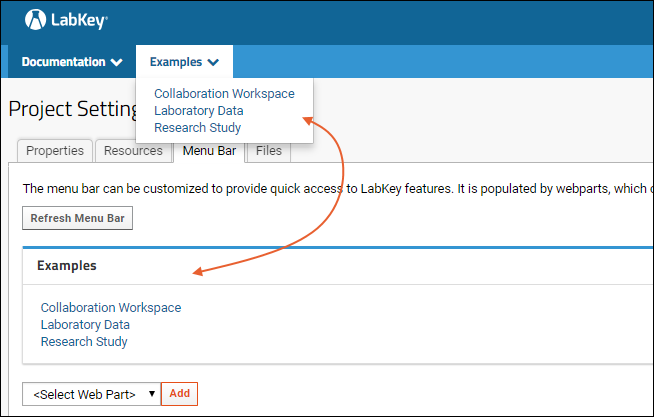
Continue to add a web part on this page for each custom menu you would like. Click
Refresh Menu Bar to apply changes without leaving this page.
List or Query Menu
The other option on the creation page for the
Custom Menu web part is "Create from List or Query". You might want to offer a menu of labs or use a query returning newly published work during the past week.
- On the Menu Bar page, add a Custom Menu web part.
- The default Title is "My Menu"; edit it to better reflect your content.
- Select Create from List or Query.
- Use the pulldowns to select the following in order. Each selection will determine the options in the following selection.
- Folder: The folder or project where the list or query can be found.
- Schema: The appropriate schema for the query, or "lists" for a list.
- Query: The query or list name.
- View: If more than one view exists for the query or list, select the one you want.
- Title Column: Choose what column to use for the menu display. In the "Labs" example shown here, perhaps "Principal Investigator" would be another display option.
- Click Submit to create the menu.
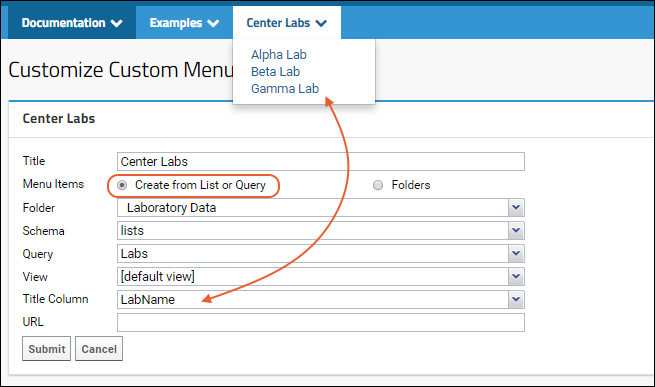
- Each item on the menu will link to the relevant list or query result.
Resource Menus
There are three built in custom menu types which will display links to all of the specific resources in the project. There are no customization options for these types.
Study List
If your project contains one or more studies, you can add a quick access menu for reaching the home page for any given study from the top bar.
- Return to the Menu Bar tab.
- Add a Study List web part. Available studies will be listed in a new menu named "Studies".
If no studies exist, the menu will contain the message "No studies found in project <Project_Name>."
Assay List
If your project contains Assays, you can add a menu listing them, along with a manage button, for easy access from anywhere in your project.
- Return to the Menu Bar tab.
- Add an AssayList2 web part. Available assays will be listed in a new menu named "Assays".
If no assays exist, the menu will only contain the
Manage Assays button.
Samples Menu
The
Samples Menu similarly offers the option of a menu giving quick access to all the sample types in the project - the menu shows who uploaded them and when, and clicking the link takes you directly to the sample type.
- Return to the Menu Bar tab.
- Add an Samples Menu web part. Available sample types will be listed in a new menu named "Samples".
If no samples exist, the menu will be empty.
Define a Menu in a Wiki
By creating a wiki page that is a series of links to other pages, folders, documents, or any destination you choose, you can customize a basic menu of common resources users can access from anywhere in the project.
- Create a new Wiki web part somewhere in the project where it will become a menu.
- Click Create a new wiki page in the new web part.
- Give your new page a unique title (such as "menuTeamA").
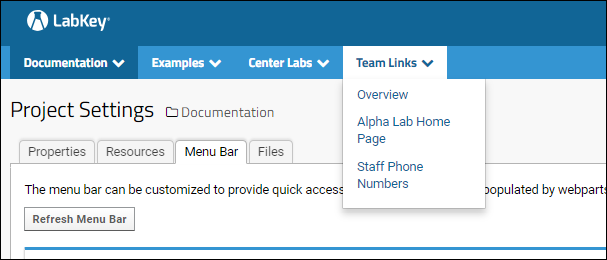
- Name your wiki as you want the menu title to appear "Team Links" in this example.
- Add links to folders and documents you have already created, in the order you want them to appear on the menu. For example, the wiki might contain:
[Overview|overview]

[Alpha Lab Home Page|http://localhost:8080/labkey/project/Andromeda/Alpha%020/begin.view?]

[Staff Phone Numbers|directory]
- In this example, we include three menu links: the overview document, the home page for the Alpha Lab, and the staff phone list document in that order.
- Save and Close the wiki, which will look something like this:

To add your wiki as a custom menu:
- Return to > Folder > Project Settings. Click the Menu Bar tab.
- Select Wiki Menu from the <Add Web Part> pulldown and click Add. An empty wiki menu (named "Wiki") will be added.
- In the new web part, select Customize from the (triangle) menu.
- Select the location of your menu wiki from the pulldown for Folder containing the page to display. The "Page to display" pulldown will automatically populate with all wikis in that container.
- Select the menu wiki you just created, "menuTeamA (Team Links)" from the pulldown for Page to display:
- Click Submit to save.
- If your menu does not immediately appear in the menu bar, click Refresh Menu Bar.
- The team can now use your new menu anywhere in the Andromeda project to quickly access content.
Menu Visibility
By selecting the
Permissions link from the pulldown on any menu web part on the
Menu Bar tab, you can choose to show or hide the given menu based on the user's permission.
You must enter
> Page Admin Mode to see the "Permissions" option.
The
Required Permission field is a pulldown of all the possible
permission role levels.
Check Permission On: allows you to specify where to check for that permission.
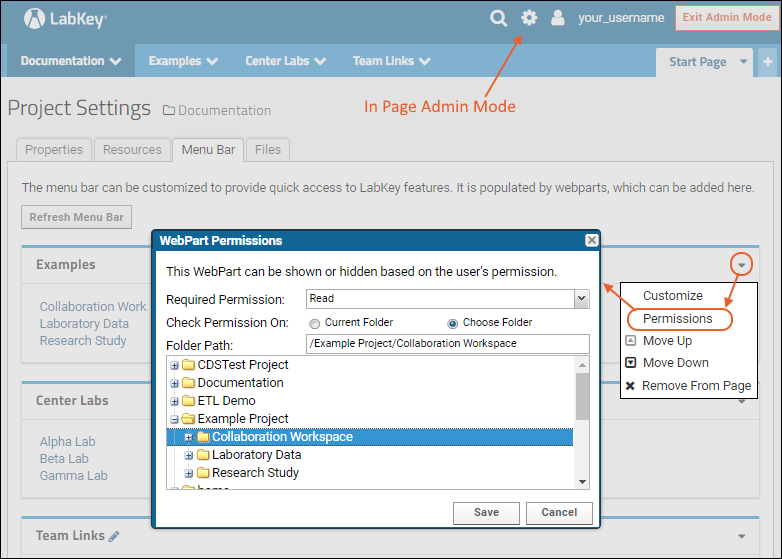
If the user does not have the required permission (or higher) on the specified location, they will not see that particular menu.
Define a New Menu Type in a Custom Module
If you have defined a web part type inside a custom module (for details of the example used here see
Tutorial: Hello World Module), you can expose this web part as new type of custom menu to use by adding <location name="menu"> to the appropriate .webpart.xml file, for example:
<webpart xmlns="http://labkey.org/data/xml/webpart"
  title="Hello World Web Part">
    <view name="begin"/>
    <locations>
        <location name="menu"/>
        <location name="body"/>
    </locations>
</webpart>
Your web part will now be available as a menu-type option:
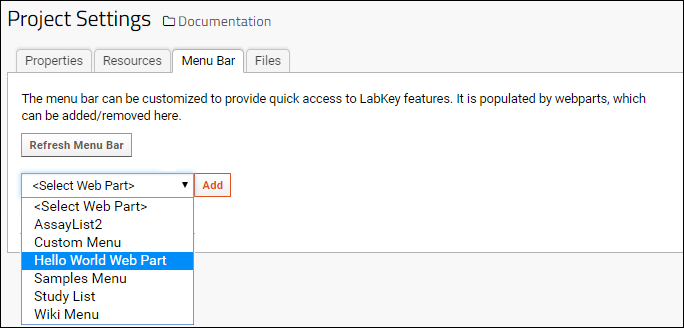
The resulting menu will have the same title as defined in the view.xml file, and contain the contents. In the example from the Hello World Tutorial, the menu "Begin View" will show the text "Hello, World!"

