Default Luminex® assay designs include properties specific to the technology, and beyond the default properties included in
General assay designs. The general process for designing an assay is described in
Design a New Assay. A design based on the built-in defaults for Luminex is defined in the Luminex assay tutorials (
Step 1: Create a New Luminex Assay Design). This page offers additional details on the default properties defined for this type of assay.
For optional, additional properties that are used by the Luminex QC transform script, see
below, or review
Review Fields for Script.
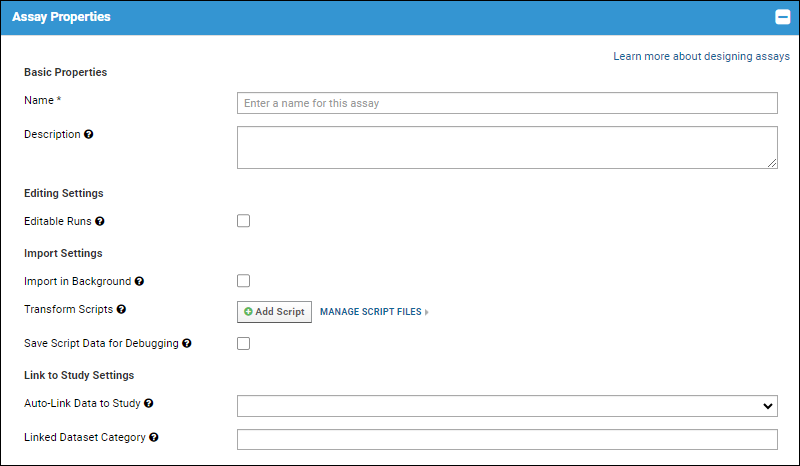
Assay Properties

Import in Background
Using this option is particularly helpful when you have large runs that are slow to upload. If this setting is enabled, assay uploads are processed as jobs in the data pipeline.
You will see the
Upload Jobs page while these runs are being processed. Your current jobs are marked "Running." When the jobs have completed, you will see "Completed" instead of "Running" for the job status for each. If you see "Error" instead of completed, you can see the log files reporting the problem by clicking on "Error." Luminex assay properties (batch, run, well role/titration settings, and analyte properties) are also written to the log file to assist in diagnosing upload problems.
When the
Status of all of your jobs is "Completed", click the
Description link for one of the runs to see all of the data for this run.
Transform Scripts
Add any transform script here by clicking
Add Script, then either uploading the script or specifying the path. During script development, you can also check the box to
Save Script Data for Debugging.
Learn more in this topic:
Link to Study Settings
If you want the assay to
Auto-Link Data to Study, select the target study here. You can also choose the
Linked Dataset Category if desired.
Learn more in this topic:
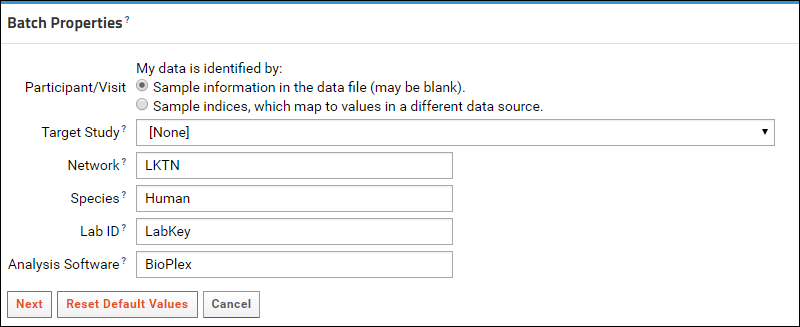
Batch Properties
The user is prompted for batch properties once for each set of runs during import. The batch is a convenience to let users set properties once and import many runs using the same suite of properties.

Included by default:
- Participant Visit Resolver: Required. This field records the method used to associate the assay with participant/visit pairs. The user chooses a method of association during the assay import process.
- TargetStudy: Including this field simplifies linking assay data to a study, but it is not required. Alternatively, you can create a property with the same name and type at the run level so that you can then link each run to a different study.
- Network: Enter the network.
- Species: Enter the species under study.
- LabID: The lab where this experiment was performed.
- Analysis Software: The software tool used to analyze results. For LabKey's Luminex tool, this is typically "Bioplex."
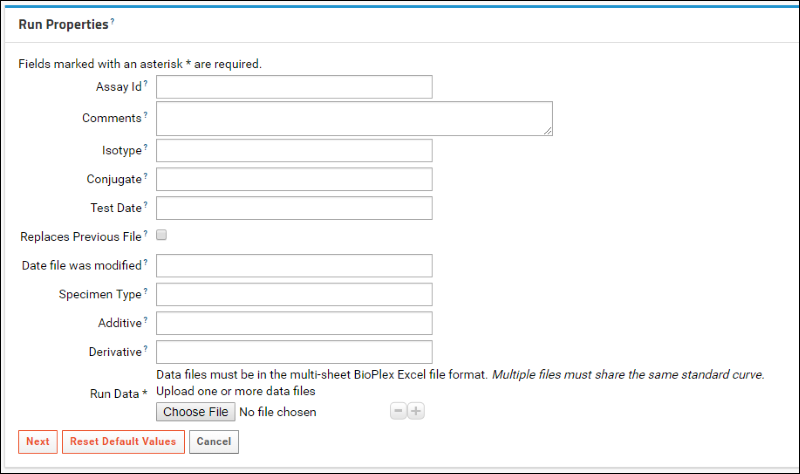
Run Properties
The user is prompted to enter run level properties for each imported file. These properties are used for all data records imported as part of a Run.

Included by default:
- Assay Id: If not provided, the file name is used.
- Comments
- Isotype
- Conjugate
- Test Date
- Replaces Previous File: Boolean
- Date file was modified
- Specimen Type
- Additive
- Derivative
- Run Data (Required): Data files must be in the multi-sheet BioPlex Excel file format.
Well Roles
The user is prompted to select well roles next. If a sample appears at several different dilutions, we infer you have titrated it. During the import process for the run, you can indicate whether you are using the titrated sample as a standard, quality control, or unknown.
Included by default:
- Well Roles for Standard, QC Control, and Other Control
- Single Point Controls
A standard is typically the titration used in calculating estimated concentrations for unknowns based on the standard curve. A quality control is typically a titration used to track values like AUC and EC50 over time for quality purposes. Learn more in
Luminex Calculations.
In this panel you will also see checkboxes for
Tracked Single Point Controls. Check a box if you would like to generate a Levey-Jennings report to track the performance of a single-point control. Learn more in the Level II tutorial which includes:
Step 5: Track Analyte Quality Over Time and
Track Single-Point Controls in Levey-Jennings Plots.
Analyte Properties
On the same page as well roles, the
Analyte Properties section is used to supply properties that may be specific to each analyte in the run, or shared by all analytes in the run. They are not included in the data file, so need to be entered separately. For example, these properties may help you track the source of the analytes or beads used in the experiments, for the purpose of quality control. In the second Luminex tutorial we
track two lots of analytes using these properties.
For each analyte the user enters (a checkbox allows entering the same value for all analytes for any property):
- Standard Name
- Analyte Type
- Weighting Method
- Bead Manufacturer
- Bead Dist
- Bead Catalog Number
- Use Standard: Elect whether to use the standard specified under well roles as the standard for a given analyte.
Additional analyte properties present in the data:
- PositivityThreshold: The positivity threshold.
- AnalyteWithBead: The name of the analyte including the bead number.
- BeadNumber: The bead number.
Excel File Run Properties
When the user imports a Luminex data file, the server will try to find these properties in the header and footer of the spreadsheet, and does not prompt the user to enter them.
Included by default:
- File Name
- Description
- Acquisition Date (DateTime)
- Reader Serial Number
- Plate ID
- RP1 PMT (Volts)
- RP1 Target
Parsing of the Description Field
The Excel file format includes a single field for sample information, the
Description field. LabKey Server will automatically attempt to parse the field to split it into separate fields if it contains information like Participant and Date. Formats supported include:
- <SpecimenId>; <PTID>, Visit <VisitNumber>, <Date>, <ExtraInfo>
- <SpecimenId>: <PTID>, Visit <VisitNumber>, <Date>, <ExtraInfo>
- <PTID>, Visit <VisitNumber>, <Date>, <ExtraInfo>
The "Visit" before the visit number itself is optional. <Date> and <ExtraInfo> are optional as well. LabKey Server will use the value of the "TargetStudy" field (specified as a batch or run field), if present, to resolve the SpecimenId.
Results/Data Properties
The user is prompted to enter data values for each row of data associated with a run.
Not included by default in the design, but should be considered:
- SpecimenID: For Luminex files, data sources are uniquely identified using SpecimenIDs, which in turn point to ParticipantID/VisitID pairs. For Luminex Assays, we automatically extract ParticipantID/VisitID pairs from the SpecimenID. If you exclude the SpecimenID field, you will have to enter SpecimenIDs manually when you copy the data to a study.
Additional Properties for the Transform Script
The LabKey Luminex transform script calculates additional values (e.g., curve fits and negative bead subtraction) that are used by the LabKey Luminex tool. Custom batch, run, analyte, and data properties used by this script are covered in these pages:
Customize Luminex Assay for Script and
Review Fields for Script. Some useful assay properties are listed here:
Assay Properties
| Field Label | Value | Description |
|---|
| Editable Runs | Unchecked | When selected, allows run data to be edited after import by default. If you allow editing of run data, you may wish to uncheck Advanced Settings > Display Options > Show on update form... in the domain editor for each field used or calculated by the script. The script runs only on data import, so preventing later editing of such fields is necessary for calculated data to continue matching the values displayed for the fields in the assay. |
| Import in Background | Unchecked | When selected, runs are imported in the background, allowing you to continue work on the server during import. This can be helpful for importing large amounts of data. This tutorial leaves this value unchecked merely for simplicity of workflow. For further information on what happens when you check this property, see Luminex Properties. |
| Transform Script | -- | Path to the LabKey Luminex transform script. The path provided must be local to your server. The default path provided in a XAR will be usable only on the server where the XAR was created. |
Related Topics