This topic details the minimal number of setup steps necessary to create a custom Luminex assay that works with the LabKey Luminex transform script. You can start from the default Luminex assay type that is built into the server, or as an alternative, it may be easier to start with the XAR-generated assay design used by the
Luminex Assay Tutorial Level II and customize the design to your needs.
It may be helpful to use the
Review Fields for Script page in addition to this topic.
Create a New Assay Design
These steps assume that you are in a "Luminex" folder (of type "Assay"), as described in
Set Up Luminex Tutorial Folder.
- Select > Manage Assays.
- Click New Assay Design.
- Click the Specialty Assays tab.
- Under Use Instrument Specific Data Format, choose Luminex.
- For the Assay Location, choose Current Folder (folder name). This is important to ensure that lookups to lists in the same folder will work.
- Click Choose Luminex Assay.
- Give the new assay design a Name.
- Optional: Check the Import in Background box.
- Checking this box means that assay imports will be processed as jobs in the data pipeline, which is helpful because Luminex runs can take a while to load.
- Add fields as described in the following sections before clicking Save in the bottom right.
Add Script-specific Fields
Make sure not to put a space in the
Name property for any field you add. See
Review Fields for Script page for details about each field.
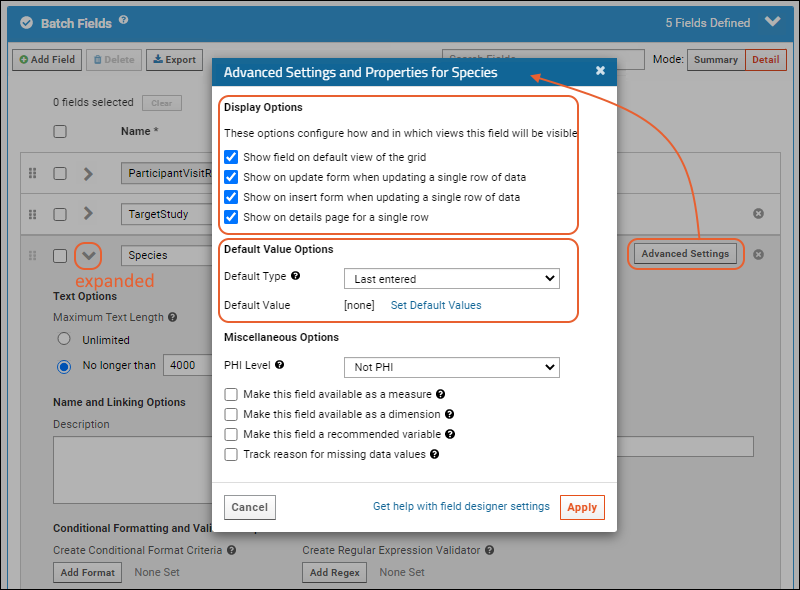
Advanced settings and properties let you customize field behavior. For example, you can hide, and thus prevent editing of particular values after a run has been imported - in cases where those values are used for calculations/graphs during import. For example, we don't want the user inadvertently changing the script version each time they run it. It should only change when the version actually changes.
You can also use
Default Value Options to guide your users with smart defaults on a per-folder basis.

Add Batch Fields
- In the Batch Fields section, click the Add Field button for each of the following:
- Add a field for TransformVersion, expand it, then click Advanced Settings.
- Optional: Uncheck the Shown on insert… and Show on update… options (so that the user is not asked to enter a value).
- Optional: Change the Default Type to Fixed Value (so that you can specify a fixed value for the default for this field).
Add Run Fields
- In the Run Fields section:
- Add a field for NotebookNo of type Text.
- Add a field for SubtNegativeFromAll of type Boolean.
- Optional: In the Advanced Settings, uncheck the Show on update.. and Show on insert... boxes.
- Add a field for StndCurveFitInput:
- The type of this field can be either Text or a lookup to a list which has the following three string values: FI, FI-Bkgd, FI-Bkgd-Neg.
- Optional: In the Advanced Settings, uncheck the Show on update.. and Show on insert... boxes.
- Optional: based on the lab preference, you may want to set the Default Type for this field to either remember the last entered value or to have an editable default value selected (the script defaults to using the “FI” column if no value is specified for the StndCurveFitInput field). When creating this lookup and others, you may find it useful to import the list archive provided in the Set Up Luminex Tutorial Folder. If you import this archive of lists into the same folder as your assay, you can set this field to target the relevant list.
- Add a field for UnkCurveFitInput:
- The type of this field can be either Text or a lookup to a list which has the following three string values: FI, FI-Bkgd, FI-Bkgd-Neg.
- Optional: In the Advanced Settings, uncheck the Show on update.. and Show on insert... boxes.
- Optional: Based on the lab preference, you may want to set the Default Type of this field to either remember the last entered value or to have an editable default value selected (the script defaults to using the “FI” column if no value is specified for the UnkCurveFitInput field)
- Optional: Add a field for CalculatePositivity of type Boolean.
- Optional: Add a field for BaseVisit of type Decimal.
- Optional: Add a field for PositivityFoldChange of type Decimal.
Add Analyte Properties
- In the Analyte Properties section:
- Add a field for LotNumber of type Text.
- Optional: Add a field for NegativeControl of type Boolean.
Add Data Fields
- In the Assay Data Fields section:
- Add a field for FIBackgroundNegative of type Decimal.
- Optional: Add a field for Positivity of type Text.
- Optional: Add the optional Data Property fields listed in Appendix D of Review Fields for Script. These are filled in by the transform script and may be interesting to statisticians.
Once all of the custom properties have been added to the assay design, click
Save in the lower right.
Customize Data Grids
Any properties you add to the assay design can also be added to the various results, run, and batch grid views for the assay using the
(Grid Views) > Customize Grid menu option.
Related Topics