Sample data can be integrated into a LabKey Study, aligning by participant and point in time. This is accomplished by linking the Sample data to the study, similar to how
assay data can be linked to a study. Once connected, users can search for samples based on study subject details.
Alignment Fields in Sample Type
In order to align with study data, your sample data needs the concepts of participant and time. These are provided in fields of the following types. You can either provide values at the time of linking to study, or add fields of these types to your Sample Type:
In order to use
automatic link to study upon import, you must use these types, noting the following:
- Ordinary "DateTime" fields will not work for linking samples to studies.
- You can name the fields as needed (i.e. "SubjectID" or "MouseID" for the Subject/Participant field) though specific naming rules apply if you plan to auto link samples to study.
Use Alignment Fields from a Parent Sample
To link samples where the participant and visit information is stored on a parent sample (i.e. to link a set of derivatives from a single blood draw from a participant), follow these steps:
- The child sample type should not include fields of type Subject/Participant and VisitID/VisitDate.
- The parent sample type does include the fields of type Subject/Participant and VisitID/VisitDate.
- Lineage relationships are singular, meaning each child has only one parent of the parent type.
- Edit the default grid view for the child sample type to include the participant and visit fields from the parent.
- In the LabKey Server interface, open > Customize Grid for the child sample type.
- Check Show Hidden Fields.
- Expand the Input node, then Materials, then the node for the parent sample type.
- Check the boxes for the participant and visit fields.
- Save as the default view, being sure to check the Shared box to make this grid view available to all users.
- Now return to the grid for the child sample type, noticing the participant and visit alignment fields.
Proceed to link the samples as if the fields had been defined on the child samples directly.
Link Samples to Study
View your grid of Samples. Select the rows to link, then click
Link to Study.

- Choose target study and click Next.
- You can also specify a category for the linked dataset if desired. By default the new dataset will be in the "Uncategorized" category and can be manually reassigned later.

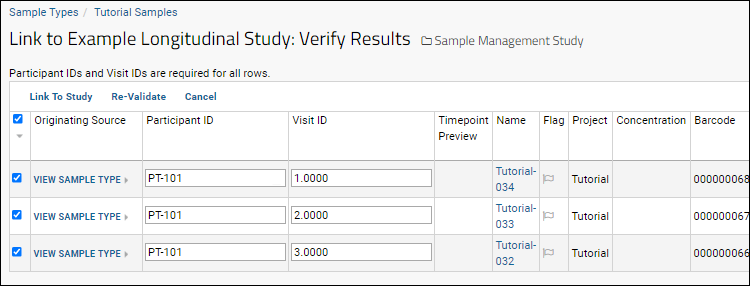
On the
Verify Results page, provide
ParticipantID and
VisitID (or
VisitLabel or
VisitDate) if they are not already provided in your data:

Click
Link to Study.
Access Related Study Data
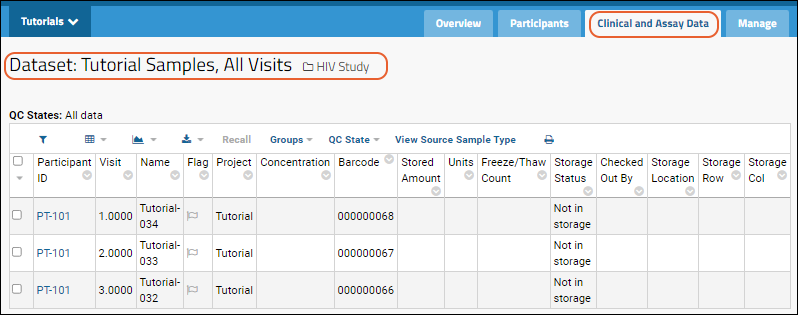
When the linking is complete, you will see the linked dataset in the study you specified. It looks very similar to the sample grid, but is a dataset in the study.

Click a Participant ID to see more about that participant.
Unless you
specified a category during linking this new linked dataset will appear as "Uncategorized" on the
Clinical and Assay Data tab and will be named for the Sample Type. Click the name to reopen the grid.
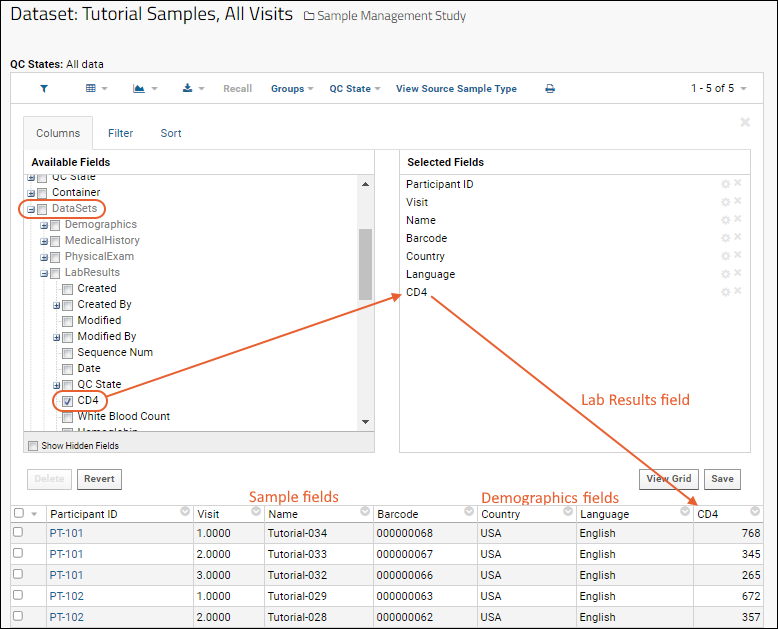
Using
grid view customization, you can add fields from other datasets in the study to get a full picture of the context for your sample data. For example, here we see sample barcodes alongside demographic information and CD4 levels recorded for the participant at that visit where that sample was drawn.

In the linked dataset, you can also select one or more rows and click
Recall to undo the linkage from here. This will
not delete the source data from the sample type; it will undo the linkage so that row no longer appears in the study. Learn more in this topic:
Recall Linked Data
Automatic Link-to-Study Upon Import
When you always plan to link samples to the same study, you can automate the manual process by building it directly into the Sample Type. When new samples are created, they will then automatically link to the target study using Participant and VisitID/VisitDate/VisitLabel information described. Similar to
configuring this in assays, you can set this field during Sample Type creation, or edit later.

Be sure to name the integration fields in your Sample Type to match your study target:
- ParticipantID (type "Subject/Participant") or however this field is named in your study.
- VisitID (type "Visit ID" or "Visit Label"): For linking to visit-based studies.
- Date (type "Visit Date"): For linking to time-based studies. Note that a "DateTime" field will not work.

Shared Sample Types: Auto Link with Flexible Study Target
If your Sample Type design is defined at the project level or in the
Shared project, it could potentially be used in many folders on your site.
- You can set a single auto-link study destination as described above if all users of this sample type will consolidate linked data in a single study folder.
- You may wish to configure it to always link data to a study, but not necessarily always to the same destination study. For this situation, choose the folder option "(Data import folder)". This will configure this Sample Type to auto link imported data to the study in the same folder where the data is imported.

Samples of this type imported throughout the scope where it is defined will now attempt to link to a study in the same folder.
- In a study folder, imported sample data will automatically be linked to that study.
- In a folder that is not a study, the sample import will still succeed, but an error message about the inability to link to the study that doesn't exist will be logged.
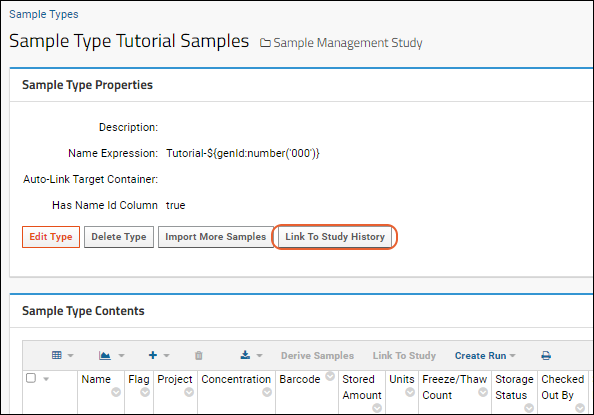
View Link to Study History
From the study dataset, click
View Source Sample Type to return to the original Sample Type you linked. Click
Link to Study History to see the history.

Learn more about managing linking history in this topic:
Link-To-Study History
Troubleshooting
Name Conflicts
In a study, you cannot have a dataset with the same name as an existing dataset or other table. This includes built in tables like "Cohort" that are unlikely to conflict, but in a scenario where you have a Sample Type that happens to have the same name as the "Subject Noun Singular" in the study, linking to study will fail when it attempts to create a new dataset with this conflicting name.
For example, if you have a Sample Type named "Pig" and attempt to link to a study where the term used for the study subjects is also "Pig", you will see an error similar to:
Cannot invoke "org.labkey.api.data.TableInfo.getDefaultVisibleColumns()" because "tableInfo" is null
To work around this issue, you can rename the Sample Type to be something that does not conflict, such as "PigSamples".
Related Topics
 On the Verify Results page, provide ParticipantID and VisitID (or VisitLabel or VisitDate) if they are not already provided in your data:
 Samples of this type imported throughout the scope where it is defined will now attempt to link to a study in the same folder.