A key component of using Luminex® instrument data is calculation of logistic curve fits as well as other values for standards, unknowns, and quality controls. During the second Luminex tutorial, in
Step 4: View 4pl Curve Fits, you saw the 4pl logistic curve fits, and then used some of the calculated values in
Step 5: Track Analyte Quality Over Time.
Some calculations are done by the BioPlex software itself, LabKey Server performs others, and still more are made using R and various packages by way of the LabKey Luminex transform script. By further customizing the assay design and adding additional operations to the transform script, additional calculations may be added enabling you to tailor the instrument data framework to suit your specific research needs.
Background
LabKey Luminex Transform Script Calculations
The LabKey Luminex transform script uses R packages to calculate logistic curve fits for each titration for each analyte. Titrations may be used either as standards or as quality controls. In this tutorial, all titrations are used as standards.
Curve fits are calculated using a 4 parameter logistic (4pl). For each run, the script outputs a PDF that includes plots for curve fits for each analyte. Each plot shows the dose response curve for fluorescence intensity with increasing concentration or reduced dilution. These plots can be useful for examining how well the curves fit the data.
LabKey Server Calculations
LabKey Server itself calculates the
AUC ("Area Under the Curve") for each standard titration using a trapezoidal calculation based on observed values. LabKey Server also identifies the
HighMFI ("Highest Mean Fluorescence Intensity") for each titration.
BioPlex Calculations vs. LabKey Luminex Transform Script Calculations
The
Excel run files produced by the BioPlex instrument also include 5-parameter logistic curve fits for each titrated standard and each titrated quality control. These 5pl regressions were calculated by the BioPlex software. The Excel run files also include estimates for sample concentrations generated using each sample's measured
FI-Bkgd (fluorescence intensity minus background well fluorescence intensity) and the 5pl regression equations derived for the standards by the instrument software.
Review Calculated Values
In
Step 4: View 4pl Curve Fits you reviewed calculated values as they are available in both titration qc reports or in the results grid for the run data. The titration qc report includes summary results for both
standards and
QC controls for a given run or for all runs. The results grid includes regression parameters for all curve fits.
Subtract Negative Control Bead Values
The
FI-Bkgd-Neg column shows the fluorescence intensity after both the background well and the negative bead are subtracted. The assay design used in the
Luminex Assay Tutorial Level II tells the script (via the
StandardCurveFitInput property's default value) to use fluorescence alone (
FI), without subtraction, to fit 4pl curves to titrated
standards. In contrast, the assay design tells the script (via the
UnknownFitInput property's default value) to use
FI-Bkgd-Neg to estimate concentrations for
unknowns using the 4pl regression equations calculated from the standards.
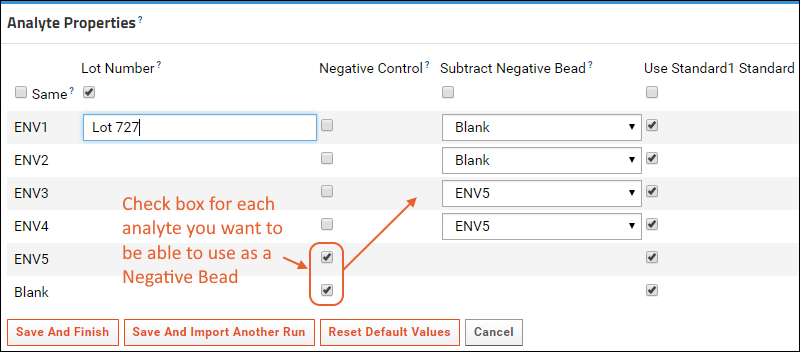
When calculating the value FI-Bkgd-Negative (fluorescence intensity minus background FI minus a negative bead), you may specify on a per analyte basis what to use as the negative bead. Depending on the study, the negative bead might be blank, or might be a more suitable negative control antigen. For example, in a study of certain HIV antigens, you might subtract MulV gp70 from gp70V1V2 proteins, blank from other antigens, etc. Note that the blank bead is not subtracted by default - it must be explicitly selected like any other negative bead.
To enable subtraction of negative control bead values, the assay design must be modified to include a run field of type Boolean named
NegativeControl. Then during the assay run import, to select negative beads per analyte, you'll set
Analyte Properties when importing data files. First identify specific analytes using checkboxes in the
Negative Control column, then select one of these negative beads for each analyte in the
Subtract Negative Bead column.

Use Uploaded Positivity Threshold Defaults
If your lab uses specific positivity cutoff values, you can manually enter them on an antigen-by-antigen basis during upload on the
Analyte Properties panel. To simplify user entry and reduce the possibilities of errors during this process, you may specify analyte-specific default values for the
PositivityThreshold property on a per folder and assay design combination. The default default value is 100. To specify analyte-specific defaults, add them to the assay design for a given folder as described here using the
Luminex Assay Tutorial Level II example:
- Select > Manage Assays, then click Luminex Assay 200.
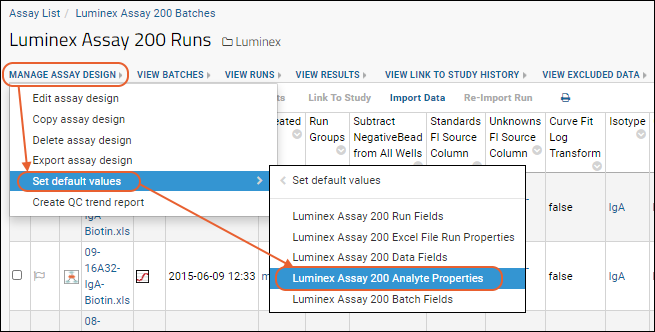
- Select manage assay design > set default values > Luminex Assay 200 Analyte Properties.

- Enter the Analyte and desired Positivity Threshold.
- Click Add Row to add another.

- You may instead click Import Data to upload or paste TSV file data to simplify data entry.
- Click Save Defaults when finished.
When you import a set of positivity threshold data, it overwrites the prior set, meaning that any defaults previously defined but missing from the imported TSV will be dropped.
Related Resources

