This topic explains how administrators can configure quality control (QC) states for datasets in a study. Managing the flow of incoming data through a quality review process can ensure consistent and reliable results. Providing QC states for data reviewers to use can support any workflow you require.
Workflow
Administrators first take these actions:
- Define new QC states to be assigned to dataset records.
- Control the visibility of records based on QC state.
Once activated, the user interface includes the following:
- Data grids display the QC State menu to Readers and Editors.
- Data grids can be filtered based on QC state.
- Editors can update the QC state of dataset records.
- Data imported to the study can be automatically marked with particular QC states depending on the method of data import.
Set Up Dataset QC
- In a study folder, select the Manage tab.
- Click Manage Dataset QC States.

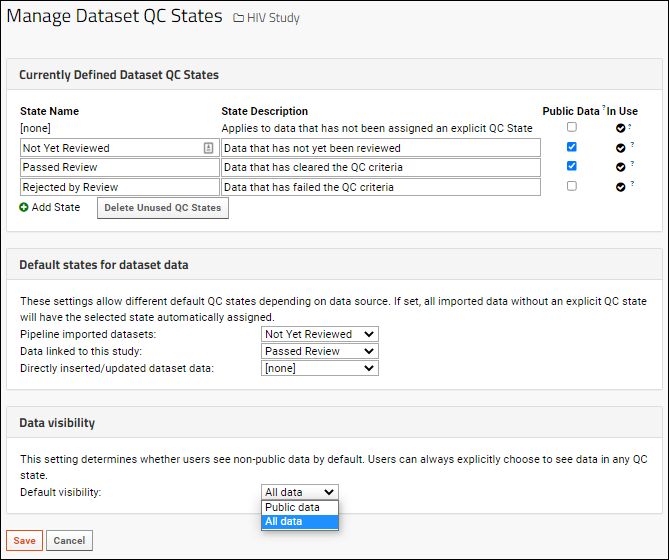
Currently Defined Dataset QC States. Define any number of QC states and chose the default visibility for these categories by using the
Public Data checkbox.
- Note: This meaning of "public" data is data visible to users with Read access to the study. It does not literally mean "public" (unless you have granted that access explicitly).
- When a QC state is not marked public, data in this state will be hidden if the Dataset visibility option is set to "Public/approved Data".
- This list of QC states also includes any Assay QC states defined in the same folder.
Default states for dataset data. These settings allow different default QC states depending on data source. If set, all imported data without an explicit QC state will have the selected state automatically assigned. You can set QC states for the following:
- Pipeline-imported datasets
- Data linked to this study from assays or sample types
- Directly inserted/updated dataset data
Any Datasets that have been incorporated into your study before you set up QC states will have the QC state 'none'.
Data visibility. This setting determines whether users see non-public data by default. Readers can always explicitly choose to see data in any QC state.
- The default setting is "All data", i.e., all records regardless of QC state will be initially displayed.
Add QC Columns to a Dataset
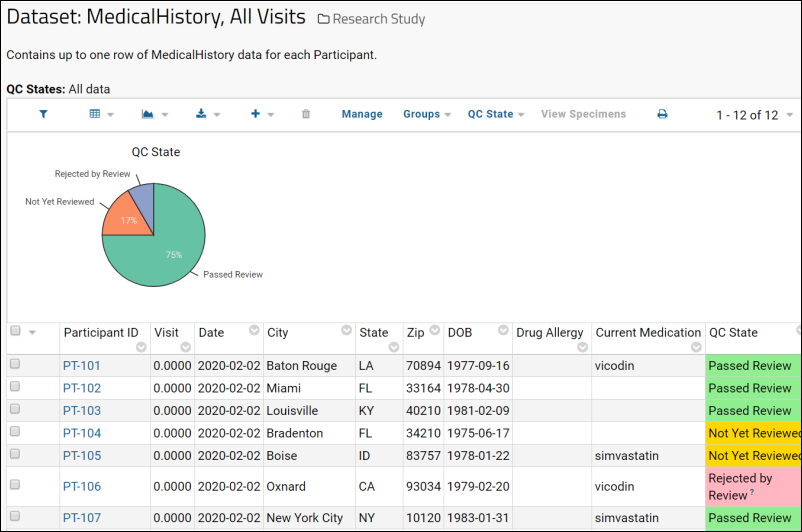
This section explains how to add QC columns to a dataset, similar to the following:

To add QC states to a dataset, pull in columns from the core.QCStates table:
- Navigate to the dataset.
- Select (Grid views) > Customize Grid.
- Under Available Fields, place a checkmark next to the QC State.
- Click Save and save the grid as either the default view or as a named view.
Add Color Formatting
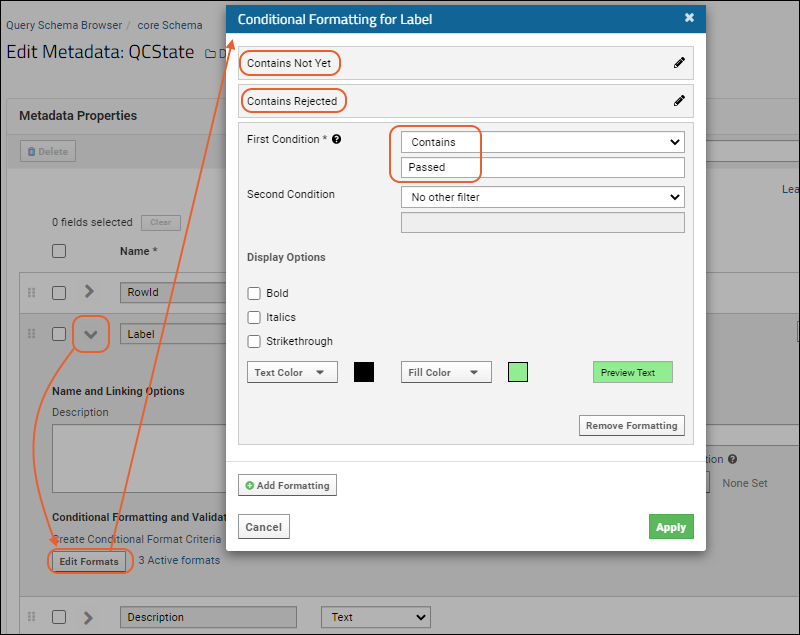
To add color formatting to the dashboard, add conditional formatting to the QCStates table:
- Go to > Go To Module > Query.
- Open the core schema and select QCState.
- Click Edit Metadata.
- Expand the Label field.
- Under Create Conditional Format Criteria, click Add Format (or Edit Formats once some are defined).
- Add conditions with corresponding colors for each of your QC states. For example:

Related Topics
 To add QC states to a dataset, pull in columns from the core.QCStates table:
