All users in LabKey must have user accounts at the site level. The site administrator can add and manage registered user accounts via
> Site > Site Users, as described in this topic. Site user accounts may also be added by site or project administrators from the
project permissions interface.
Site Users
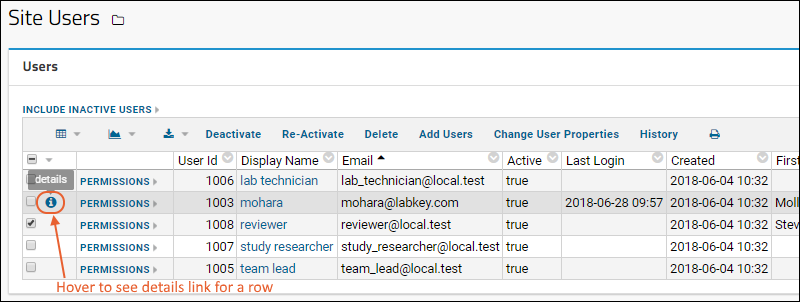
Edit user contact information and view group assignments and folder access for each user in the list.
- Select > Site > Site Users.

- Add Users: Click to insert users by entering a list of email addresses. Optionally send password verification emails. See Add Users for more details.
- Deactivate/Re-activate: Control which users are active, i.e. have access to their accounts.
- Delete: Delete a user account. See below for more information about the consequences of this action; you may want to deactivate instead.
- Change User Properties: Manage the set of columns in this table.
- History: Show the history of changes, additions, deletions to this table.
- The "Has Password" column indicates that the user has a password in LabKey's built-in database authentication system.
Project Administrators can manage similar information for project users by going to
> Folder > Project Users. See
Manage Project Users for further information.
Edit User Details
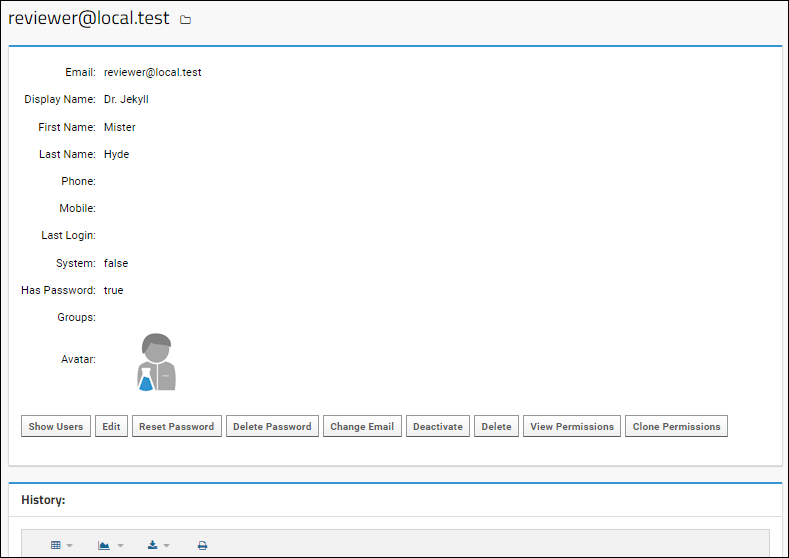
To edit information for a user from the site admin table, hover over the row for the user of interest to expose the
(Details) link in the first column, as shown in the screencap above, then click it to view editable details. The user themselves can access a
subset of these actions.

- Show Users: Return to the site users table.
- Edit: Edit contact information.
- Reset Password: Force the user to change their password by clearing the current password and sending an email to the user with a link to set a new one before they can access the site.
- Create Password: If LDAP or another authentication provider is enabled on a premium edition of LabKey Server, the user may not have a separate database password. In this case you will see a Create Password button that you can use to send the "Reset Password" email to this user for selecting a new database password. This will provide an alternative authentication mechanism.
- Delete Password: If a password was created on the database, you can delete it using this button. Note that unless another authentication method is enabled for this server, the user will then have no way to log in until an administrator uses Create Password to assist them. This button will not be shown for your own user account, or if an authentication provider such as SAML is using "Set as Default for Login" to auto-redirect.
- Change Email: Edit the email address for the user.
- Deactivate: Deactivated users will no longer be able to log in, but their information will be preserved (for example, their display name will continue to be shown in place where they've created or modified content in the past) and they are re-activated at a later time.
- Delete: Permanently delete the user. This action cannot be undone and you must confirm before continuing by clicking Permanently Delete on the next page. See below for some consequences of deletion; you may want to consider deactivating the user instead.
- View Permissions: See a detailed permission report for this user.
- Clone Permissions: Replace this user's permissions with those of another user.
- History: Below the user properties you can see the history of logins, impersonations, and other actions for this user.
Users can manage their own contact information when they are logged in, by selecting
(User) > My Account from the header of any page.
Customize User Properties
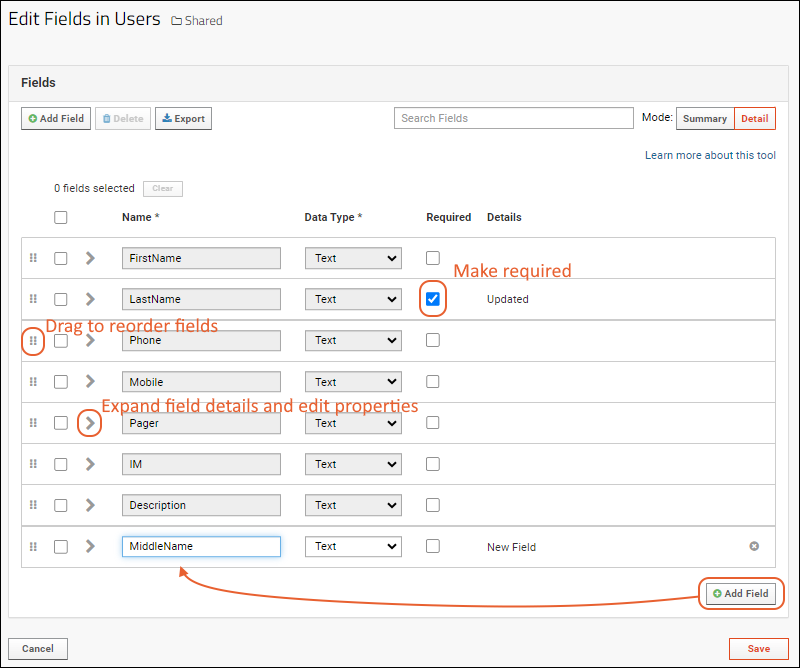
You cannot delete system fields, but can add fields to the site users table, change display labels, change field order, and also define which fields are required.
- Select > Site > Site Users.
- Click Change User Properties.
- To mark a field as required, check the Required box, as shown for "LastName" below.
- To rearrange fields, use the six-block handle on the left.
- To edit a display label, or change other field properties, click the to expand the panel.
- To add a new field, such as "MiddleName", as shown below:
- Click Add Field.
- Enter the Name: MiddleName (no spaces).
- Leave the default "Text" Data Type selected.

- Click Save when finished.
UID Field for Logins (Optional)
If an administrator configures a text field named "UID", users will be able to use this field when logging in (for either LabKey-managed passwords or
LDAP authentications), instead of entering their email address into the login form. This can provide a better user experience when usernames don't align exactly with email addresses. The UID field must be populated for a user in order to enable this alternative.
Manage Permissions
To view the groups that a given users belongs to and the permissions they currently have for each project and folder on the site, click the [
permissions] link next to the user's name on the Site Users page.
If your security needs require that certain users only have access to certain projects, you must still create all users at the site level. Use
security groups to control user access to specific projects or folders. Use caution as the built in group "Site: Users" will remain available in all containers for assignment to roles.
Clone Permissions from Another User
When you
create a new user, you have the option to assign permissions to match an existing user. In cases where roles within an organization change, you may want to update an existing user's permissions to match another existing user.
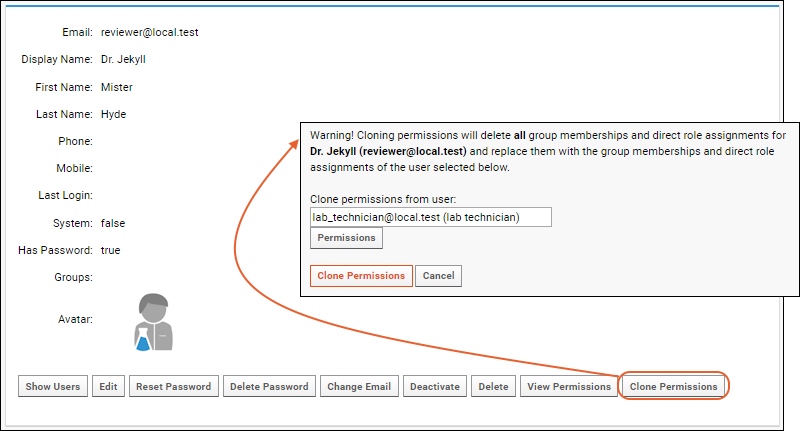
Note that this action will delete all group memberships and direct role assignments for the user and replace them with the permissions of the user you select.
- To replace a user's permissions, open the details for that user, then click Clone Permissions.
- Select the account that has the desired permission set; begin typing to narrow the list.
- Click Permissions to see a popup report of the 'target' permissions.
- Click Clone Permissions.

This option replaces their original permissions, so can be used either to 'expand' or 'retract' a user's access.
This action will be recorded in the "Group and role events" audit log, using a comment phrase "had their group memberships and role assignments deleted and replaced".
Deactivate Users
The ability to deactivate a user allows you to preserve a user identity within your LabKey Server even after site access has been withdrawn from the user. Retained information includes all audit log events, group memberships, and individual folder permissions settings.
When a user is deactivated, they can no longer log in and they no longer appear in drop-down lists that contain users. However, records associated with inactive users still display the users' names. If you instead deleted the user completely, the display name would be replaced with a user ID number and in some cases a broken link.
Some consequences of deactivation include:
- If the user is the recipient of important system notifications, those notifications will no longer be received.
- If the user owned any data reloads (such as of studies or external data), when the user is deactivated, these reloads will raise an error.
Note that any scheduled ETLs will be run under the credentials of the user who
checked the "Enabled" box for the ETL. If this account is later deactivated, the admin will be warned if the action will cause any ETLs to be disabled.

Such disabled ETLs will fail to run until an active user account unchecks and rechecks the "Enabled" box for each. Learn more in this topic:
ETL: User Interface. A site admin can check the pipeline log to determine whether any ETLs have failed to run after deactivating a user account.
The Site Users and Project Users pages show only active users by default. Inactive users can be shown as well by clicking
Include Inactive Users above the grid.

Note that if you View Permissions for a user who has been deactivated, you will see the set of permissions they would have if they were reactivated. The user cannot access this account so does not in fact have those permissions. If desired, you can edit the groups the deactivated user is a member of (to remove the account from the group) but you cannot withdraw folder permissions assigned directly to a deactivated account.
Reactivate Users
To re-activate a user, follow these steps:
- Go to the Site Users table at > Site > Site Users.
- Click Include Inactive Users.
- Find the account you wish to reactivate.
- Select it, and click Reactivate.
- This takes you to a confirmation page. Click the Reactivate button to finish.
Delete Users
When a user leaves your group or should no longer have access to your server, before deciding to
delete their account, first consider whether that user ID should be deactivated instead. Deletion is permanent and cannot be undone. You will be asked to confirm the intent to delete the user.
Some consequences of deletion include:
- The user's name is no longer displayed with actions taken or data uploaded by that user.
- Group membership and permission settings for the deleted user are lost. You cannot 'reactivate' a deleted user to restore this information.
- If the user is the recipient of important system notifications, those notifications will no longer be received.
- If the user owned any data reloads (such as of studies or external data), when the user is deleted, these reloads will raise an error.
- If the user had created any linked or external schemas, these schemas (and all dependent queries and resources) will no longer be available.
Generally, deactivation is recommended with long time users. The deactivated user can no longer log in or access their account, but account information is retained for audit and admin access.
Related Topics

