LabKey Server's functionality is packaged inside of modules. For example, the query module handles the communication with the databases, the wiki module renders Wiki/HTML pages in the browser, the assay module captures and manages assay data, etc.
You can extend the functionality of the server by adding your own module. Here is a partial list of things you can do with a module:
- Create a new assay type to capture data from a new instrument.
- Add a new set of tables and relationships (= a schema) to the database by running a SQL script.
- Develop file-based SQL queries, R reports, and HTML views.
- Build a sequence of scripts that process data and finally insert it into the database.
- Define novel folder types and web part layouts.
- Set up Extract-Transform-Load (ETL) processes to move data between databases.
Modules provide an easy way to distribute and deploy code to other servers, because they are packaged as single .module files, really just a renamed .zip file. When the server detects a new .module file, it automatically unzips it, and deploys the module resources to the server. In many cases, no server restart is required. Also, no compilation is necessary, assuming the module does not contain Java code or JSP pages.
The following tutorial shows you how to create your own "Hello World" module and deploy it to a local testing/development server.
Set Up a Development Machine
In this step you will set up a test/development machine, which compiles LabKey Server from its source code.
If you already have a working build of the server, you can skip this step.
- Download the server source code and complete an initial build of the server by completing the steps in the following topic: Set Up a Development Machine
- Before you proceed, build and deploy the server. Confirm that the server is running by visiting the URL http://localhost:8080/home/project-begin.view?
- For the purposes of this tutorial, we will call the location where you have based the enlistment <LK_ENLISTMENT>.
Module Properties
In this step you create the main directory for your module and set basic module properties.
- Go to <LK_ENLISTMENT>.
- Inside <LK_ENLISTMENT>/server/modules, create a directory named "helloworld".
- Inside the helloworld directory, create a file named "module.properties", resulting in the following:
<LK_ENLISTMENT>/server/modules/helloworld/module.properties
- Add the following property/value pairs to module.properties. This is a minimal list of properties needed for deployment and testing. You can add a more complete list of properties later on if desired. Find available properties in: module.properties Reference.
Name: HelloWorld
ModuleClass: org.labkey.api.module.SimpleModule
Build and Deploy the Module
build.gradle
- Add a file named "build.gradle" to the root directory of your module, resulting in: <LK_ENLISTMENT>/server/modules/helloworld/build.gradle
- Add these lines to the file build.gradle:
plugins {
   id 'org.labkey.build.fileModule'
}
Note that if you are generally building your server from artifacts, using
"buildFromSource=false" in your enlistment, you should also add a text file "<LK_ENLISTMENT>/server/modules/helloworld/
gradle.properties" that contains the line: "buildFromSource=true". Otherwise your build will fail to "find the artifact" for this local module.
- Confirm that your module will be included in the build:
- Open a command window.
- Go to the <LK_ENLISTMENT> directory.
- Call the Gradle task:
In the list of projects, you should see the following (other lines not shown):
...
+--- Project ':server:modules'
...
|    +--- Project ':server:modules:helloworld'
...
- Stop your server if it is running.
- Build and deploy the server by calling the Gradle task:
OR, for a more targeted build, you can call the gradle task:
gradlew :server:modules:helloworld:deployModule
Confirm the Module Has Been Deployed
- Start the server.
- In a browser go to: http://localhost:8080/home/project-begin.view?
- Sign in.
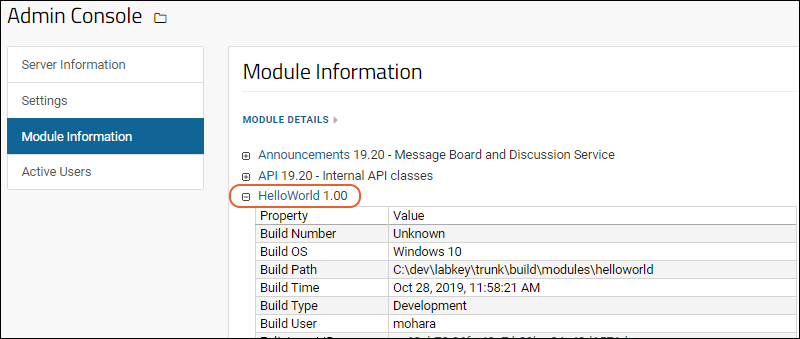
- Confirm that HelloWorld has been deployed to the server by going to > Site > Admin Console. Click the Module Information tab. Open the node HelloWorld to see properties.

Add a Default Page
begin.htmlEach module has a default home page called "begin.view". In this step we will add this page to our module. The server interprets your module resources based on a fixed directory structure. By reading the directory structure and the files inside, the server knows their intended functionality. For example, if the module contains a directory named "assays", this tells the server to look for XML files that define a new assay type. Below, we will create a "views" directory, telling the server to look for HTML and XML files that define new pages and web parts.
- Inside helloworld, create a directory named "resources".
- Inside resources, create a directory named "views".
- Inside views, create a file named "begin.html". (This is the default page for any module.)
helloworld
   │   build.gradle
   │   module.properties
   └───resources
       └───views
               begin.html
- Open begin.html in a text editor, and add the following HTML code:
Test the Module
- Stop the server.
- Build the server using 'gradlew deployApp'.
- Restart the server.
- Navigate to a test folder on your server. A "Tutorials" project is a good choice.
- Confirm that the view has been deployed to the server by going to > Go to Module > HelloWorld.
- The begin.html file you created is displayed as a panel like the following.
- Notice the URL ends with "HelloWorld-begin.view". Learn more about using the URL to access module resources in this topic: LabKey URLs.

- If you don't see the HelloWorld module listed, be sure that you rebuilt your server after adding the view.
- Enable the module in your folder as follows:
- Go to > Folder > Management and click the Folder Type tab.
- In the list of modules on the right, place a checkmark next to HelloWorld.
- Click Update Folder.
Modify the View with Metadata
You can control how a view is displayed by using a [ViewName].view.xml metadata file. For example, you can define the title, framing, and required permissions.
begin.view.xml
- Add a file to the views directory named "begin.view.xml". Note that this file has the same name (minus the file extension) as begin.html: this tells the server to apply the metadata in begin.view.xml to begin.html:
helloworld
   │   build.gradle
   │   module.properties
   └───resources
       └───views
             begin.html
             begin.view.xml
- Add the following XML to begin.view.xml. This tells the server to: display the title 'Begin View', display the HTML without the default framing that looks like a web part.
<view xmlns="http://labkey.org/data/xml/view"
  title="Begin View"
  frame="none">
</view>
- Save the file.
- You may need to stop, rebuild, restart your server and return to the module to see the result.
- The begin view now looks like the following:

- Experiment with other possible values for the 'frame' attribute:
- portal (If no value is provided, the default is 'portal', i.e. show the view like a web part.)
- title
- dialog
- div
- left_navigation
- none
- For the next step of the tutorial, if the 'frame' is none, you will only see a web part frame in page admin mode. To show the frame to all users, set the 'frame' to 'portal' before continuing.
Hello World Web Part
You can also package your custom view as a web part using another metadata file.
begin.webpart.xml
- In the helloworld/resources/views directory add a file named "begin.webpart.xml". This tells the server to surface the view inside a web part. Your module now has the following structure:
helloworld
   │   build.gradle
   │   module.properties
   └───resources
       └───views
             begin.html
             begin.view.xml
             begin.webpart.xml
- Paste the following XML into begin.webpart.xml:
<webpart xmlns="http://labkey.org/data/xml/webpart"
  title="Hello World Web Part">
    <view name="begin"/>
</webpart>
- Save the file.
- Return to your test folder using the project menu in the upper left.
- Enable the Hello World module in your folder, if you did not do so earlier:
- Go to > Folder > Management and click the Folder Type tab.
- In the list of modules on the right, place a checkmark next to HelloWorld.
- Click Update Folder.
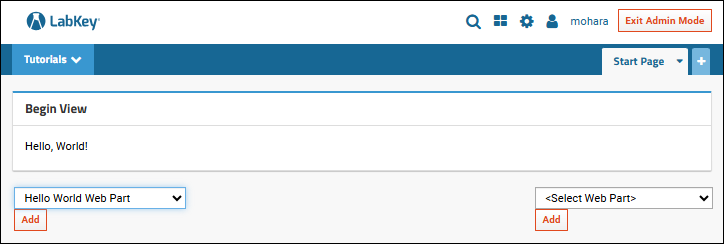
- In your test folder, enter > Page Admin Mode, then click the pulldown menu that will appear in the lower left: <Select Web Part>.
- Select the web part Hello World Web Part and click Add.
- Your new web part will be added to the page:

- Click Exit Admin Mode.
- Note that if you left the begin.view.xml attribute 'frame' set to 'none', the frame is now gone. If you want to see web part framing for your new part, edit the begin.view.xml to set the 'frame' to 'portal' before continuing.
Hello World Module View
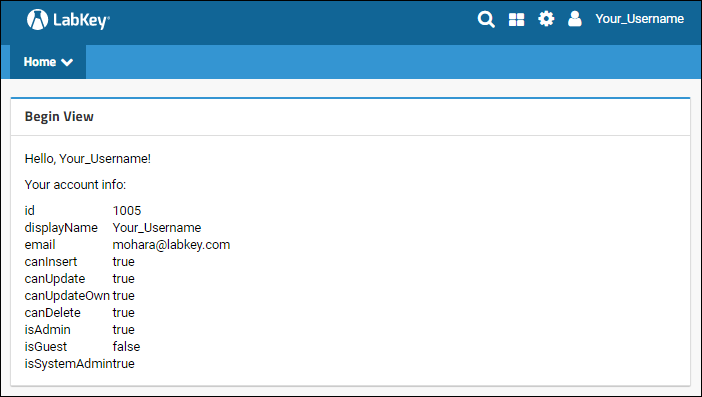
The final step enhances this view using the JavaScript API to display the name of the user and list the modules deployed on this server.
- Open begin.html and replace the HTML with the content below.
<p>Hello, <span id="username"></span>!</p>

<p>Modules on this server: </p>

<div id='queryDiv'/>

<script type="text/javascript" nonce="<%=scriptNonce%>">

    document.getElementById("username").textContent = LABKEY.Security.currentUser.displayName;

    var qwp1 = new LABKEY.QueryWebPart({
      renderTo: 'queryDiv',
      title: 'LabKey Modules',
      schemaName: 'core',
      queryName: 'Modules',
    });
</script>
- Refresh the server to see the changes.
- Note that once the module structure is defined, you can interate and test some changes directly in the built deployment under <LK_ENLISTMENT>/build/deploy/modules/helloworld, letting you avoid rebuilding for each change. Once you are happy with the results, be sure that any changes you make in this way are migrated back to the <LK_ENLISTMENT>/server/modules/helloworld source location so that your next module build includes them.
- Once you've refreshed, the web part will look something like this, displaying your own server's modules:

Make a .module File
You can distribute and deploy a module to a production server by making a helloworld.module file (a renamed .zip file).
- Be sure that any module edits you made under the build location were migrated back to the source under <LK_ENLISTMENT>/server/modules/helloworld.
- In anticipation of deploying the module on a production server, add the property 'BuildType: Production' to the module.properties file:
module.properties
Name: HelloWorld
ModuleClass: org.labkey.api.module.SimpleModule
BuildType: Production
- Rebuild the module by running:
gradlew :server:modules:helloworld:deployModule
- The build process creates a helloworld.module file at:
<LK_ENLISTMENT>/build/deploy/modules/helloworld.module
This file can be deployed by copying it to a production server's externalModules directory, or by deploying it through
the server UI. When the server detects changes in the externalModules directory, it will automatically unzip the .module file and deploy it. You may need to restart the server to fully deploy the module.
Important: While you built this module in your development machine's "modules" location,
Do not place your own modules in the "modules" directory of a server run as a service (locally or otherwise), as it will be overwritten during upgrades.
Here is a completed helloworld module:
helloworld.module
Related Topics
These topics show more functionality that you can package as a module:
These topics describe the build process generally:


