This topic describes transferring Natural Language Processing (NLP) Result Sets, also referred as abstraction or annotation results, from one server to another. For example, a number of individual
Registry Servers could submit approved results to a central
Data Sharing Server for cross-registry comparison and review.
Set Up Servers for NLP Result Transfer
The following steps are required on both the
source (where the transferred data will come from) and
destination servers.
Encryption
A system administrator must first enable AES_256 encryption for the server JRE.
API Keys
A user creates an
API key on the
destination server. This key is used to authorize data uploads sent from the
source server, as if they came from the user who generated the API key. Any user with write access to the destination container can generate a key, once an administrator has
enabled this feature.
On the
destination server:
- Select (Your_Username) > API Keys.
- Note: Generation of API Keys must be enabled on your server to see this option. Learn more: API Keys.
- Click Generate API Key.
- Click Copy to Clipboard to do so and share with the system administrator of the source server in a secure manner.
On the
source server, an administrator performs these steps:
- Select > Site > Admin Console.
- Under Premium Features, click NLP Transfer.
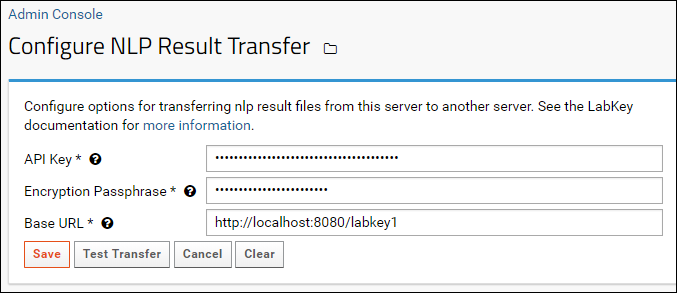
- Enter the required information:
- API Key: Enter the key provided by the destination server/recipient.
- Encryption Passphrase: The passphrase to use for encrypting the results, set above.
- Base URL: The base URL of the destination server. You will enter the path to the destination folder relative to this base in the module properties below.

- Click Test Transfer to confirm a working connection.
- Click Save.
Module Properties
In each folder on the
source server containing results which will be exported, a folder administrator must configure these properties.
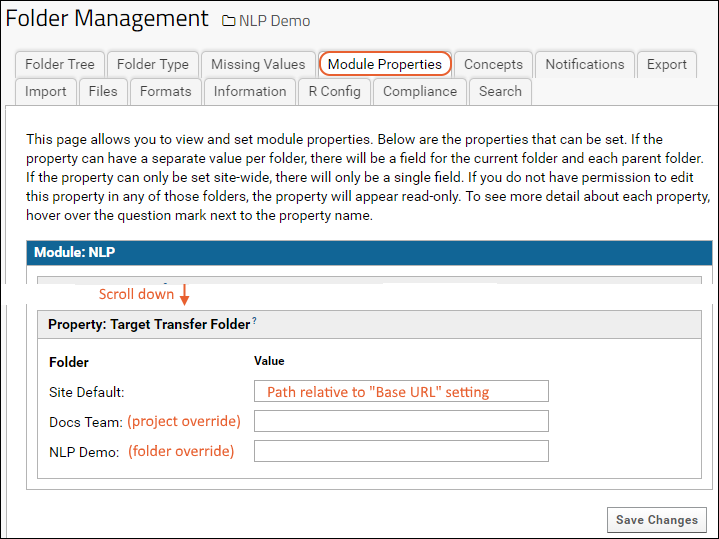
- Select > Folder > Management.
- Click the Module Properties tab.
- Scroll down to Property: Target Transfer Folder.

- Enter the path to the target folder relative to the Base URL on the destination server, which was set in the NLP Transfer configuration above.
- Note that you can have a site default for this destination, a project-wide override, or a destination specific to this individual folder.
Transfer Results to Destination
To transfer data to the destination, begin on the
source server:
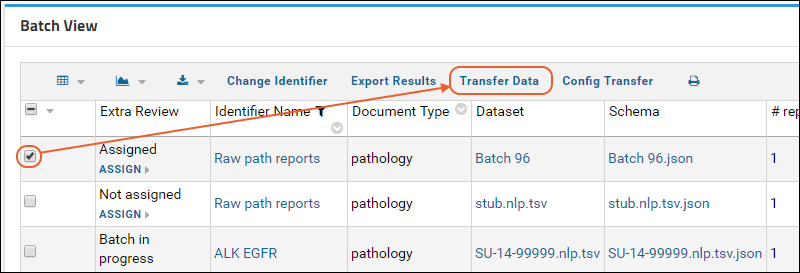
- Navigate to the Batch View web part containing the data to transfer.
- Three buttons related to transferring results are included.
- Export Results: Click to download an unencrypted bundle of the selected batch results. Use this option to check the format and contents of what you will transfer.
- Transfer Data: Click to bundle and encrypt the batches selected, then transfer to the destination. If this button appears inactive (grayed out), you have not configured all the necessary elements.
- Config Transfer: click to edit the module property to point to the correct folder on the destination server if not done already.
- Select the desired row(s) and click Transfer Data.

- The data transfer will begin. See details below.
Note: The Batch View web part shows both Dataset and Schema columns by default. Either or both of those columns may have been
hidden by an administrator from the displayed grid but both contain useful information that is transferred.
Zip File Contents and Process
- Result set files, with files in JSON, XML, and TSV format. The entire bundle is encrypted using the encryption key entered on the source server. Results can only be decrypted using this password. The encrypted file is identical to that which would be created with this command line:
gpg --symmetric --cipher-algo AES256 test_file.txt.zip
- Report text.
- metadata.json schema file
- Batch info metadata file which contains:
- The source server name
- The document type
- Statistics: # of documents, # abstracted, #reviewed
Use Results at the Destination
The
destination server will receive the transfer in the folder configured from the source server above.
Developers can access the results using the schema browser, (schema = "nlp", query "ResultsArchive", click "View Data"). For convenience, an admin can create a web part to add it to a folder as follows:
- Navigate to the folder where results were delivered.
- Enter > Page Admin Mode.
- Select Query from the selector in the lower left, then click Add.
- Give the web part a title, such as "Results Archive".
- Select the Schema: nlp.
- Click Show the contents of a specific query and view.
- Select the Query: ResultsArchive.
- Leave the remaining options at their defaults.
- Click Submit.
Users viewing the results archive will see a new row for each batch that was transferred.

The columns show:
- Source: The name of the source server; shown here regional registries.
- Schema: The name of the metadata.json file.
- Dataset: A link to download the bundled and encrypted package of results transferred.
- Document Type, # reports, # abstracted, and # reviewed: Information provided by the source server.
- Created/Created By: The transfer time and username of the user who created the API key authorizing the upload.
To unpack the results:
- Click the link in the Dataset column to download the transferred bundle.
- Decrypt it using this command:
gpg -o test.txt.zip -d test.txt.zip.gpg
- Unzip the decrypted archive to find all three export types (JSON, TSV, XML) are included.
Folder editors and administrators have the ability to delete transferred archives. Deleting a row from the
Results Archive grid also deletes the corresponding schema JSON and gpg (zip archive) files.
Related Topics
 The columns show: